Chapter 7Results and approval
Menu: Results and approval (in the bar, after Samples). Address: /results.
7.1 What this screen is for
This is where the laboratory's work becomes a result a patient can be given. A technologist enters the values of each order here, the program checks them against the reference interval, the previous result and the analyzer's own readings, and a person with the right to approve approves them. Nothing reaches a printed report, a message or a referring physician before it has been approved here.
One screen holds the whole path: finding the order, typing or receiving the values, handling the unusual ones (outside the interval, critical, far from the last result), approving, and — when a mistake is found later — amending or withdrawing an approved result with a written reason.
7.2 Who sees it
Whoever holds Enter results or Verify results. The menu hides the screen from everyone else. Within the screen:
| You can… | …if your role holds |
|---|---|
| Type and save values | Enter results |
| Change a value already saved but not yet approved | Enter results and Change a result not yet approved |
| Approve; call a critical value; approve the plain ones together; withdraw the approval of a result | Verify results |
| Amend an approved result | Verify results and Change a result not yet approved |
| Set a test's delta limit (7.7.4 Task 4 — A value far from the last one (delta check)) | Manage settings |
| See the list of results approved today | Publish reports, or Verify results |
| See the Previous column (the patient's last result) | Read patient files. Without it the column says so instead of showing a value. |
| Preview the report | Print reports, receipts and labels |
| Share a saved view with a role | Manage settings |
Most buttons you may not use stay visible but dim, and their tooltip says why (for example «You may not approve results.»). Some are not shown at all: Preview report, Amend, Withdraw approval, the fields for a delta limit, and sharing a view.
7.3 The screen at a glance
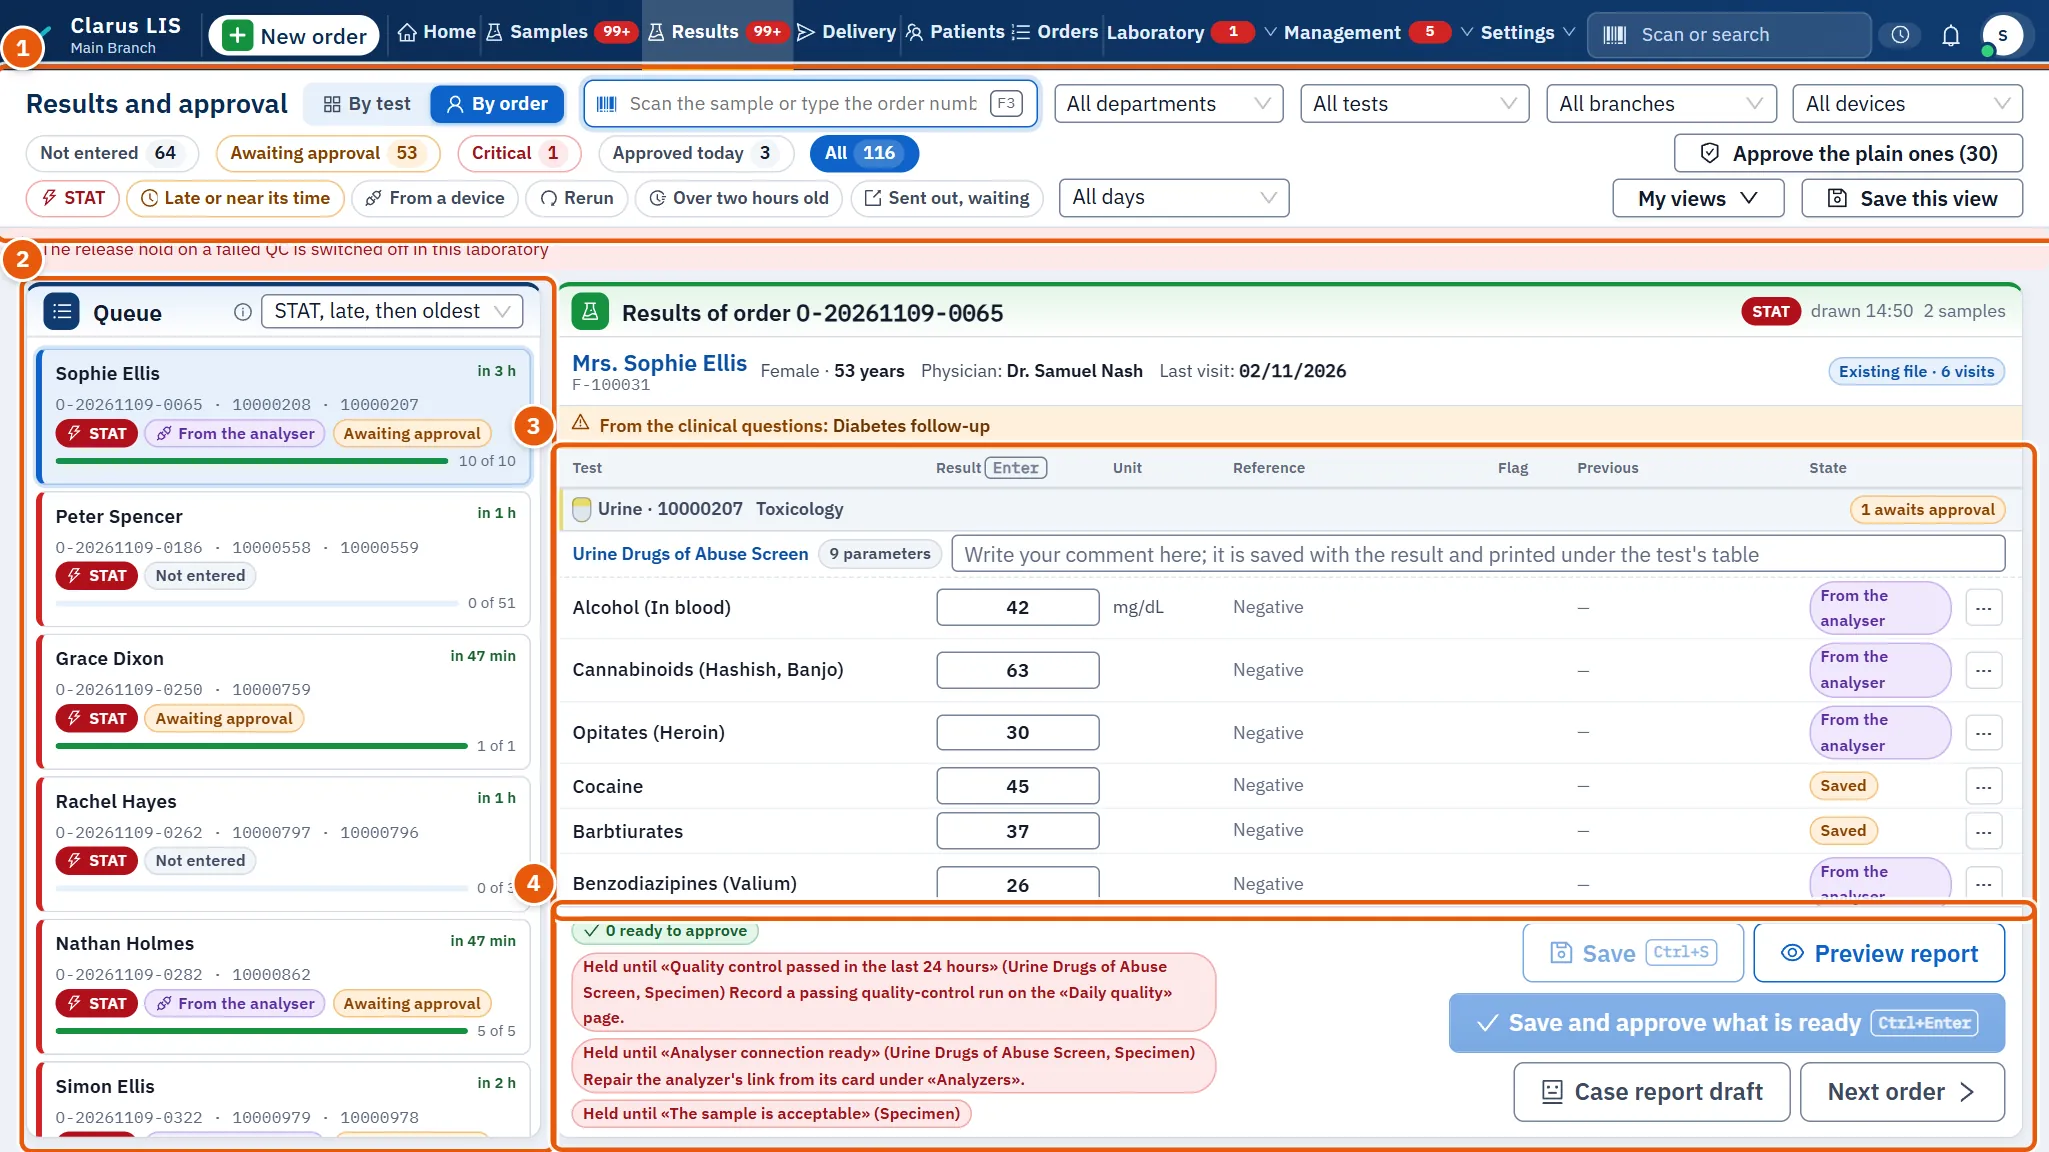
The screen has four parts, from top to bottom:
- The head: the box to scan a sample or type an order number; the two ways of working; the five states; the filters and your saved views.
- Queue: the orders (or tests) waiting, most urgent first.
- The open order: its heading, then the table of its tests, tube by tube.
- The foot: what is ready, what is held and why, and the buttons to save, preview, approve and go to the next order.
7.4 The head
7.4.1 Finding an order
| Control | What it does |
|---|---|
| Scan the sample or type the order number (key F3 jumps here) | A barcode scanner types the sample's code and presses Enter. The order opens. If nothing has that number: «No sample or order has the number …». If the order has nothing left to enter or approve: «Nothing in this order is waiting for entry or approval.» |
| Way of working: By order / By test | “By order” lists orders and opens one at a time. “By test” lists the tests waiting, with how many patients each has, and shows one test for all those patients — the way to work a whole run on one analyzer. |
| The five states (keys 1 to 5) | 1 Not entered, 2 Awaiting approval, 3 Critical, 4 Approved today, 5 All. Each shows how many it holds. State 4 appears only if you may see approved results. |
| Department | Limits the queue to one department; the open order then shows only that department's tests («Only the … department of this order is shown»). |
| Days | “All days”, “Today”, “Yesterday”, “A day” (choose it) or “A period” (From / To). |
| Narrow the list | STAT; Late or near its time; From a device; Over two hours old; Rerun; Sent out, waiting; and by Test, Branch, Device, Priority and source. |
| In force | The filters now in effect as small tags. Press a tag's cross to remove it, or Clear all. |
If the filters hide orders, the queue says so: «No results with these filters; 3 orders are hidden» with Show them. A line above the queue also reminds you of unapproved samples and tests from earlier days, with Show them.
7.4.2 Saved views
A combination of filters you use every day can be kept.
- Set the filters.
- Press Save this view, type a name (up to 40 characters) and press Enter or Save.
- Choose it later from My views. Delete the view «…» removes it.
Views are kept for you alone, in this browser, and no more than eight. A name used again replaces the view that had it.
Whoever manages settings can Share with a role: choose the role; the view then appears for that role under Shared with my role, and «Stop sharing …» withdraws it.
7.4.3 Sorting
Order sorts the queue: “STAT, late, then oldest” (the default), “Oldest first” or “Newest first”.
7.5 The queue
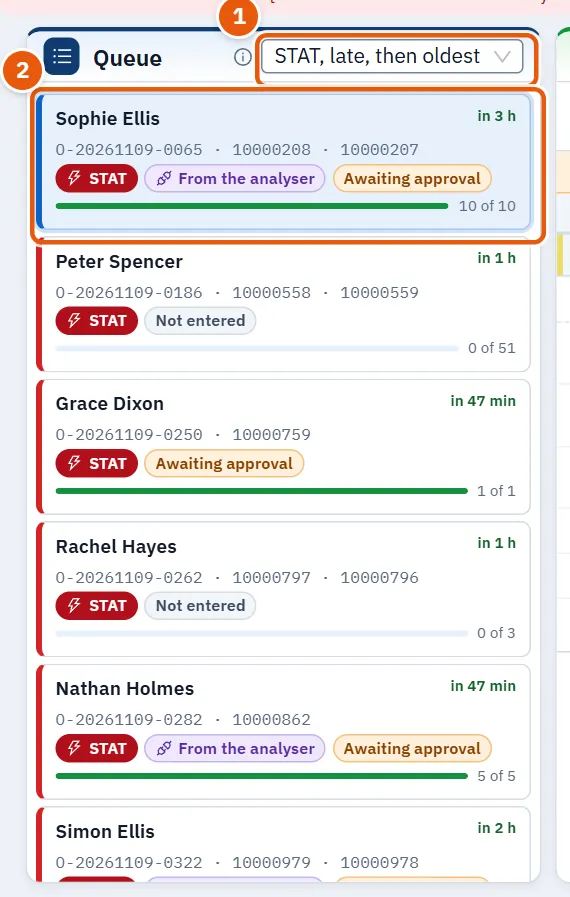
Each line is an order: patient, order number, the tubes, and how far along it is (Not entered, Incomplete, Awaiting approval, or «3 of 8»). Marks beside it: STAT, Critical value, From the analyser, and the time: «in 40 min», «late in 12 min», «late by 2 h». In “By test” the lines are tests with the number of patients waiting. In “Approved today” they are the orders approved today with the number of tests in each.
7.6 The open order
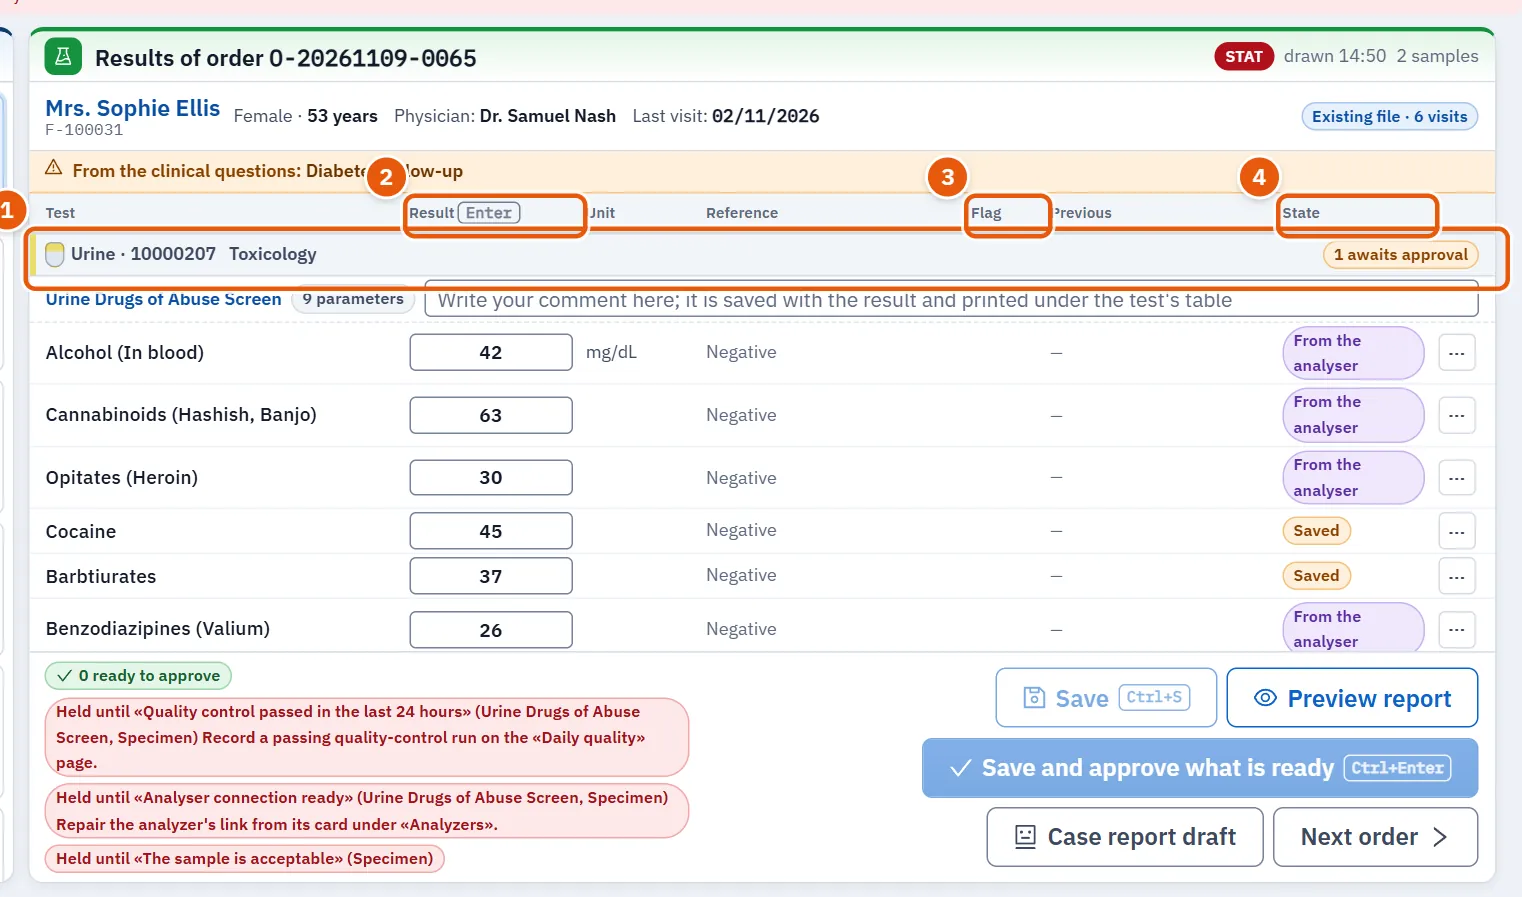
The heading shows the order number, the patient, age and sex, the physician, the last visit, how many samples, when each was drawn, and the answers to the clinical questions asked at reception.
The table has one row per test, grouped under its tube, with a stripe in the tube's colour:
| Column | Meaning |
|---|---|
| Test | The test's name. A panel shows how many parameters it has and how many await approval. |
| Result (Enter moves to the next field, Shift+Enter to the one before) | Where you type. A pick-list test offers its choices; type the first letter to pick. Numbers are always shown left to right. |
| Unit | The unit. |
| Reference | The reference interval for this patient's age and sex. |
| Flag | Low, high, critical, or the flag the analyzer sent. |
| Previous | The patient's last approved result of the same test. |
| State | Not saved (typed but not saved), Saved, From the analyser, Calculated, Critical. |
A calculated test (for example a ratio or an estimated filtration rate) is never typed: it is worked out from the others and shows Calculated. If an input is missing the row says why — for example that triglycerides above 400 mg/dL make the equation invalid, or that the patient's age is not recorded — and the value can be entered as measured directly.
If a test's result agrees with neither itself nor the others you will see does not match its own inputs; recheck the inputs.
Differentials. While you type a differential, the program adds the parts up and warns when they do not reach what is expected («adds up to 97, 3 less than 100%»).
7.7 Tasks, step by step
7.7.1 Task 1 — Enter the results of an order
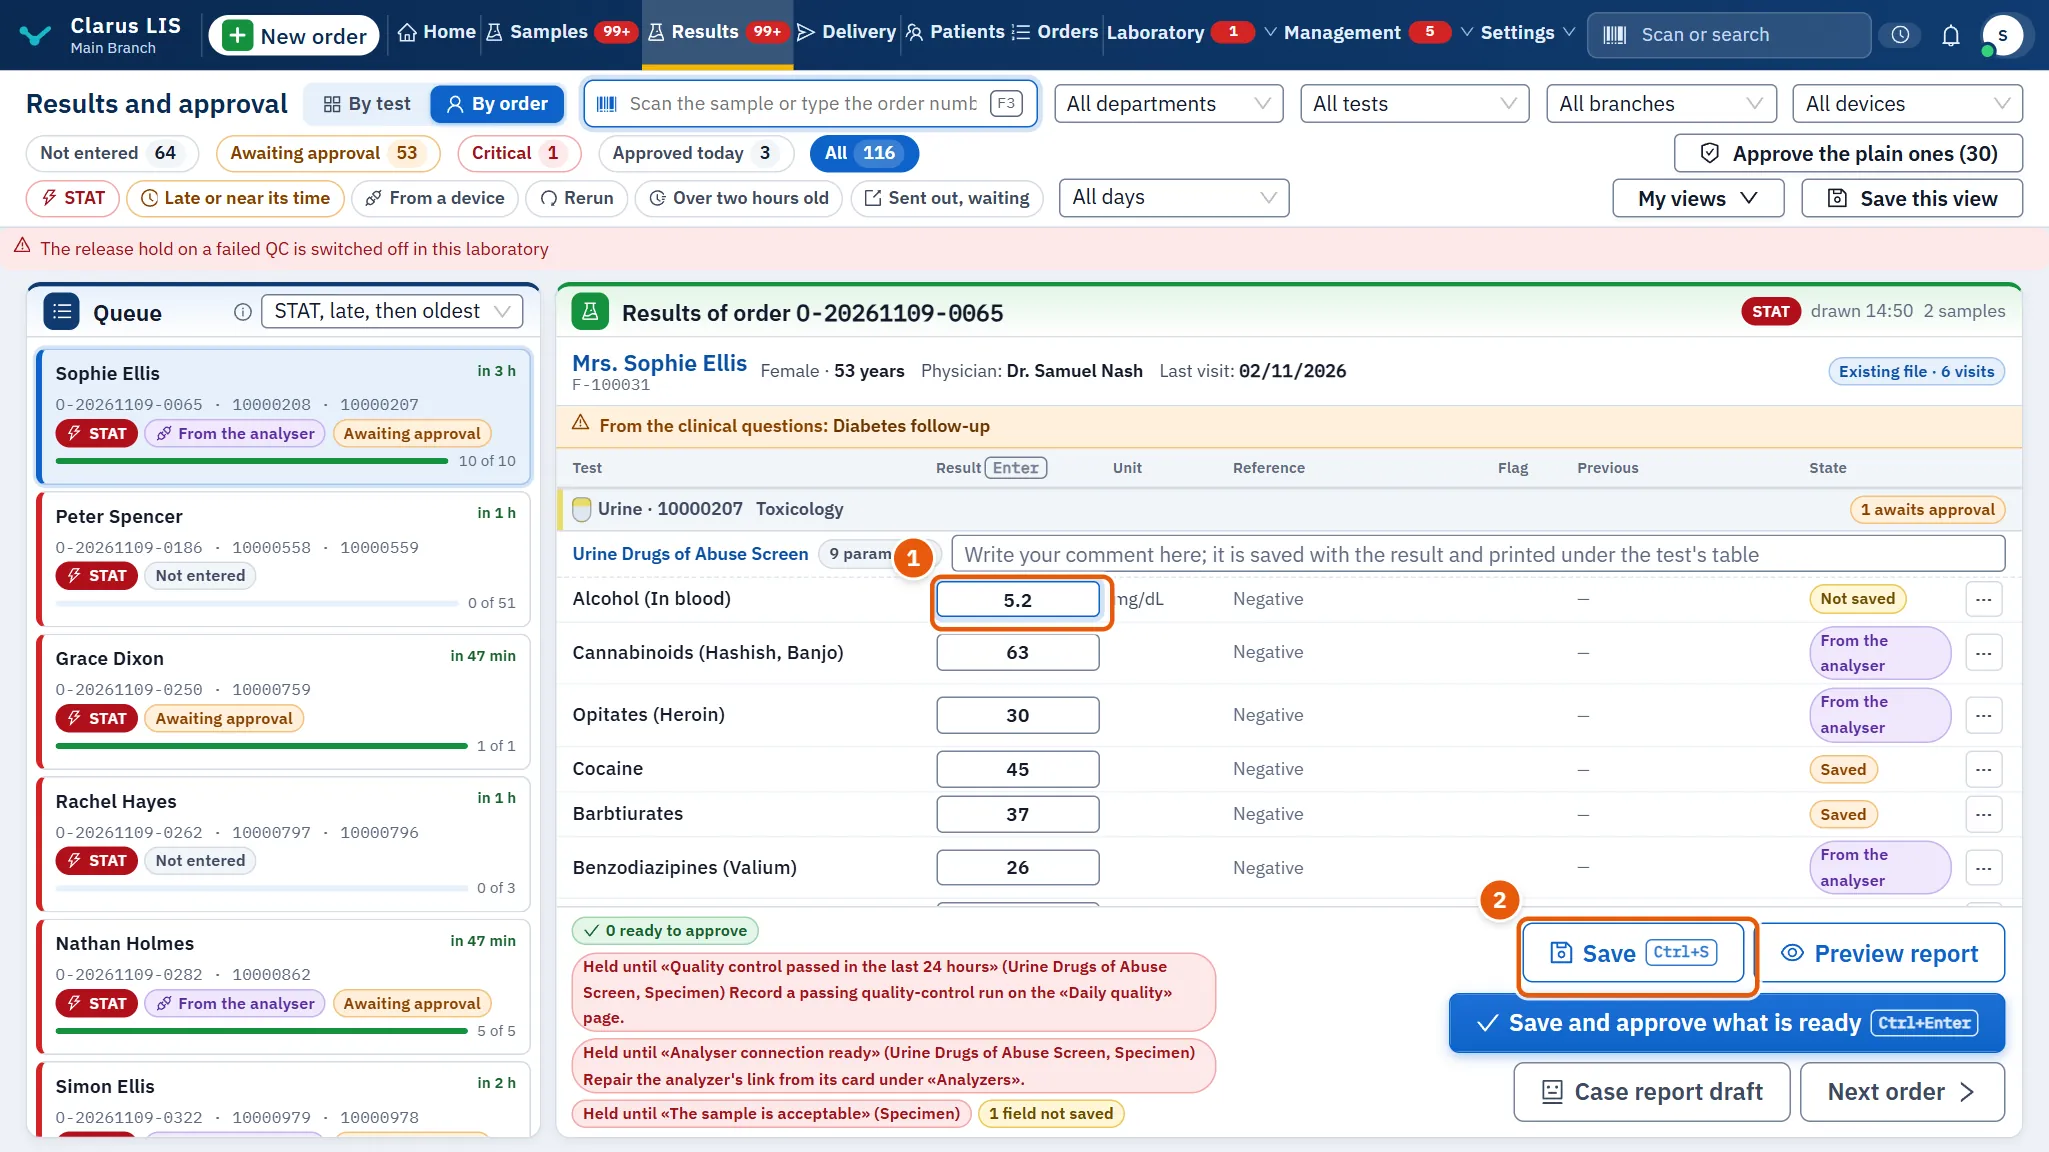
- Scan the sample, or choose the order from the queue. The cursor goes to the first empty field.
- Type the value and press Enter. The cursor moves to the next field.
- A value outside the reference interval is flagged at once. Far outside it (more than 20 times the upper limit of the interval, or less than the lower limit divided by 20) the program asks Check this value before it is saved — press The value is right, save it or Go back and correct it.
- A value beyond what the analyzer can measure asks A value beyond the measuring range: Yes, the value is right or Type it again.
- When all are typed, press Save (Ctrl+S). The foot says «5 results saved».
If you try to leave the order with something typed and not saved, Results not saved asks: Save and go, Stay here, or Go without saving.
7.7.2 Task 2 — A panel or a descriptive sheet
A test made of many parameters (a urinalysis, a stool exam, semen analysis, a coagulation profile, a manual differential) shows one line with Open the sheet or Open the form.
- Press it. The sheet opens with all the parameters; Enter moves between them.
- For pick-lists, Normal for the empty (n) fills every empty pick-list field with the normal value the catalogue names. The values are marked Suggested — they are not results until you press Confirm the normal shown or change them. A number is never filled.
- Press Save the sheet, or Save and go to the next.
Colours: “Suggested” (not a value until confirmed); “Normal filled by the program: check it”; “Abnormal”; “Empty”: closed as «not performed» at approval, after asking you.
Semen analysis and the other forms check what you type against the WHO 2021 limits and warn when motility parts do not add to 100% or the time from collection to analysis exceeds 60 minutes. Images and charts from the analyzer can be attached with Upload image; they print in the report.
7.7.3 Task 3 — A critical value
A critical value is held until it is called to the physician and read back.
- The row shows Critical and a bar: «Critical value: called to the physician, who reads it back, before approval.»
- If your laboratory has chosen «Type a critical value twice» (off unless it is switched on), the program asks you to type the value a second time before saving; if the two differ it asks again.
- Press Record the call on the row. The window Critical value call opens with three steps: (1) Who takes it — press I take it; (2) Call and read-back — Called to (the physician), The value as read back, Note, then press Record the call again. The read-back is compared with the result; if it differs, the call is refused and stays open; (3) Approval — when recorded, «The test can be approved now.» Press Approve the test.
- If you cannot reach anyone, Escalate: choose To whom, give the Reason and press Record the escalation.
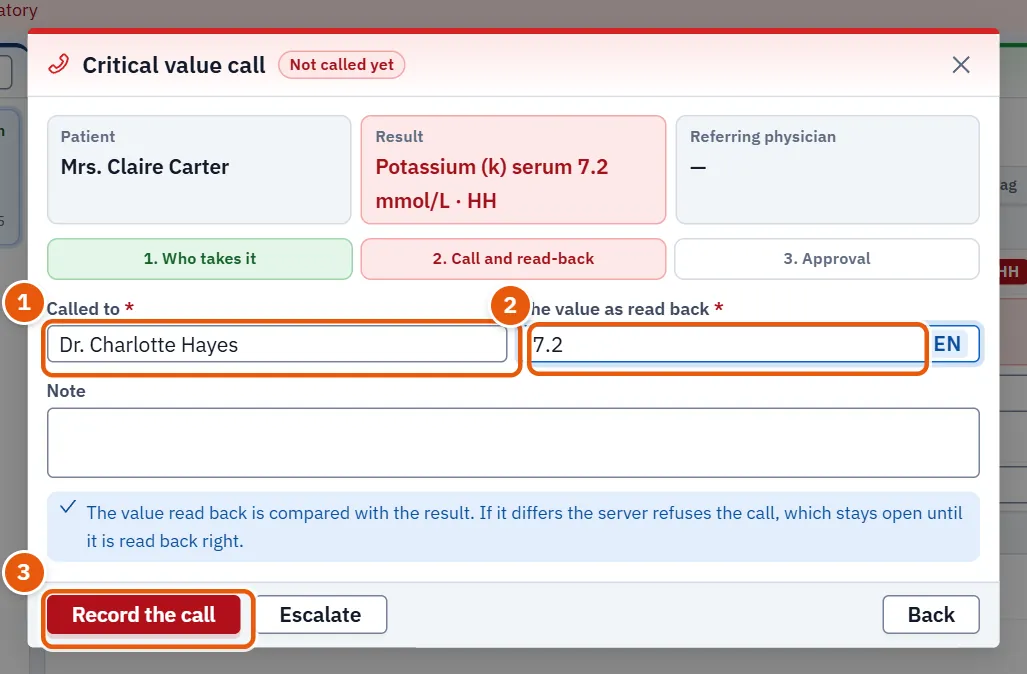
The Record the call button on the row is dim for anyone who may not approve results.
7.7.4 Task 4 — A value far from the last one (delta check)
If a test has a delta limit and the new value moved more than the limit from the patient's last approved result within the look-back days, the row shows Past the delta limit with the sentence («Moved by 2.1 from 4.0; the limit is ±1.5.»). Approval holds it until you review the value.
To set the limit open the test's Tools (see 7.7.9 Task 9 — Test tools); the fields appear only to whoever manages settings: Delta limit against the previous result — “Largest change (%)”, “Largest difference (unit)”, “Look-back (days)”. Leave both limits empty to switch it off (the look-back days alone do not set a limit), then Save the limit.
7.7.5 Task 5 — The analyzer's readings and rerunning
When the analyzer sent more than one reading, the row shows Rerun. If two readings are far apart it shows Two readings far apart: choose one, and approval is held until you choose.
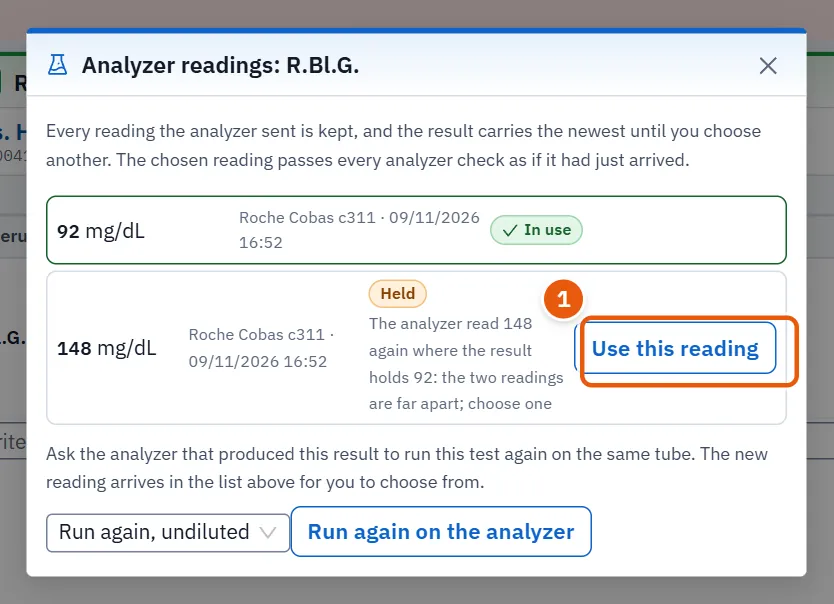
The held reading says why it is held, in the program's own words, and nothing changes in the result until you press Use this reading on the reading you trust.
- Press the mark. Analyzer readings: [test] lists every reading, with the dilution, the run number, the operator, the instrument and the reagent lot.
- The newest is In use. Press Use this reading on another to choose it; it passes all the analyzer's checks as if it had just arrived.
- To ask the analyzer to repeat the test on the same tube press Run again on the analyzer. Choose the dilution — Run again, undiluted, Diluted ×n, Less sample (Dec), More sample (Inc) — The request goes to the analyzer's station and the new reading appears in the list.
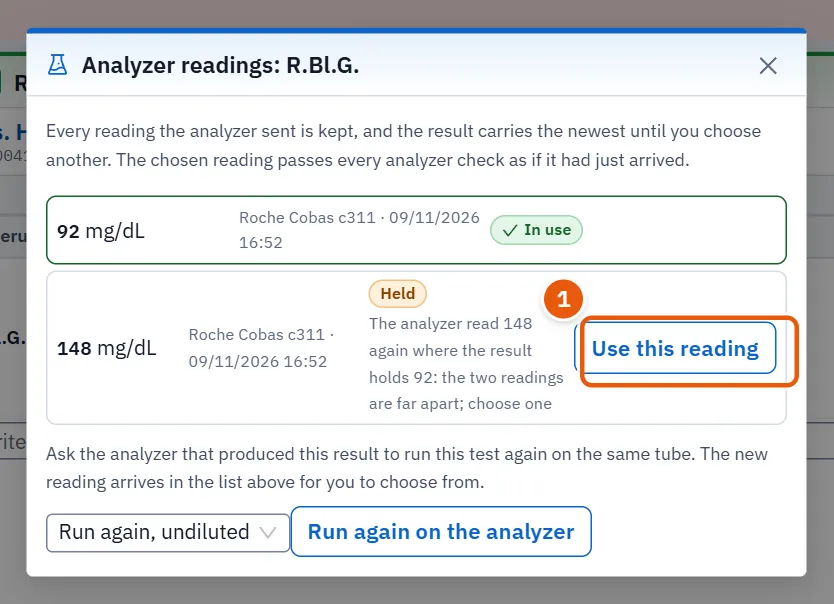
Flags the analyzer sent show beside the reading with what each means to the laboratory (information, interpretation, morphology, specimen, serum indices — haemolysis, icterus, lipaemia —, error, outside the measuring range). A serum-index flag can stop a result releasing itself.
7.7.6 Task 6 — Approve
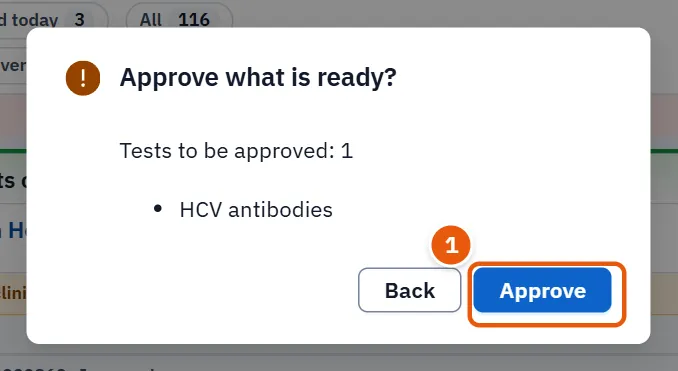
At the foot, a green mark says how many tests are ready; orange marks list what needs review; red marks list what is held.
- Press Save and approve what is ready (Ctrl+Enter). The program saves what you typed first.
- Approve what is ready? shows «Tests to be approved: 5». Press Approve.
- If some tests have empty fields, Empty fields says «2 empty fields will be closed as "not performed"». Close them and approve, or Do not approve this test.
- The result: «5 tests approved». If the server refused any, it says which and why.
- Press Next order.
Approve the plain ones (n) (in “By order”, for those who may approve) approves at once every test in the list that is complete and not critical, and has no value outside the interval, unless your laboratory has chosen to let non-critical high and low values in (then your name is recorded with each such value). The window The tests to approve lists them; Approve n tests confirms. Tests that cannot be approved this way are listed with the reason, to be approved from their own cards. The server checks each test again.
7.7.7 Task 7 — When approval is held
A red mark in the foot names what holds a test and where to fix it.
| Held until… | Where to fix it |
|---|---|
| A quality-control run passed in the last 24 hours | Record one on Daily QC (the screen's own messages call the page «Daily quality») |
| A quality-control violation is resolved | Daily QC |
| The analyzer's connection is repaired | The analyzer's card in Devices and printers |
| The analyzer's calibration is recorded | Its card in Devices and printers |
| The analyzer's alert is reviewed | Held messages on its card |
| Two far-apart readings are chosen between | The mark beside the result |
| The critical value is called | The critical-value window |
| Patient consent / timed protocol / request form is complete | The mark names the check only; the screen does not say where to complete it |
Some checks cannot be overridden: the mark then says Held by a check that cannot be overridden.
7.7.8 Task 8 — Preview the report
Preview report shows the report as it will print. While any result on it is unapproved it carries «DRAFT — NOT APPROVED». If you have typed values not yet saved, the preview shows them as a draft that is never stored.
7.7.9 Task 9 — Test tools
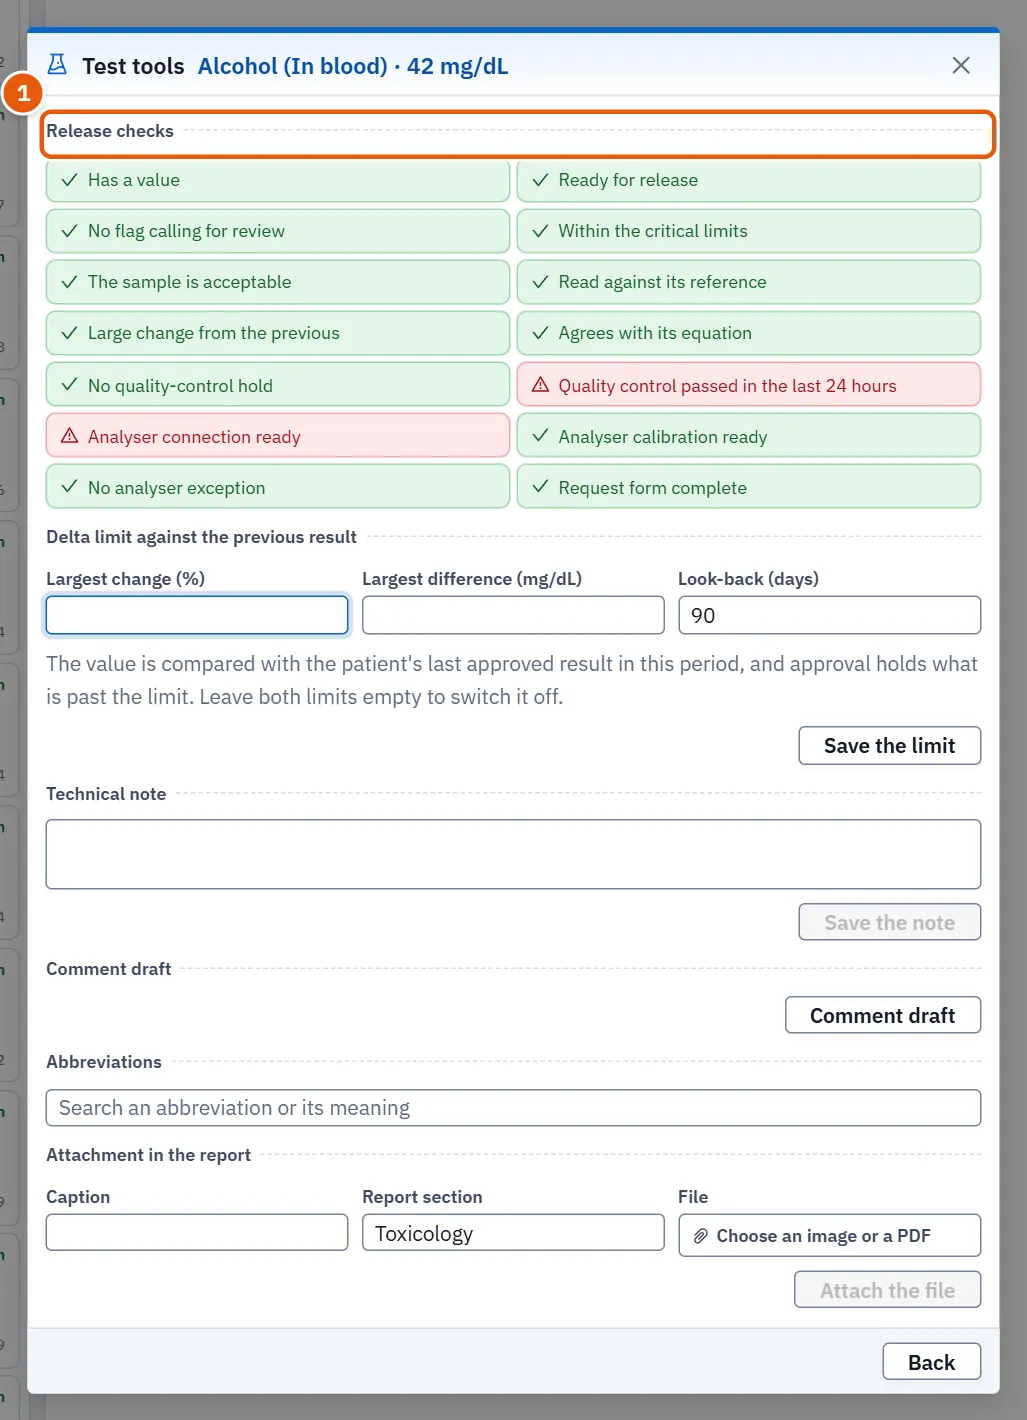
Tools of [test] (beside each test) opens:
- Release checks — the list of checks the result passes before approval, each ticked or not.
- Technical note — type a note and Save the note. RealLab's ready comments offers comments to put in the note; only Save the note saves it.
- Abbreviations — search an abbreviation or its meaning.
- Attachment in the report — Caption, Report section, Choose an image or a PDF, Attach the file.
- Delta limit (7.7.4 Task 4 — A value far from the last one (delta check)).
7.7.10 Task 10 — Amend or withdraw an approved result
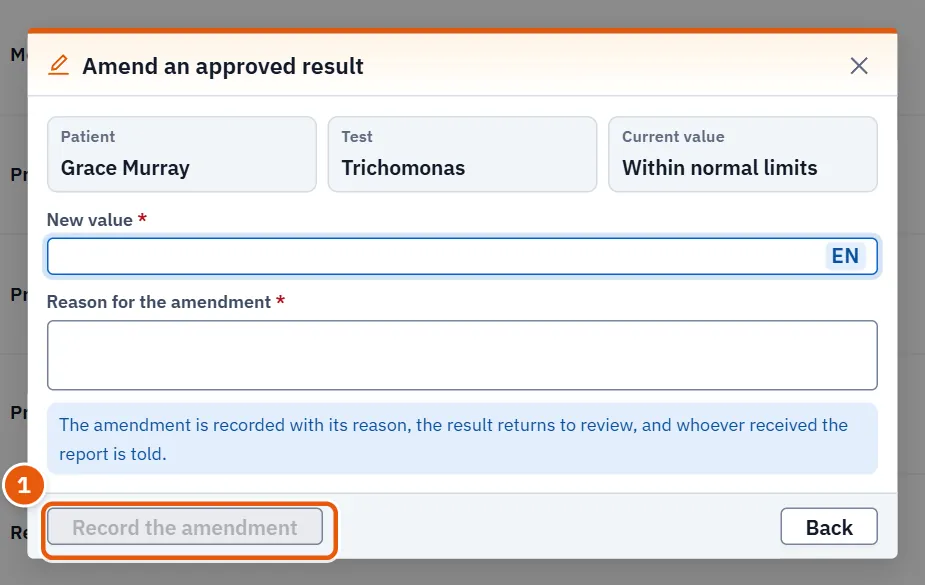
- Press state 4 Approved today, choose the order. Each result shows who approved it and when.
- Amend: type the New value and the Reason for the amendment; Record the amendment. The amendment is recorded with its reason, the result returns to review, and whoever received the report is told. If no report had been issued yet, the value is simply saved.
- Withdraw approval: give the Reason for withdrawing the approval; Withdraw the approval. The result keeps its value and returns to the queue to be changed and approved again; its report is withdrawn, and once approved again it prints headed Amended Report.
Withdrawing needs “Verify results”; amending needs that and “Change a result not yet approved”. Without them the button is not shown. The old value and reason stay in the record.
7.8 Keys
| Key | Does |
|---|---|
| F3 | Go to the scan box |
| 1 – 5 | Choose the state (never while typing in a field) |
| Enter / Shift+Enter | Next / previous field |
| Ctrl+S | Save |
| Ctrl+Enter | Save and approve what is ready |
7.9 Messages and what to do
| The screen says | Meaning | What to do |
|---|---|---|
| No sample or order has the number … | The code was mistyped, or belongs to another branch | Scan again; check the branch filter |
| Not everything typed was saved | The server refused some values | Read the refusal beside each; correct and save |
| The approval failed; nothing was approved | A connection fault | Check the connection and try again |
| The server refused to approve some tests | A check failed on the server | See the red marks in the foot |
| The value … is above the most the analyzer measures | Beyond the measuring range | Confirm, or dilute and rerun |
| The previous one was zero, so no percent can be taken | Delta by percent impossible | Review the value by eye |
| needs permission to read patient files | Your role cannot see Previous | Ask the administrator if you need it |
7.10 See also
Samples (what arrives here), Delivery (what leaves after approval), Daily QC (the quality hold), Devices and printers (analyzer faults), Quality (corrective actions), Settings and users (the permissions above).