Chapter 5New order
Menu: New order. Address: /order/new.
5.1 What this screen is for
This is the reception desk. Here the patient is found or registered, the tests are chosen, the price is worked out and the money is taken, and the order is saved. Saving gives the order its number and opens the samples; nothing else in the laboratory starts before it.
One screen holds the whole flow: the patient (search, a new file, checks against duplicates), the account, the referring doctor and the coverage, the clinical questions, the catalogue and the basket of tests, price changes and discounts, saving, and what you do right after saving (receipt, barcodes, collection notes, payment, results, the next patient). The same screen also reopens a saved order for editing.
5.2 Who sees it
Whoever holds Create orders. The menu hides the screen from everyone else. Within the screen:
| You can… | …if your role holds |
|---|---|
| Open the order screen and save an order | Create orders |
| Search for existing patient files, and see the files that match the name and phone you type | Read patient files |
| Change the price of a test inside the basket | Manage prices, contracts and commissions |
| Change an external laboratory's cost, make one the test's default, add or register a laboratory | Manage the laboratory's structure: branches, numbering, first run, external laboratories |
| See the patient's documents strip (existing file only) | See and add the patient's documents |
| Attach the doctor's request | Enter results |
| Add a doctor from the order (+ add) | Add a doctor quickly from the order screen |
| Take payment and give a manual discount | Collect money, or manage billing |
| Open a saved order for editing, right after saving it | Edit orders |
| Open the results of the saved order | Enter results, or approve them |
Anyone who may take orders can choose which laboratory a sent-out test goes to for this order; only the cost and default fields need the laboratory-structure right.
A missing right is shown in one of two ways. These are dim, with a tooltip saying why: the attachment buttons, the payment controls (method, amount, second method), and the Payment and Results buttons (for example «You may not collect money»). These are not shown at all: the price pencil on a basket line, the + add link, the patient documents strip, the duplicate suggestions, the manual-discount button and the Edit the order button (the cancel button stays in its place instead). Without the right to collect, the order is saved with no payment.
5.3 The screen at a glance
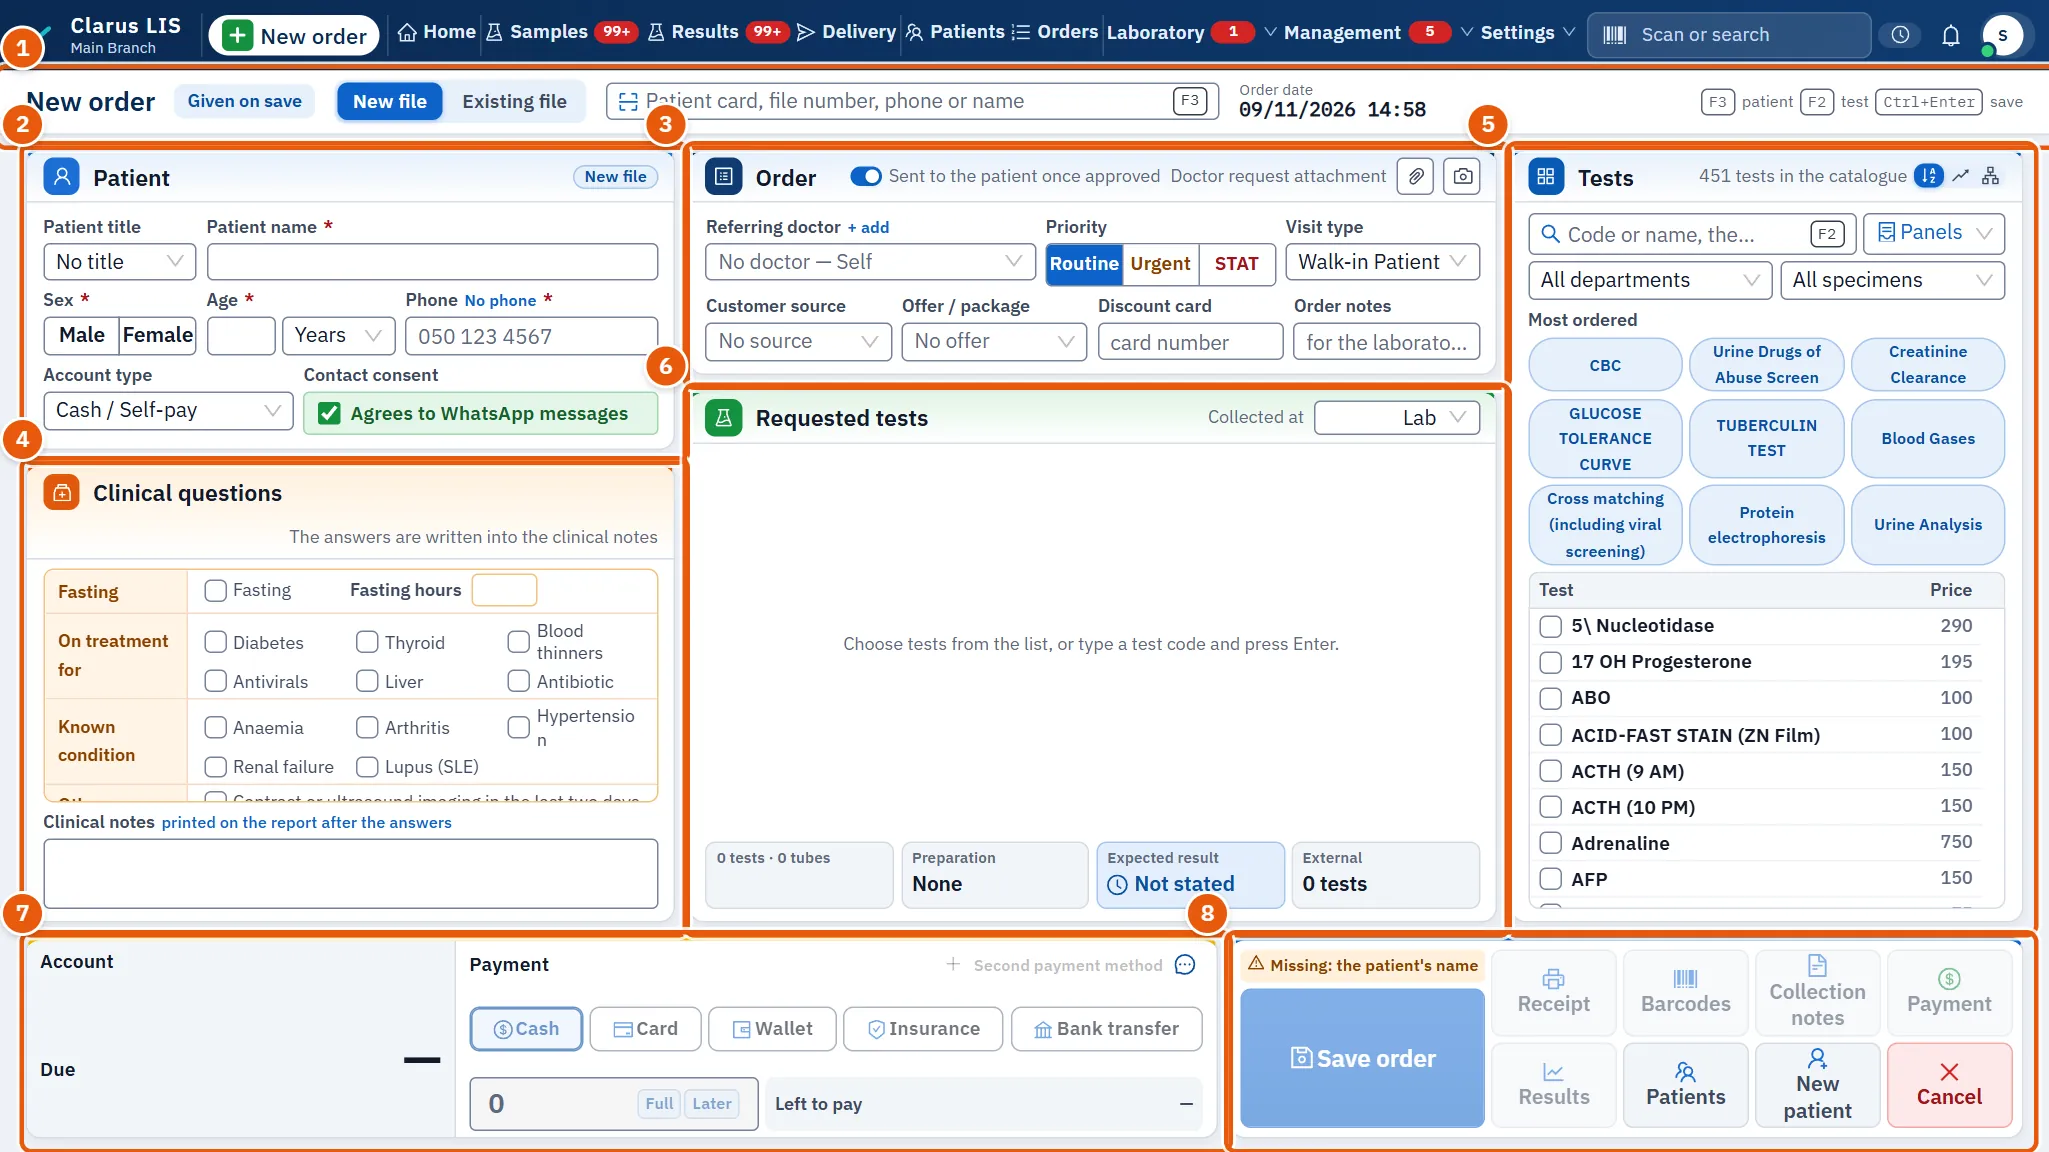
- The head strip: the order number, the patient search, the date, and whether the patient file is new or existing.
- The patient: the fields of the file, the account type and the coverage.
- The order: the doctor, the priority, the visit type, the source, the offer, the discount card and the order notes.
- The clinical questions: answers that print on the report.
- The catalogue: where tests are found and added.
- The basket: the tests chosen, their places and prices.
- Price and collection: the total, discounts, what is due and the payment.
- The actions: what is still missing before saving, and what happens after.
5.4 The head strip
| Element | What it does |
|---|---|
| Order number | Shows Given on save until the order is saved. |
| Patient card, file number, phone or name | The patient search (see 5.5.1 Finding a patient). It is closed while a saved order is being edited. |
| Order date | Today's date and the time, kept up to date by the minute. |
| Patient file | Switches between New file and Existing file; choosing the second puts the cursor in the search. Both are off after saving and while editing. |
| Editing order | Appears instead of the number when a saved order is open for editing. |
| After saving | The saved number, and Collected … and Remaining … when there is something taken or left. |
The strip also reminds you of the three shortcut targets: patient, test and save.
5.5 The patient
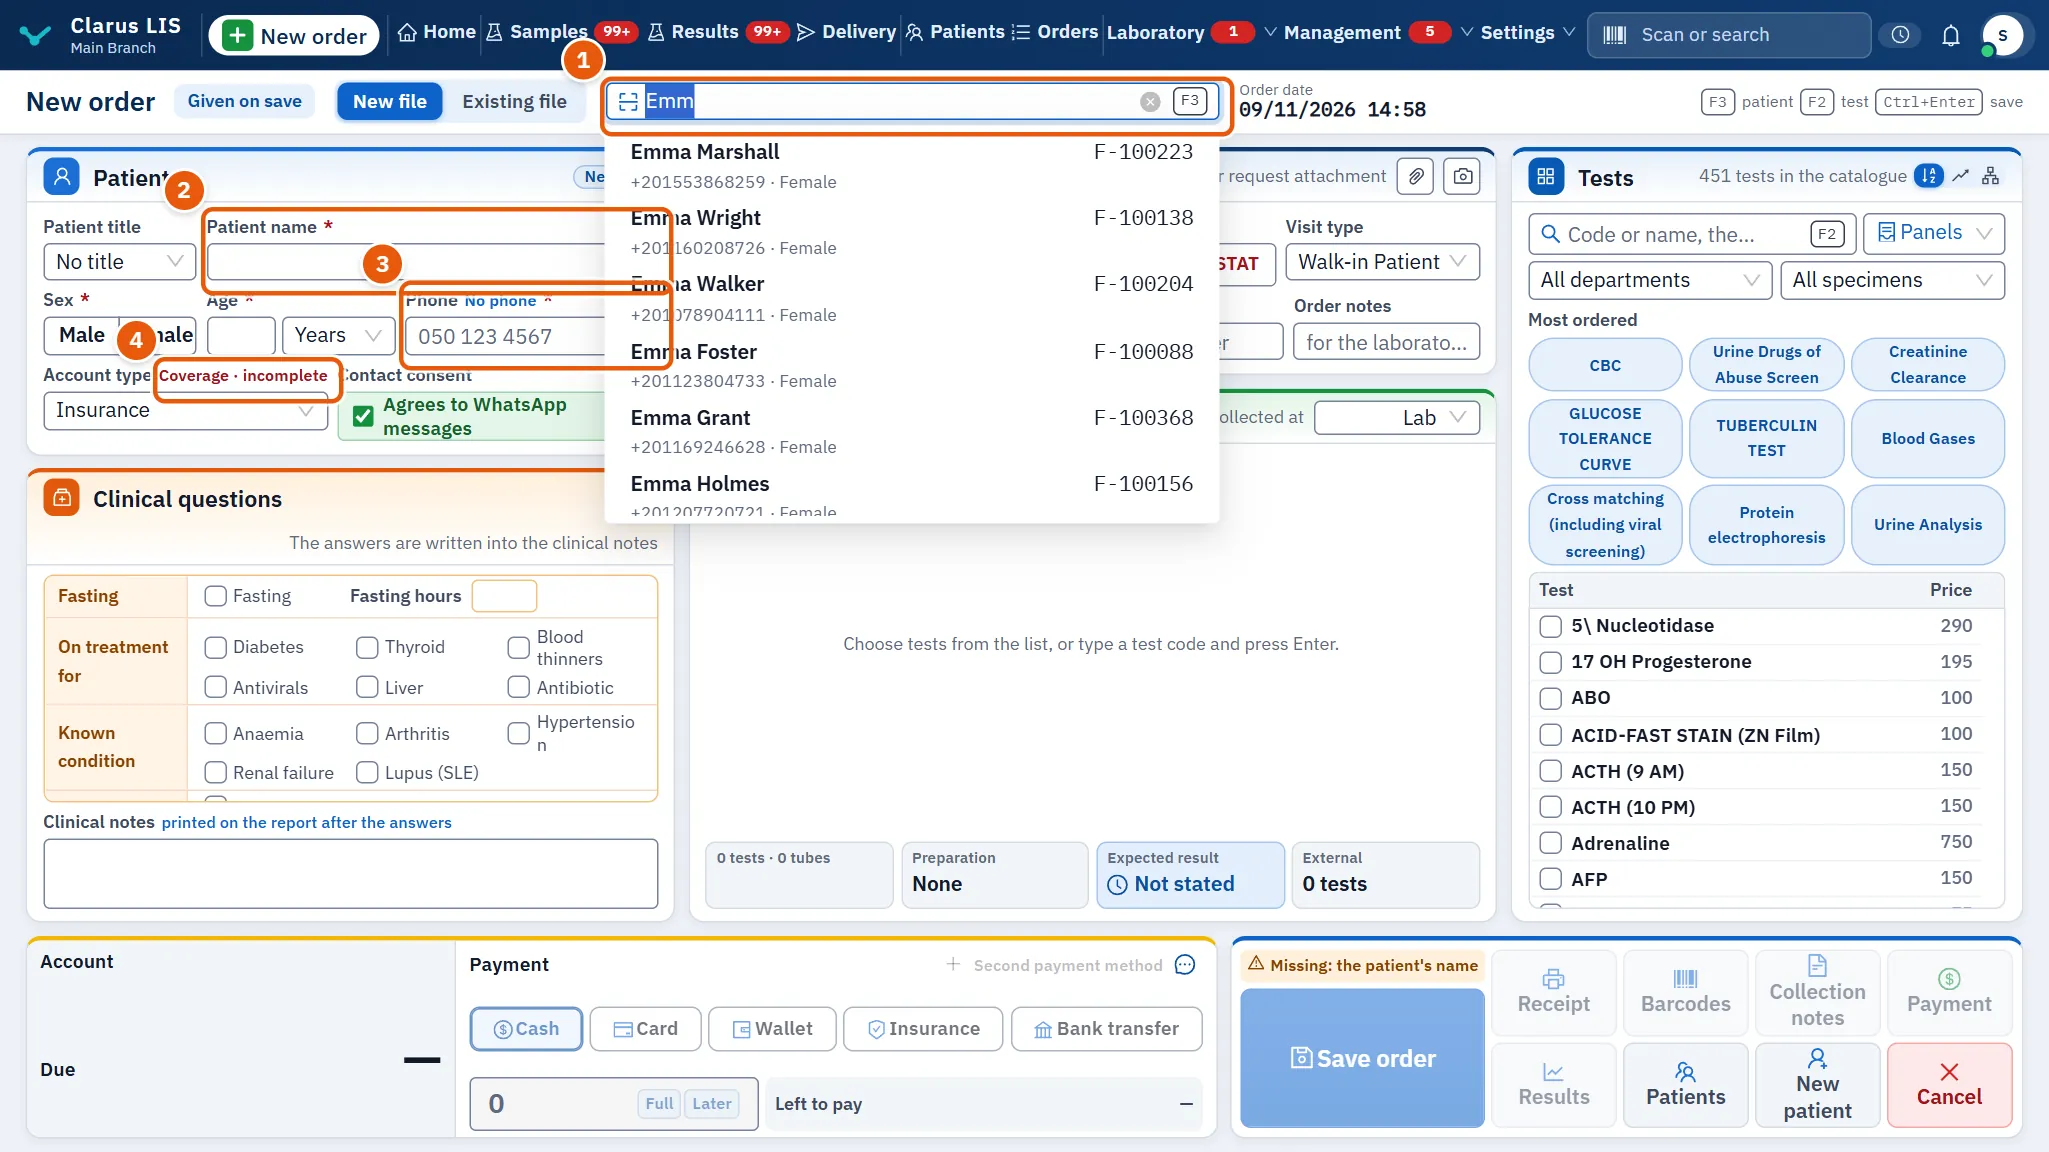
5.5.1 Finding a patient
| Control | What it does |
|---|---|
| Patient card, file number, phone or name | One box in the head strip for the patient card, the file number, the phone or the name. From two characters it lists up to eight files, marking those that share a full name with another file. Choosing one opens that patient's file. Enter in the box first tries the text as a patient card (a scanner types the code and presses Enter); if it is not a card and exactly one file matches, that file opens. |
| No patient matches this search | The message when nothing matches the search. |
Once an existing file is open its fields cannot be changed here (they are dim); the order does not change the file, so edit it on the patient's page. The one exception is the address, which a home visit asks for and which is saved to the file with the order.
If the file you choose shares its exact full name with another file, a window asks for the patient's phone or national ID before the file is used (see 5.5.3 Checks against duplicates).
5.5.2 The fields of a new file
| Field | What it does |
|---|---|
| Patient title | The patient's title. auto shows that the program chose it from the sex; No title leaves it out. |
| Patient name | Required. The full name: at least a first and a second name. |
| Sex | Required. Male or Female; nothing is chosen until you choose. |
| Age and Age unit | Required. The age (up to three digits) in Days, Months or Years. |
| Birth date | Required. Typed as DD/MM/YYYY. The screen shows either the age fields or the birth date field, according to a setting of the laboratory, not both. |
| Phone | Required, unless the laboratory's setting makes it optional. If the patient has none, press No phone, then choose Why there is no phone: A child, An elderly person, A referred sample or Another reason, which also needs The reason in a few words. |
| Contact consent | For a new file, a tick for Agrees to WhatsApp messages, shown only where the laboratory keeps consent records. For an existing file consent is changed on the patient's page. |
| Account type | Who pays. |
| Coverage | Shown beside the account type when the type is a covered one; opens the coverage details and says incomplete when something is missing. |
The coverage window holds Commercial account (Use the default account returns to the default), Contract, Membership class, Member / card number (required for some account types), Approval number and Coverage status (Automatic, Pending approval, Approved or Rejected). A note in the window appears when the payer needs an authorization number.
For an existing patient the card also shows Last visit, Visits and, when money is owed from earlier orders, Previous balance …. That balance can be collected with this order: in the payment area, tick + Previous balance (unticked by default, and offered only to someone who may collect money). Repeat the previous order adds the tests of the patient's last order.
5.5.3 Checks against duplicates
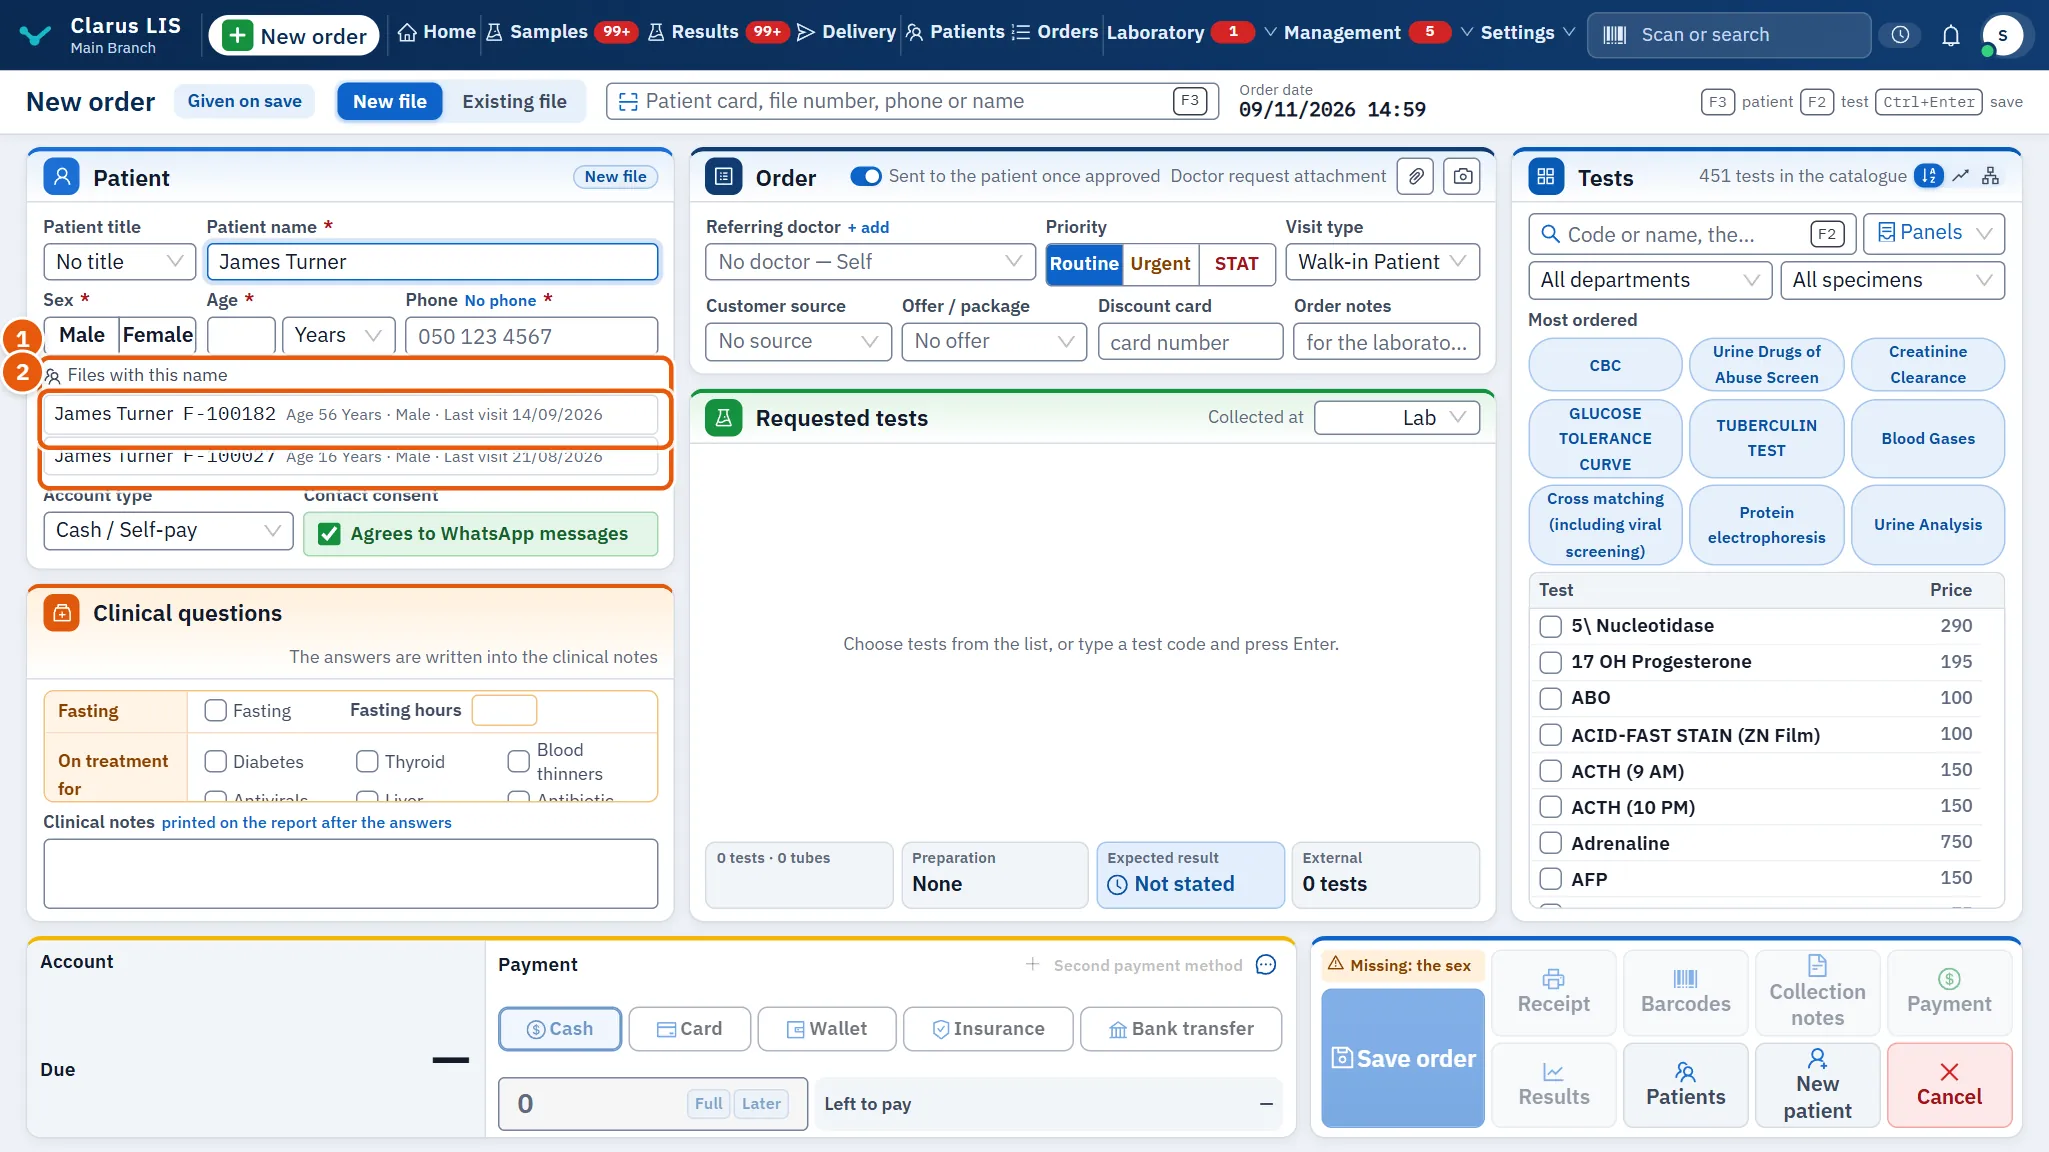
While you type the name and the phone of a new file, the program looks for existing files (only for someone who may read patient files). Existing files matching what is typed lists them, each with the age, the last visit (No order yet if none) and, when both the name and the phone belong to one file, the button Use this file. Nothing here blocks saving.
| Situation | What the screen shows | What to do |
|---|---|---|
| The name and the phone are one file's | This patient already has a file with Use this file | Press it if it is the patient; the file opens as it is |
| Files with the same name | Files with this name, each with Open this file | Open the file if it is the same patient |
| The phone is on a file under another name | This number is on a file under another name: with Open this file if it is the same patient | A family may share one number, so the number alone is not proof |
| The phone is on many different families | This number is on the files of several different families, so it identifies nobody: make sure of the patient's own number. | Confirm the patient's own number |
| You press save on a new file and a file matches strongly (not on the phone alone) | The window A file already matches this patient | Use the existing file cancels the save and nothing is saved; open that file from the search. Open a new file anyway goes on and saves. Closing the window also cancels the save |
| You press save on a new file and only the phone matches another person's file | The window This phone number is on another file | Use the existing file (or closing the window) cancels the save. New file: a family member sharing the number saves the new file with the shared number. New file: the number moved to someone else saves it and marks the number on the old file |
| You choose a file that shares its exact full name with another file | The window Two files carry this name | Ask for the patient's phone or national ID, type it and press Check; the file is used only if it matches. Closing the window abandons the choice |
If the number moved to someone else, the old file's phone is marked to be confirmed and no result message goes to it until it is saved again at that patient's next visit.
5.6 The order
| Element | What it does |
|---|---|
| Referring doctor | The referring doctor, searchable (a doctor typed on the wrong keyboard layout is still found). + add, for whoever holds the right, opens Add a doctor (Doctor's name, Specialty). Without a doctor the order is shown as a self-referral. |
| Priority | Routine, Urgent or STAT. |
| Visit type | Shown only when the laboratory uses visit types; None for none. |
| Customer source | Where the customer came from; No source for none. |
| Offer / package | The offer or package; No offer for none. |
| Discount card | The discount card number, typed or scanned. The screen says whose card it is and its percent, or why it does not apply; the order is refused until the card applies or is cleared. |
| Order notes | A free note on the order. |
| Sent to the patient once approved | A switch: whether results go to the patient by themselves once approved; the other state is Not sent to the patient by itself. |
| Doctor request attachment | Attach the doctor's request: Camera or Choose a file (dim without the right to enter results). A PNG, JPEG, WebP or GIF image or a PDF, up to 10 MB; a file the server would refuse is refused at once. Remove the attachment removes it. The file is sent after the order is saved. |
The receipt note and the billing note are written behind the notes icon in the payment area; the clinical notes are in the clinical questions.
5.7 The clinical questions
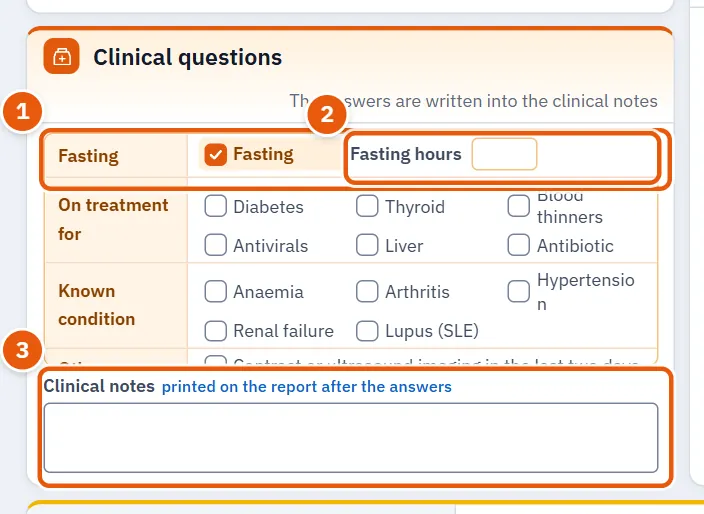
Clinical questions: the answers are written into the clinical notes. The questions come in groups: Known condition, On treatment for, Fasting and Other; some questions are offered according to the patient's sex. Each is a tick. A group that a chosen test asks for is highlighted and says for …, naming those tests. The fasting group has Fasting hours, two digits at most. Clinical notes is printed on the report after the answers.
5.8 The catalogue
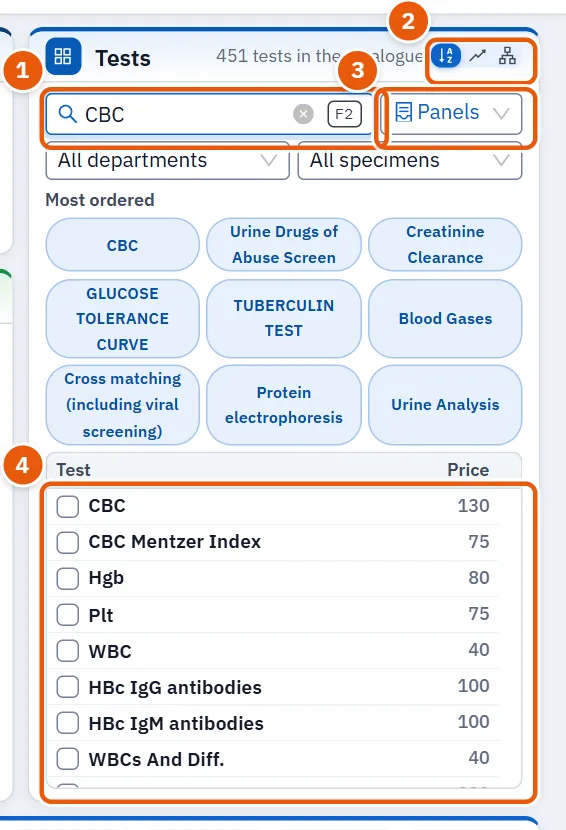
| Control | What it does |
|---|---|
| Code or name, then Enter to add | Type a code or a name and press Enter. The test is added only if what you typed is exactly its code or its name and it is switched on; otherwise nothing is added. |
| Sort the list | Alphabetical, Most ordered (offered only where the program counts orders) or By department. Each user's choice is remembered in the browser. A search lists by relevance instead. |
| All departments and All specimens | Limit the list to one department or one specimen. |
| Panels & packages | Panels and Packages & offers; choosing one adds it (a package also names the offer on the order). |
| The quick buttons | A row of up to nine panels or most-ordered tests; each toggles the test. |
| The list | Columns Test and Price; up to 150 rows. Clicking a row adds the test, and clicking it again removes it. A test inside a panel says … is in …. |
From two typed letters, tests that match but are switched off in the laboratory are listed at the end, faded. Beside each is a button to open the catalogue for whoever holds the catalogue right; for everyone else the screen says Ask whoever manages the catalogue to switch it on.. If Enter finds the code of a switched-off test it says so and adds nothing. If what you typed is not exactly one test, choose it from the list.
5.9 The basket
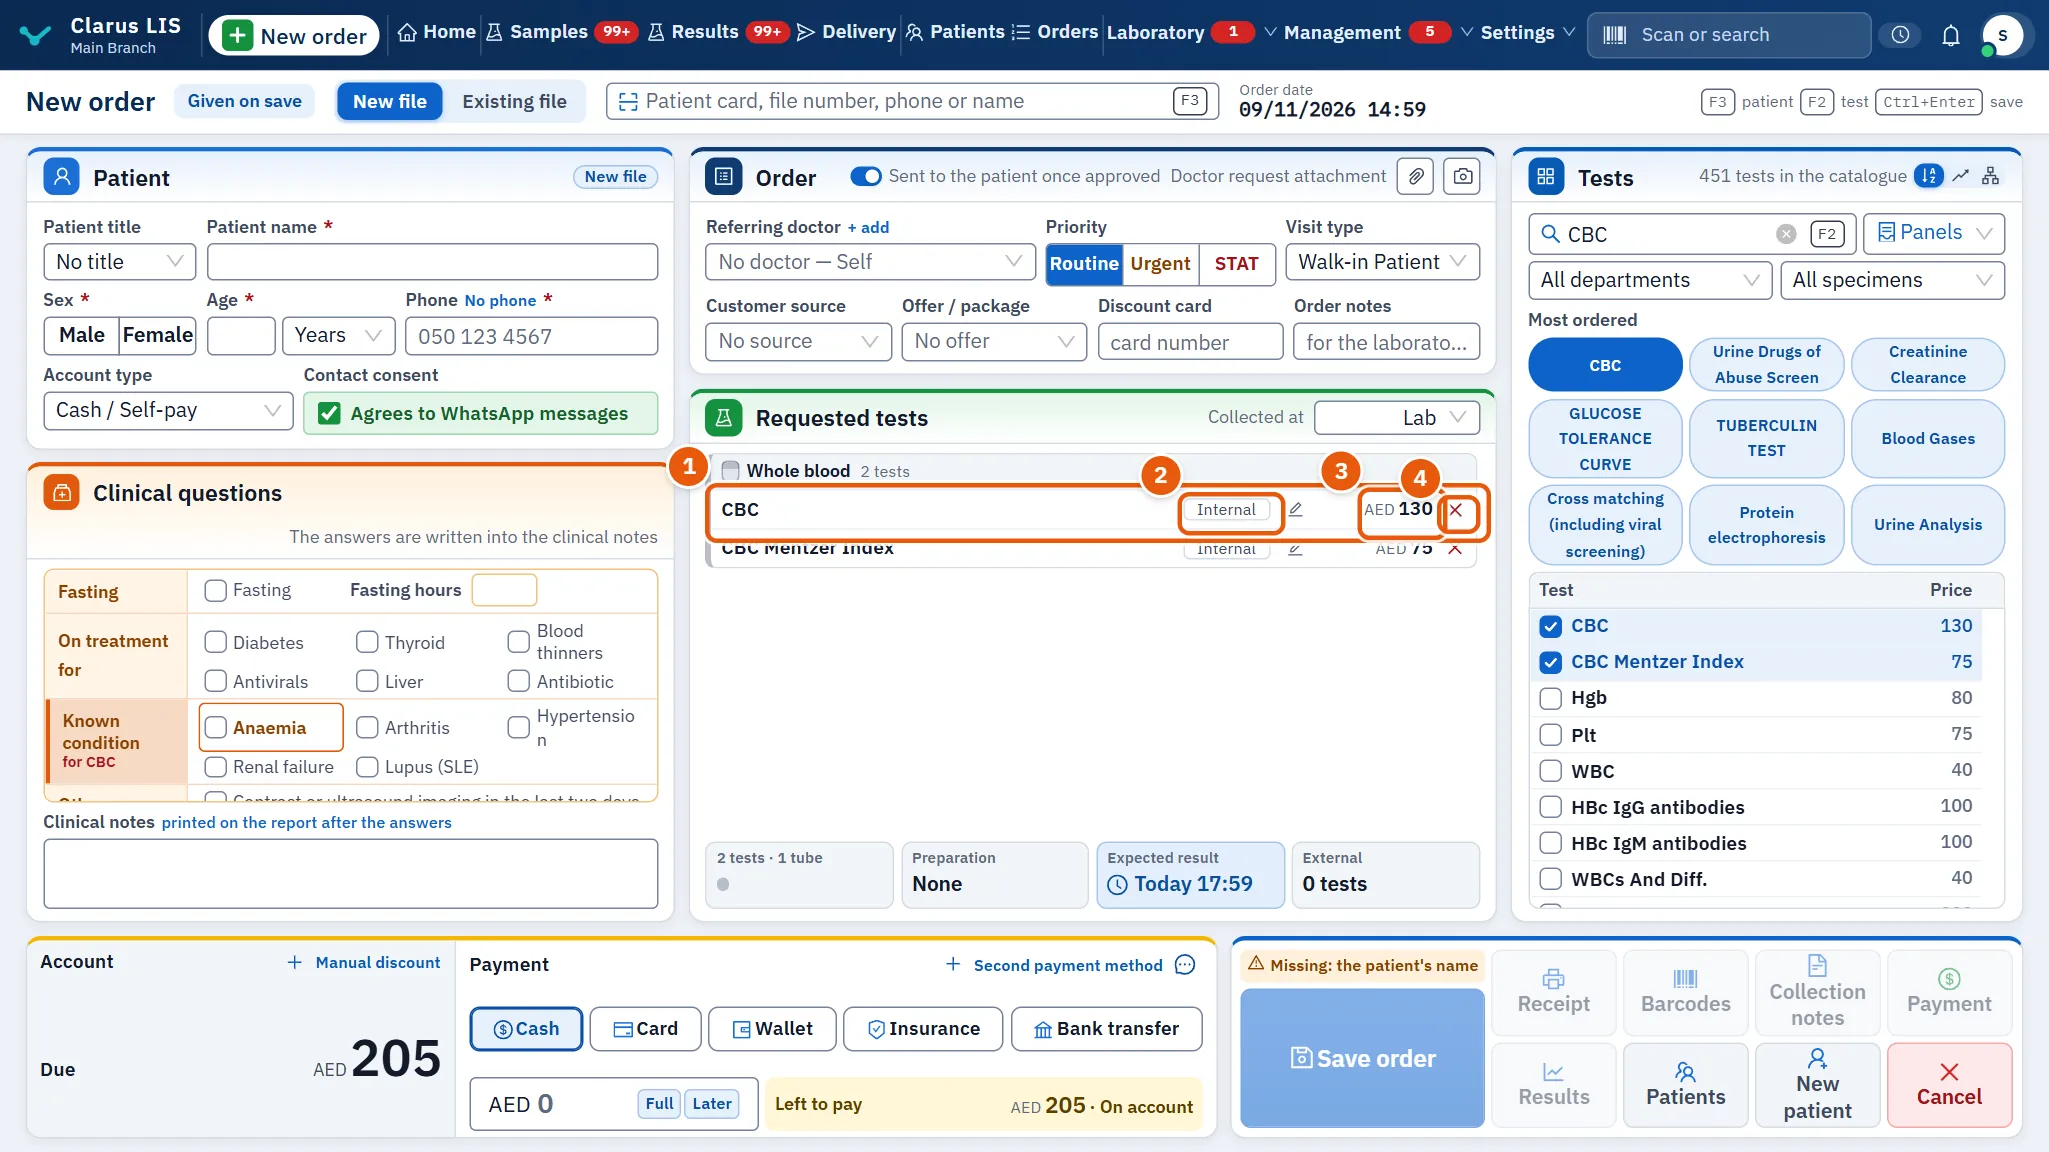
Requested tests lists the tests chosen, grouped by tube. The title bar has Sample collected at: Lab, Home or Other place. A home visit or another place asks for an address in a small window, and the address is required to save. The place cannot be changed while editing a saved order. Each line can show:
| Element | What it does |
|---|---|
| The test | Its name, a Fasting tag if it needs fasting, and a mark if the patient has a recent order of it (see 5.9 The basket). |
| Where this test is performed | Click to switch between internal and external. |
| Edit the test's price | A pencil, shown only to whoever may change prices (or, on a sent-out test, to anyone, to choose its laboratory), and only where the price comes from a list that can be edited. Opens the price window. |
| Remove this test | Removes the test. |
| Choose antibiotics | For a culture test, opens the antibiotics window (it also opens by itself when a culture is added). |
A line whose price is not on the payer's list shows a button for the pricing question instead of a figure (see 5.10.5 Task 5 — Change a test's price or its external laboratory). A sent-out line says under it which laboratory the order sends it to, or that none is set.
A summary under the lines gives the number of tests and tubes, the preparation needed (fasting or none), the expected result time and the number of external tests.
A test the patient already ordered recently is marked yellow with its order code; the mark says to ask before drawing it again.
5.10 Tasks, step by step
5.10.1 Task 1 — Register a new patient and an order
- Type in Patient card, file number, phone or name (two characters at least) to be sure the patient has no file.
- If not, fill Patient name, Sex, Age (or Birth date) and Phone.
- Choose the doctor and the priority.
- Add the tests (5.10.4 Task 4 — Choose the tests).
- Press save when Ready to save shows. If a duplicate window appears, answer it (see 5.10.2 Task 2 — Settle a possible duplicate).
5.10.2 Task 2 — Settle a possible duplicate
- When Existing files matching what is typed lists a file, compare name, age and last visit.
- If it is the patient, press Use this file (or open it from the list).
- If not, keep typing. At save, answer the window: Open a new file anyway only if you are sure. Choosing Use the existing file saves nothing; open the existing file and start again.
- For a shared phone number choose between New file: a family member sharing the number and New file: the number moved to someone else.
5.10.3 Task 3 — Answer the clinical questions
- Tick what applies in each group.
- If fasting is asked for, write Fasting hours.
- Add anything else in Clinical notes.
5.10.4 Task 4 — Choose the tests
- Type a code or a name in Code or name, then Enter to add and press Enter, or click a test in the list.
- For a whole panel or package use Panels & packages.
- Check the basket. Remove a wrong test with Remove this test.
- For a culture, check Choose antibiotics.
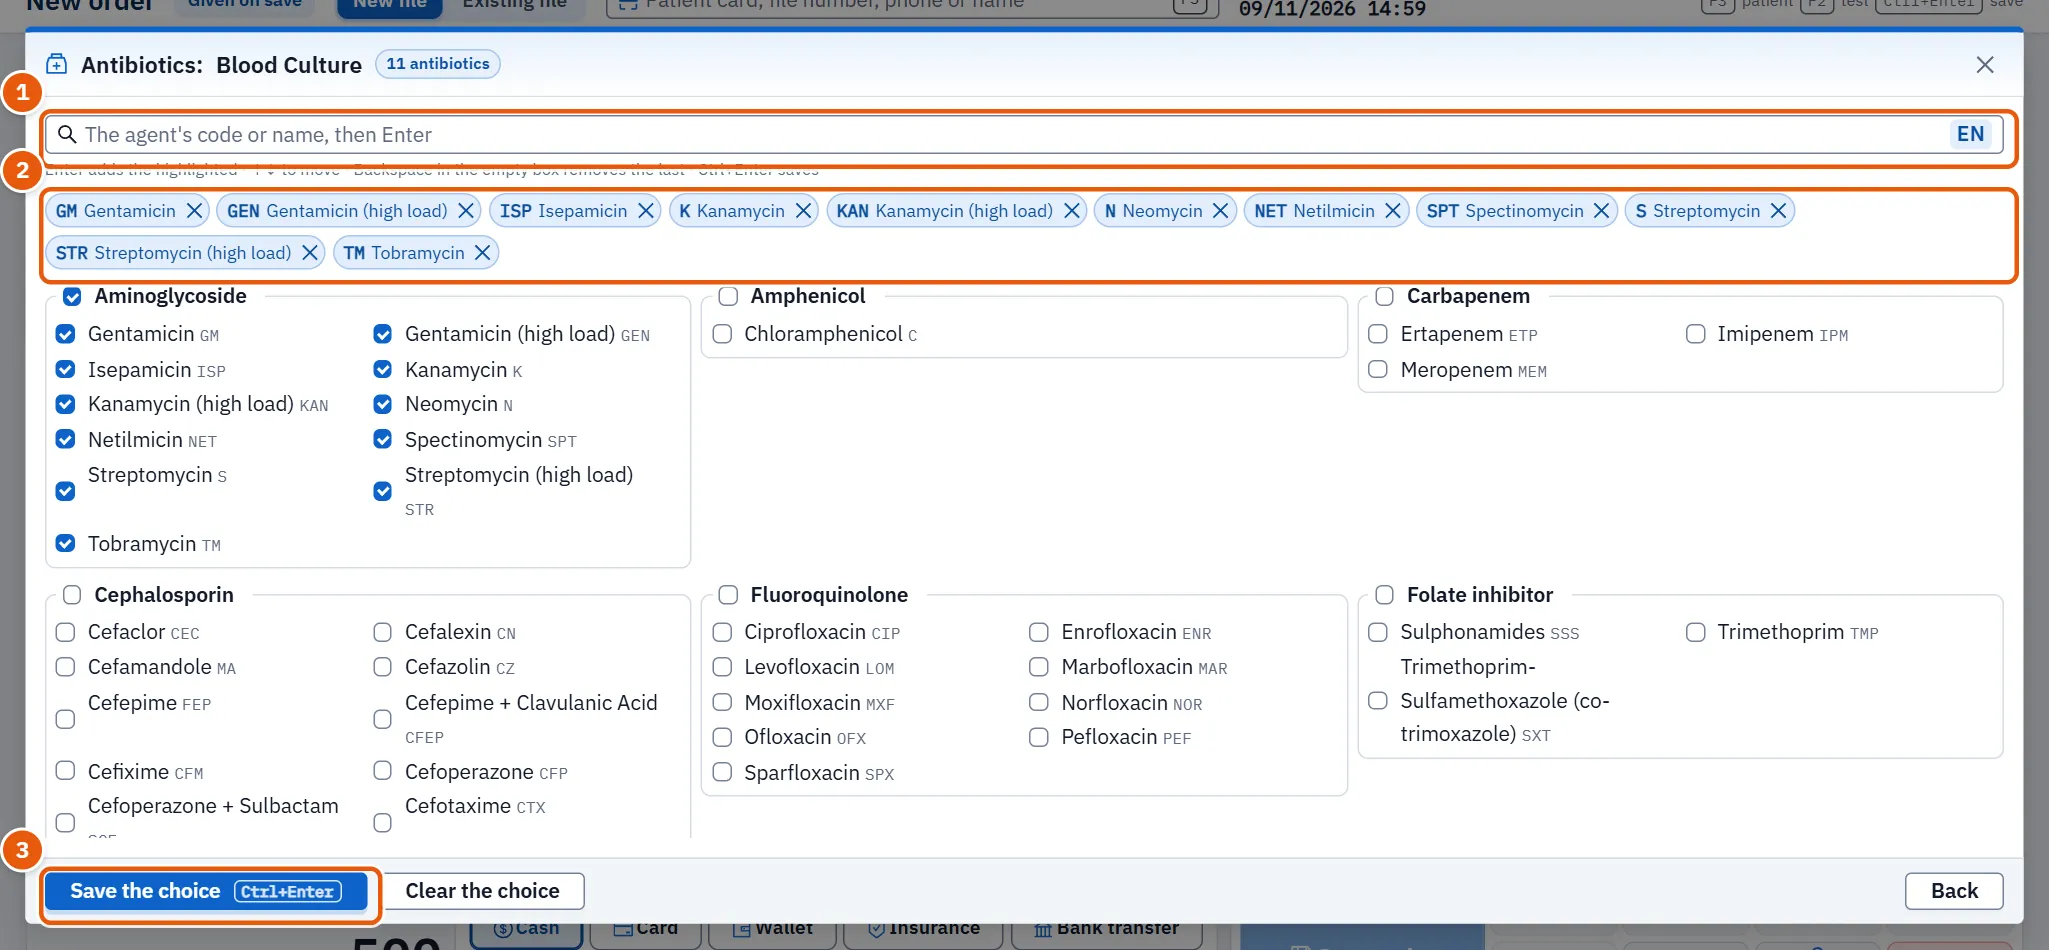
In Antibiotics: the search box takes English letters only; from two letters it lists the matching antibiotics, and Enter adds the highlighted one. The arrows move between matches, Backspace in the empty box takes back the last one, and Ctrl+Enter saves. Antibiotics can also be ticked by class. Press Save the choice, or Clear the choice. If the catalogue defines none, the window says so.
5.10.5 Task 5 — Change a test's price or its external laboratory
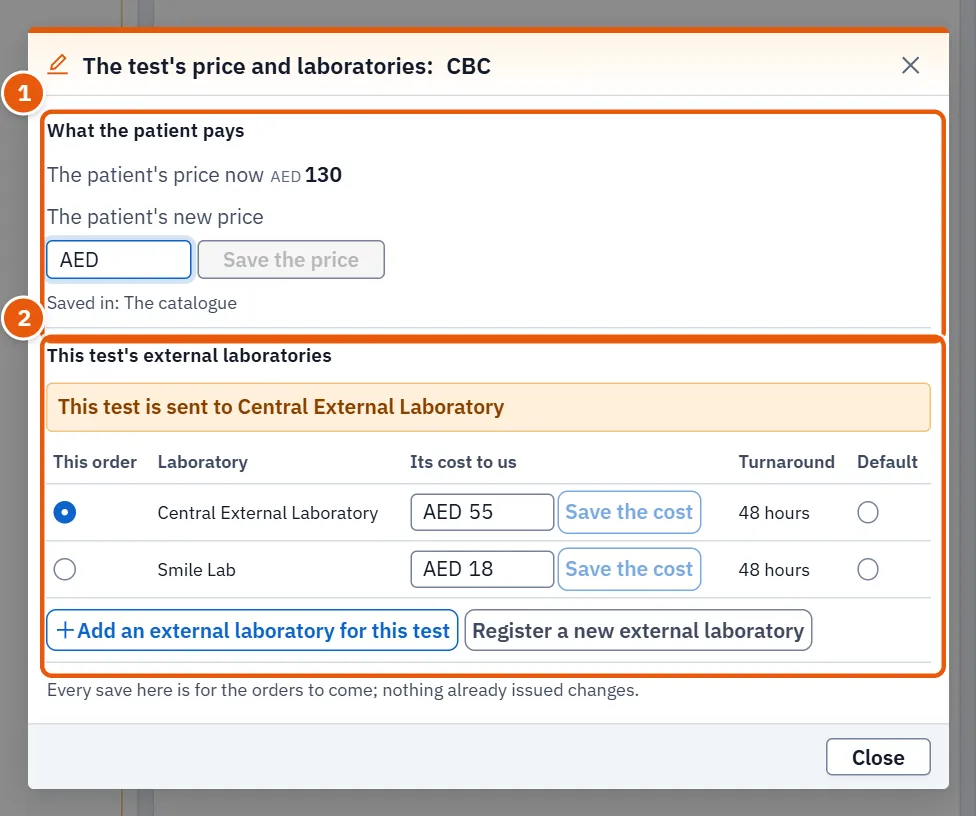
- In the basket press Edit the test's price. The window The test's price and laboratories: opens.
- Under What the patient pays (for whoever may change prices) type The patient's new price and press Save the price. The window says which list the price is saved in.
- For a sent-out test, under This test's external laboratories choose the laboratory for this order. Whoever holds the laboratory-structure right can also write its cost and press Save the cost, make a laboratory the default, and add or register a laboratory.
- To add a laboratory press Add an external laboratory for this test.
Every save here is for the orders to come; nothing already issued changes. The laboratories section is not offered while a saved order is being edited.
If a test is not on the payer's list, or the payer's list prints it on several lines, the basket line asks first: no figure is shown and the order cannot be saved until it is answered. In the window choose The patient pays it in cash, at its base price, or Write its price by hand (recorded with who wrote it and when), or choose the line the payer's paper names. Press Apply.
5.10.6 Task 6 — Collect payment and give a discount

- Read Total, then Due. Taxes and the visit fee appear as lines of the account. A previous balance can be added with its tick, + Previous balance.
- Choose Payment method (the digits 1 to 6 pick one when the cursor is not in a field) and write Collected now. The buttons Full and Later fill it, and Least appears only when a least amount is set below the due. Leave it empty to collect later. Some methods ask for a reference. Enter in the amount saves the order.
- For two methods, add Second payment method.
- For a discount, press Manual discount at the top of the account area. It is offered only to whoever may collect, once the price is known, and only while the manager has left room for a discount.
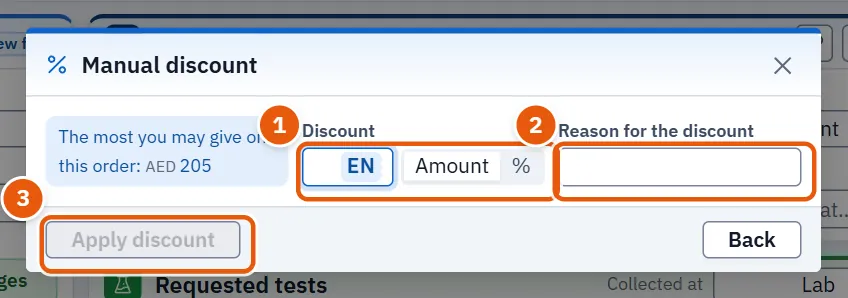
- In Manual discount read The most you may give on this order: (the most you may give, set by your role and the tests' ceilings), write Discount as an amount or a percent (up to 100) and Reason for the discount (up to 200 characters; required), then Apply discount. Remove discount cancels it. A discount beyond the room is refused.
The amount is checked: a number, not more than the total, and not less than the least to collect now. If you have no open shift the screen warns that what you take goes into no shift. Where the payer pays part, Payer share and Contract discount are shown.
5.10.7 Task 7 — Save and what comes after
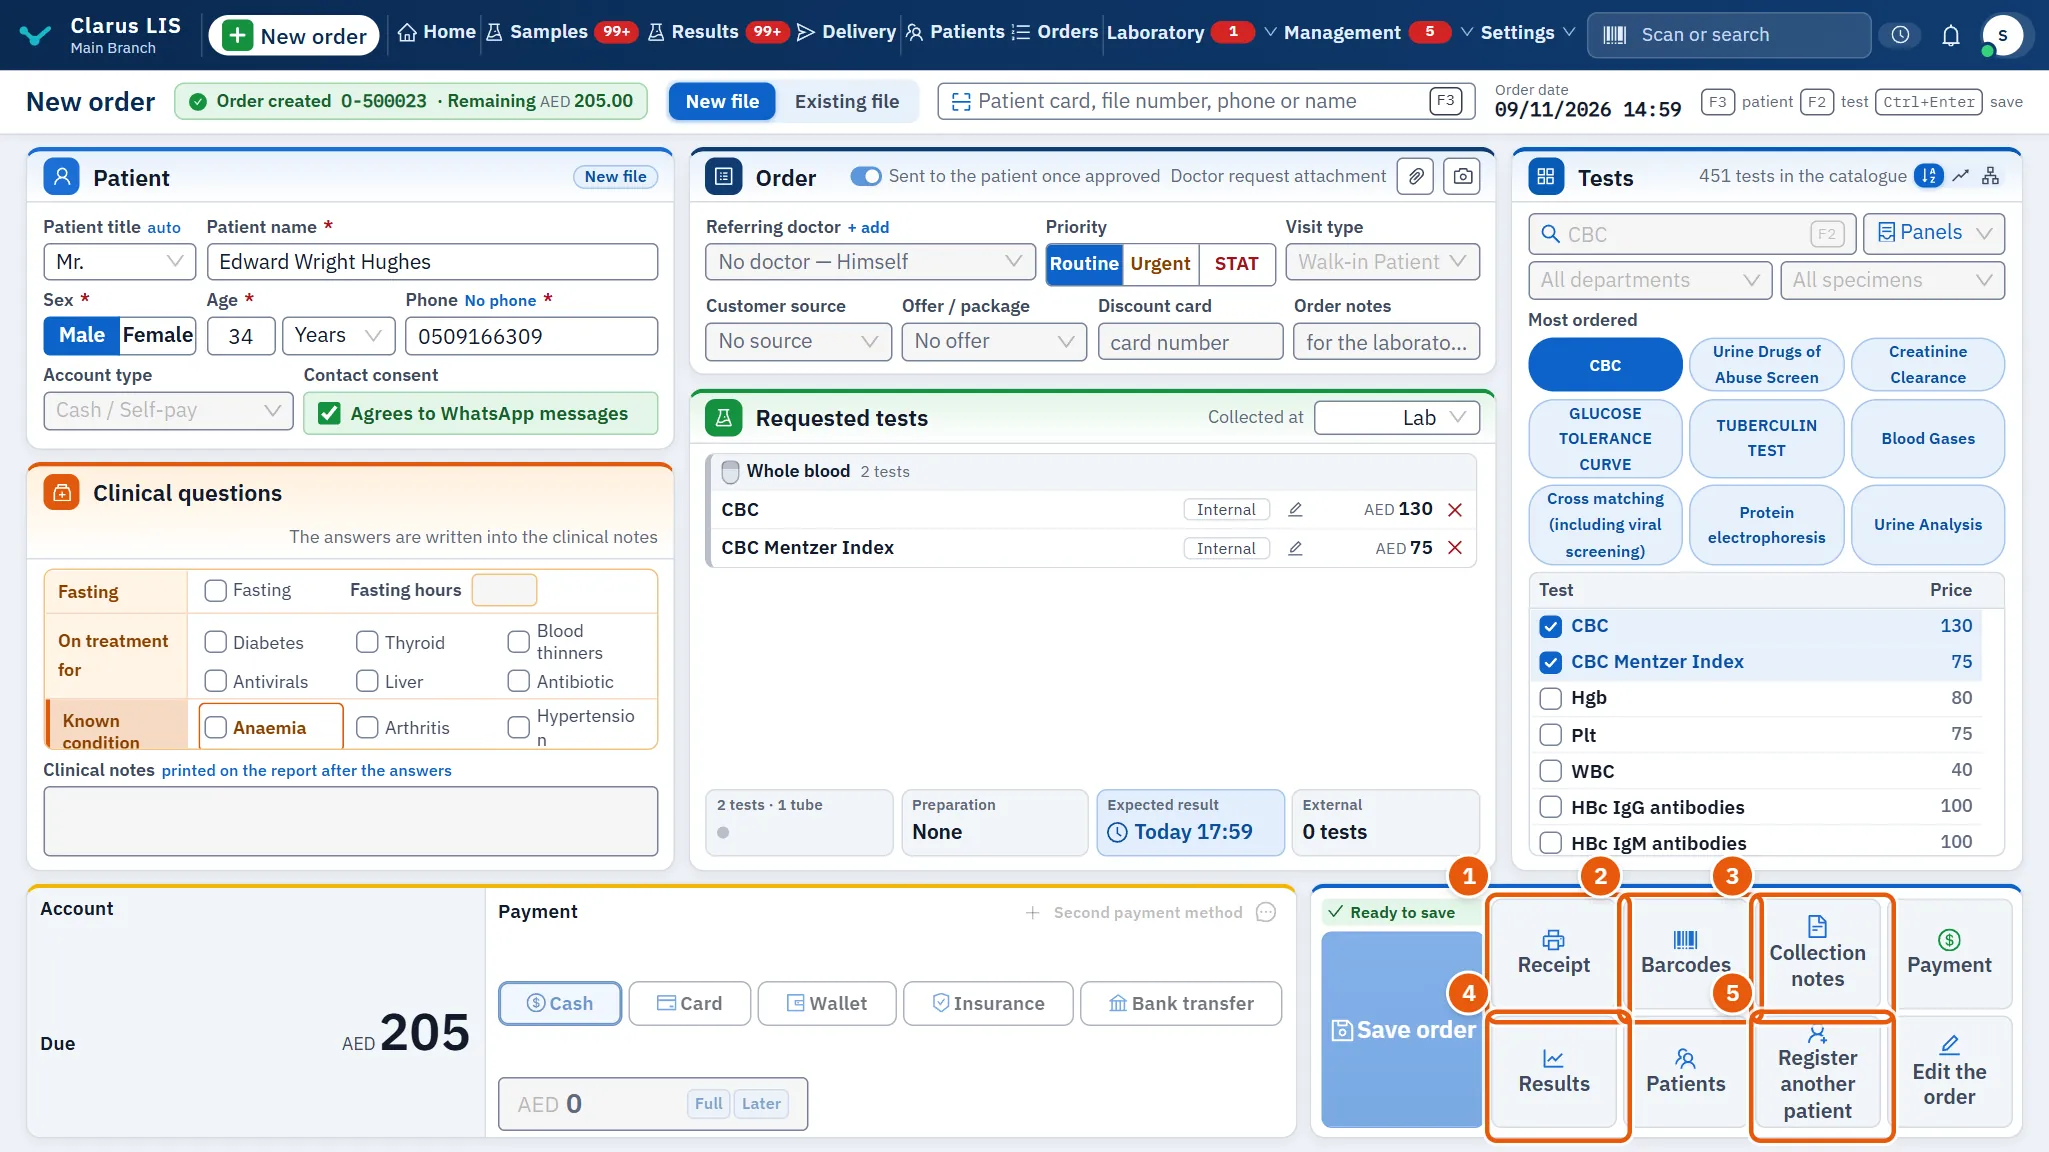
- Look at the line above the save button. It names what is missing (the patient's data, tests, the price, the amount, the member number, the address or the price question); press it to be taken there, and its tooltip gives the whole sentence.
- When it says Ready to save, save (Ctrl+Enter also saves). The order receives its number. Each sample is registered as received.
- After saving, Printed once the order is saved: Receipt, Barcodes and Collection notes. Barcodes are printed by hand, never by themselves.
- Payment opens payment of what remains; it is dim when nothing remains or you may not collect. Results opens the order's results; it is dim without the results rights.
- Register another patient clears the screen for the next patient. The Patients button is dim: its screen is not built in this interface yet.
- Edit the order appears in the place of the cancel button, for whoever may edit orders.
Before saving, the cancel button (Cancel) asks Cancel this order; confirming with Clear the order clears everything on the screen.
5.10.8 Task 8 — Edit a saved order
- Press Edit the order (after saving, for whoever may edit orders). The screen opens the order as Editing order; the patient is fixed and payment is not offered.
- Change what you need: add or remove tests, change the doctor, the account and so on.
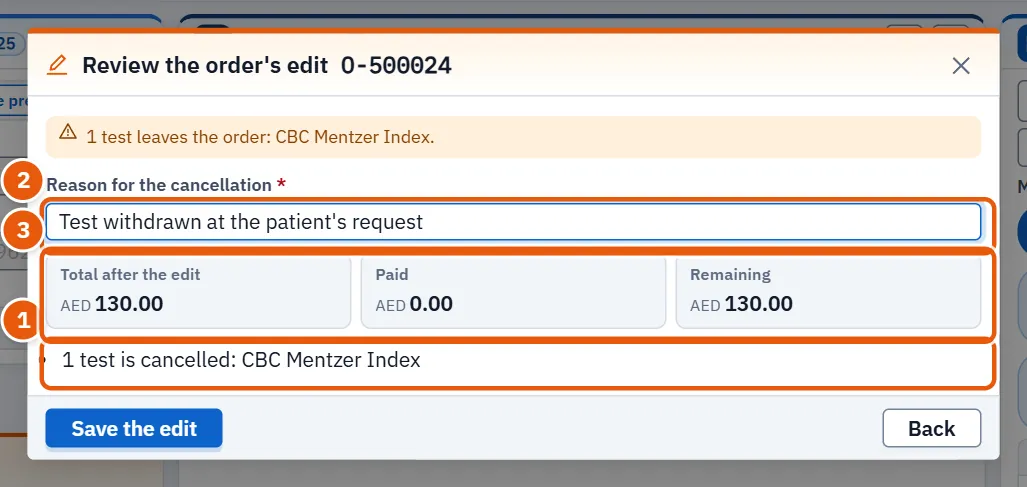
- Press save. If nothing changed the screen says so and nothing is saved. Otherwise Review the order's edit lists what the edit does: tests added or cancelled, tests priced again, new samples and their labels.
- When a test leaves the order, write Reason for the cancellation; the figures appear after it. If a result of a cancelled test was entered and not approved, tick the confirmation too.
- Check Total after the edit, Paid and Remaining, then press Save the edit. Back returns without saving.
- To abandon the edit press Undo the edit; if anything was changed it asks first. Open the order again opens the order again as it is saved (it is also offered when the order changed since you opened it).
A test whose result is already approved or on a report is not cancelled; the screen refuses and names it.
5.11 Messages and what to do
| The screen says | Meaning | What to do |
|---|---|---|
| Cannot save: … | Something is missing | Read the reason given with it |
| The order was not saved | The server refused the order | Read the reason shown, correct and save again |
| The price could not be calculated: … | The price could not be worked out | Press Try again |
| No test has the code or name «…»; nothing was added. | No test has that code or name | Check the spelling |
| The test … (…) is in the catalogue but is not switched on in this laboratory; nothing was added. | The test is off in this laboratory | Open the catalogue if you may, or ask whoever manages it |
| This phone number is one digit repeated: write the patient's real number, or choose «No phone» | The phone is one digit repeated | Write the real number or choose No phone |
| This is not a phone number in the laboratory's country; a foreign number is written with + and its country code | The number is not valid in the laboratory's country | Fix it; a foreign number needs + and its country code |
| The member or card number is required for this account type. | The account type needs a member number | Write it in the coverage details |
| Nothing in the order changed to be saved. | The edit changed nothing | Nothing to save |
| Some sample statuses were not applied. | Some samples were not updated | Check the samples screen |
5.12 See also
Patients (the file shown here), Samples (what the barcodes open), Results and approval (what comes after saving), Prices and contracts (the lists behind the price), Catalogue (switching a test on), Treasury (shifts and payments).