Chapter 8Backup and restore
This chapter is for the support technician and the laboratory's IT administrator. It covers:
- how the program saves the laboratory's data by itself every day, and where it puts the backups;
- how to make sure a backup can really be restored;
- how to keep a second copy off the machine;
- how to restore the laboratory from a backup, on the same computer or on a new one.
It ends with a table of problems and what to do about each, and a routine checklist.
8.1 How the program saves the laboratory
8.1.1 The automatic daily backup
When it is installed, the program creates a daily backup job with the code LOCAL-DAILY. It works like this:
- The job is due at once after installation, so the first backup is taken in the program's first minutes, not the next day.
- The program looks for due jobs every fifteen minutes while the program runs on the server, and takes every backup whose time has come.
- After each successful backup, the next is set twenty-four hours later.
- If the computer was off at the time, the backup is taken at the first check after it starts, so no day is skipped.
The backup runs inside the program itself, not as a separate Windows scheduled task, so nothing is backed up while the program is not running on the server. The program starts by itself, with no window, at every Windows sign-in on the server (see 4.3 How the program starts), so on a server that was restarted and that nobody has signed in to, the program is not running. That is the first thing to check when the page says there is no recent backup (see 8.11 Problems and what to do).
8.1.2 What one backup holds
One backup is a set of files that share a name and are always kept and removed together. The name is the job's code, then the date and time the backup was taken in universal time (UTC). A backup taken on 2026-11-03 at 02:00:00 UTC is named:
| File | What it holds |
|---|---|
LOCAL-DAILY-20261103-020000.postgres.dump | The whole laboratory database: patients, orders, results, invoices, settings, catalogue and users |
LOCAL-DAILY-20261103-020000.manifest.json | The backup's card: the file's fingerprint (SHA-256), when it was taken, and a signature proving this program wrote it |
LOCAL-DAILY-20261103-020000.media.tar.gz | The attachments: uploaded pictures and documents. It is not created when the laboratory has none |
The file is written first under a temporary name ending in .part, then renamed when it is complete. A file ending in .part is an unfinished backup, and nothing is restored from it.
The Download a backup now button gathers the whole set into one file whose name ends in .clarus-backup.zip. That file is the easiest way to carry the laboratory to another computer.
8.1.3 Encryption
Backups are not encrypted by default, and this is deliberate. A backup restores on any computer with no code or key that could be lost. The price is that whoever holds the file can read it. Protecting the medium is therefore the laboratory's responsibility:
- where the external disk is kept;
- who can reach the computer;
- whether the computer's disk is encrypted.
This is the same for every medical system that runs inside the laboratory.
The page says of each backup whether it is encrypted or not encrypted. Where an installation does encrypt its backups, the code that opens them on another computer is the Recovery code (see 8.8 The recovery code).
8.2 Where the backups are kept
Setup puts the backups outside the program's folder and outside the data folder, so neither uninstalling the program nor deleting the data folder can take them:
| Computer | Default backups folder |
|---|---|
| Has a usable fixed drive D | D:\Clarus\Clarus_prime-backups |
| Has no drive D | C:\ProgramData\Clarus\Clarus_prime-backups |
The data folder itself is D:\Clarus\Clarus_prime\data on a computer with a drive D, and C:\ProgramData\Clarus\Clarus_prime\data on any other.
The backups folder is changed on the page, in the field The backups folder on this computer (see 8.5 Keeping, and the backups folder). This is required after restoring a laboratory that came from another computer, because the job still names the old computer's folder.
8.3 The Backups page
Open the page from the Settings menu, then Data and continuity, then the Backups tab. It is seen by users with the Manage settings or Import data from a previous system permission. Taking, verifying and restoring backups need Manage backups.
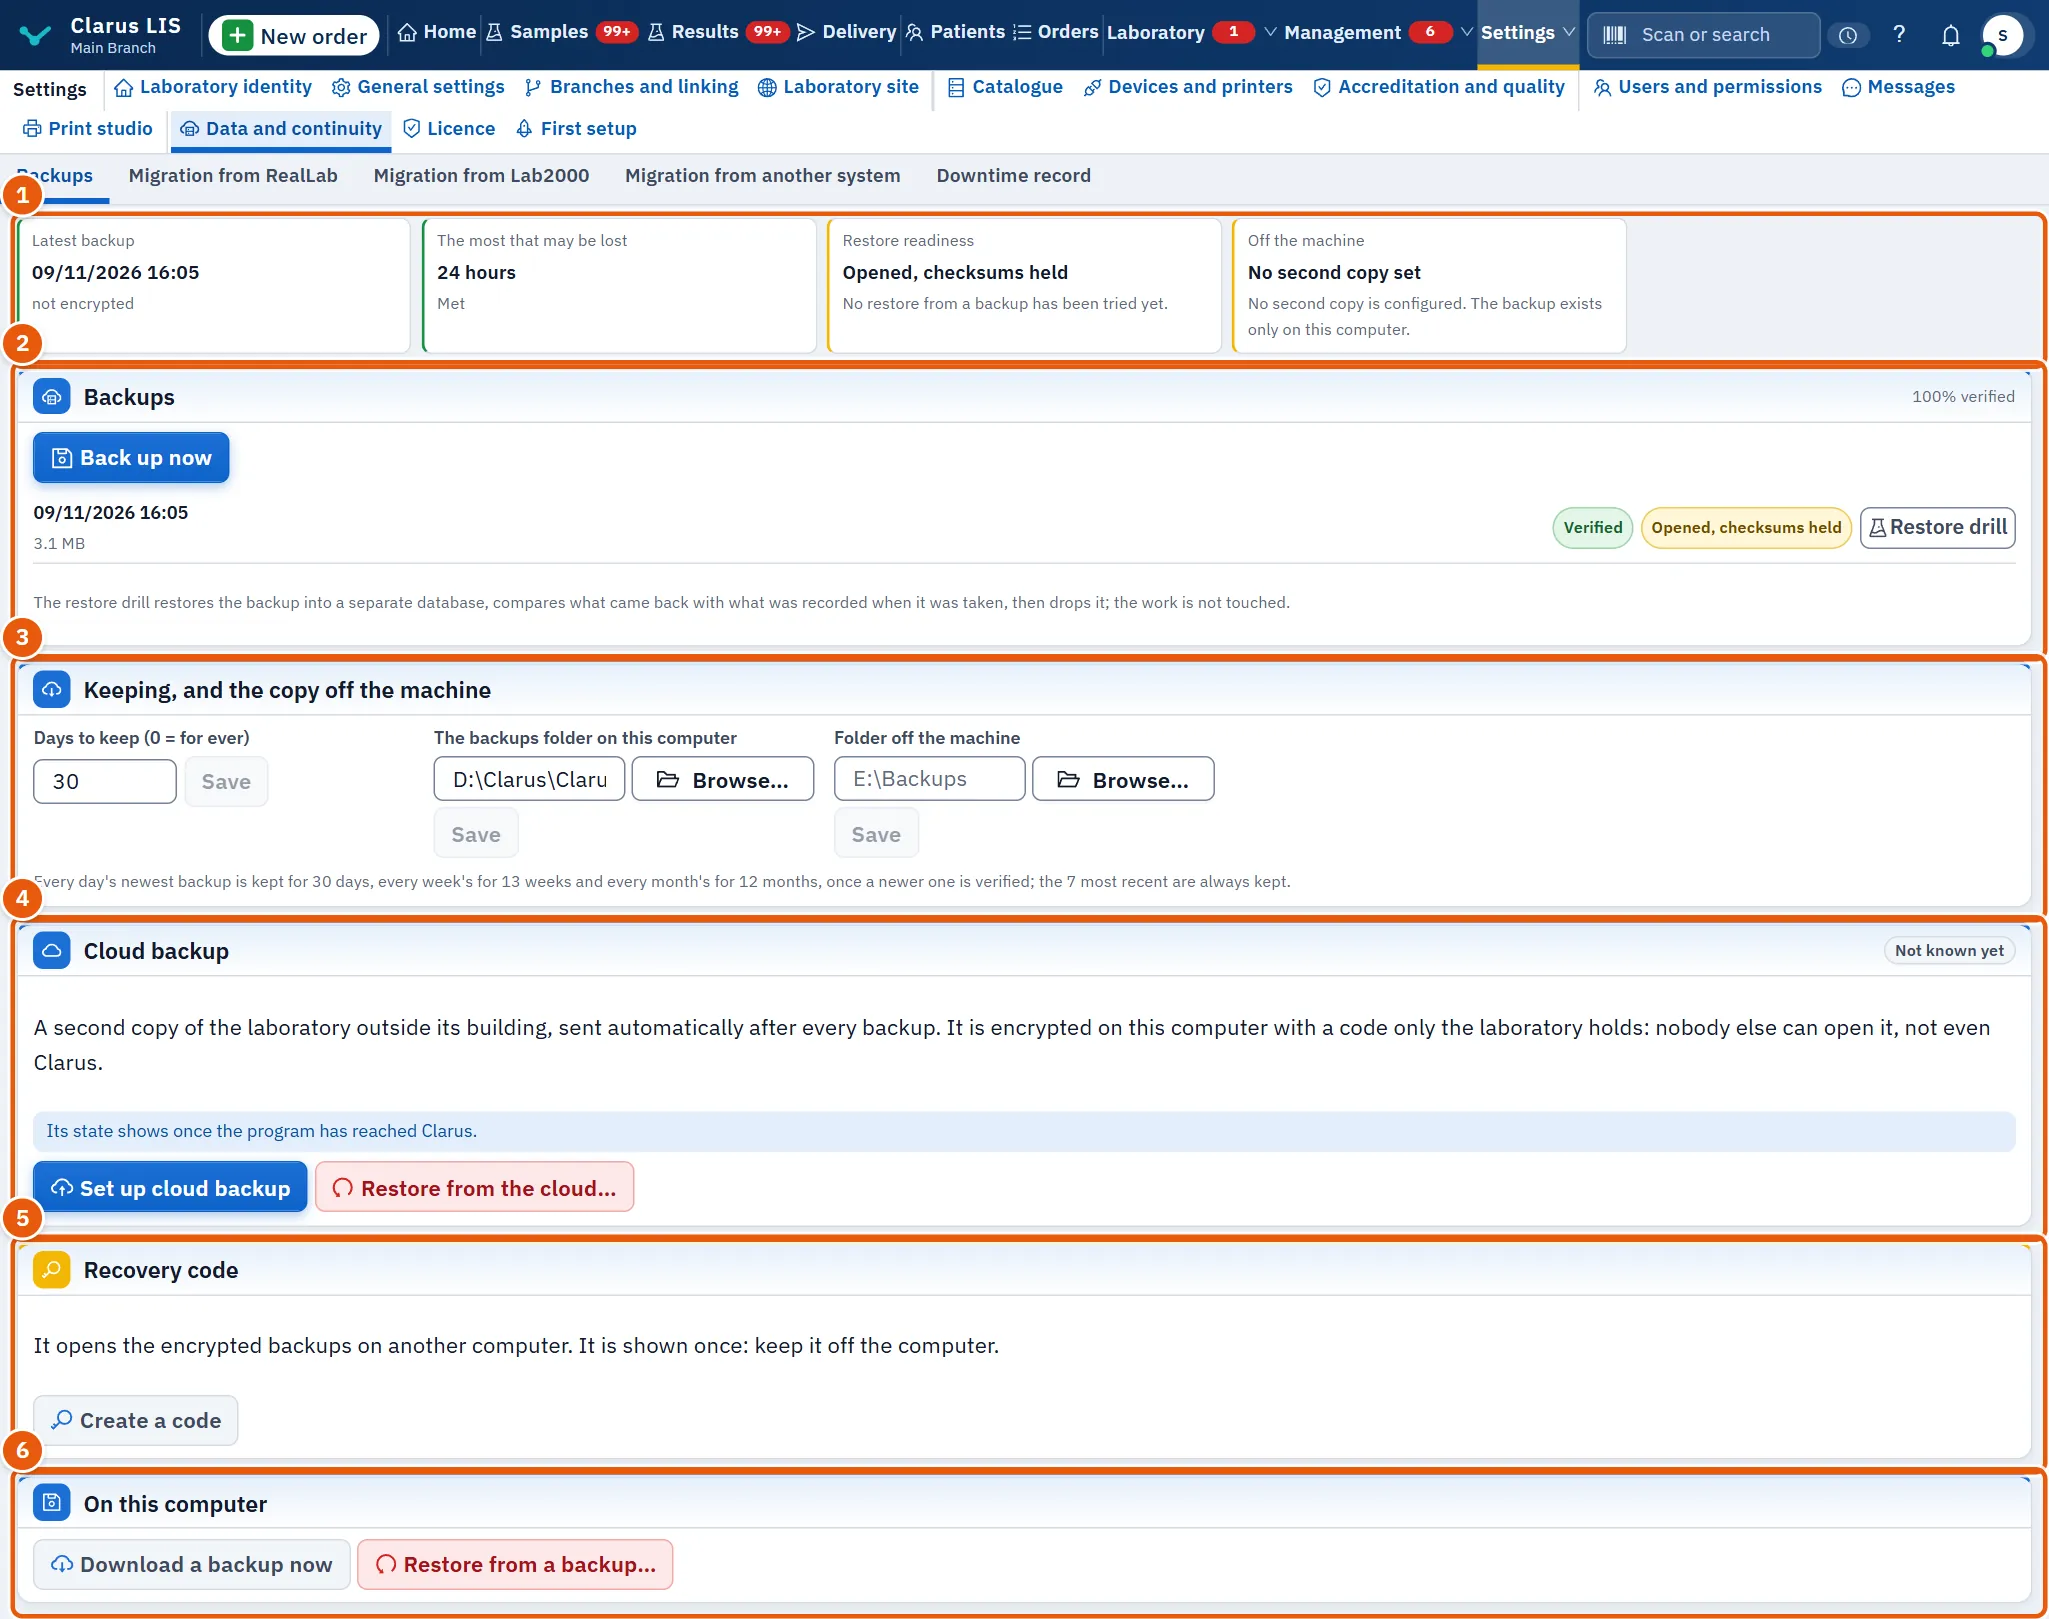
From the top of the page:
- 1 The four facts: the state of protection at a glance.
- 2 Backups: the backups taken, with the buttons to take, verify and drill them.
- 3 Keeping, and the copy off the machine: how long backups are kept, the backups folder and the second copy.
- 4 Cloud backup: the paid service for a copy outside the building.
- 5 Recovery code: to open encrypted backups on another computer.
- 6 On this computer: download a backup now, and restore from one.
8.3.1 The four facts

| Fact | What it means | When to worry |
|---|---|---|
| 1 Latest backup | When the latest successful backup was taken, and whether it is encrypted | When it reads No backup yet, or the date is more than a day old |
| 2 The most that may be lost | The most work that may be lost: twenty-four hours, that is, one backup a day at least | When Not met: no recent backup shows under it |
| 3 Restore readiness | Whether restoring a recent backup has been tried, and passed | When it reads Restore not tried or Restore drill failed |
| 4 Off the machine | The folder a second copy goes to, and whether it can be reached now | When it reads No second copy set, or the folder cannot be reached |
Each fact's colour sums it up: green is sound, yellow needs attention, red needs action now.
When free space on the disk runs low, a note says so above the list of backups:
- Warning: at ten gigabytes or less, or at 15 % or less of a disk of fifty gigabytes or less.
- Critical: at three gigabytes or less.
- Emergency: at one gigabyte or less. The note then says that the database is about to stop.
8.3.2 The list of backups

The list shows the latest twelve backups. Each has a line with its time, its size and whether it is encrypted, and its status badges:
- Verified, Not verified or Verification failed: the result of the verification.
- Restore drill passed or Restore drill failed: the result of the restore drill, if one was run.
- A backup that could not be taken carries a single red badge, and is not counted as a backup.
The list's buttons:
- 1 Back up now: takes a backup at once, outside the schedule. Use it before any large piece of work: an update, a migration, a restore or a move.
- Verify it: shown on every successful backup not yet verified (see 8.4 Verification and the restore drill).
- 3 Restore drill: shown on every successful backup (see 8.4.2 The restore drill).
Line 2 is the newest backup. The head of the list gives the share of backups that are verified.
8.4 Verification and the restore drill
Between "a backup was taken" and "it can be restored" lie two steps, each with its button.
8.4.1 Verification
The Verify it button checks the backup where it lies, three ways, and changes nothing:
- The file's fingerprint (SHA-256) is still the one written on its card when it was taken, so not one byte of it has changed.
- The card's signature is valid, so this program wrote the card and nobody edited it.
- The database can read the backup's index.
Success turns the badge to Verified. Verification alone does not prove that a restore would succeed: that is the drill's work.
8.4.2 The restore drill
The Restore drill button really restores the backup, but into a separate temporary database whose name begins with clarus_restore_drill_. It counts the rows of the tables and compares them with what was recorded when the backup was taken, then drops the temporary database. The laboratory's work is not touched at any moment.
- When every count matches, the message says the drill finished and every count matched, with the number of rows and tables, and Restore readiness turns green.
- When they do not match, the message reads "The drill finished, and the restored copy did not match what was recorded when it was taken.". That backup cannot be relied on: take a new one and drill it, and if it fails again follow 8.11 Problems and what to do.
- The drill may be handed to the system task and run in the background. The message then says so, and the result shows on the backup a few minutes later, once the page is reloaded.
8.5 Keeping, and the backups folder

The card has three fields, each with its Save button:
- 1 Days to keep (0 = for ever): how many days backups stay before the oldest are removed.
- 2 The backups folder on this computer: where the daily backups are written.
- 3 Folder off the machine: the second copy's folder (see 8.6 The second copy off the machine).
The rule for keeping:
| Value | What is kept |
|---|---|
| Nothing chosen (the default) | One backup a day for thirty days, then one a week up to thirteen weeks, then one a month up to twelve months |
| A number | The backups newer than that many days |
| 0 | Every backup; nothing is ever removed |
Two floors no choice can go below:
- at least seven backups are always kept;
- no backup younger than seven days is removed.
So typing "1" cannot leave a laboratory with only the one backup taken this morning. Old backups are removed after each successful backup, a whole set at a time, so a database is never left without its card.
8.6 The second copy off the machine
A backup on the computer itself does not protect against its disk failing or its theft. In the field Folder off the machine, set a folder on one of these:
- an external disk attached to the computer, such as
E:\Backups; - a shared folder on another computer on the network, such as
\\NAS\ClarusBackups.
Then press Save.
The folder then works like this:
- After every successful backup, the newest is copied there automatically.
- The folder is named in the fourth fact, Off the machine.
- "Available" means the folder exists and can be reached now. When the external disk is unplugged it is not available, and nothing is copied to it until it returns.
- Copy the latest backup there now copies the latest backup there at once, for instance when the external disk is plugged in again after an absence.
8.7 Cloud backup

Cloud backup is a paid service, bought from the card itself. It gives:
- a second copy outside the building, sent automatically after every backup;
- encrypted on the laboratory's computer before it leaves, with a code only the laboratory holds, so nobody else can open it, not even the company.
Before it is switched on, the program shows the service's terms, and the service does not run until the laboratory agrees to them:
- what leaves the computer: the backup, encrypted; its size; when it was taken; and this copy of the program's licence;
- the copy is health data and may be kept outside the laboratory's country, so the service is switched on only where the country's rules allow health data to leave it;
- the code is the only key: if it is lost together with the computer, nobody can open the copies;
- the copies are deleted thirty days after the service ends.
To switch it on:
- Press Set up cloud backup, read the terms, and tick I have read this and I agree.
- Press Create the code. Write down the code shown, or save it with Save the code as a file on a medium kept away from the computer.
- Type the code's last group to confirm, then press Switch cloud backup on.
Once it is on, the card shows:
- the last cloud copy, the number of copies kept and the space used;
- the result of the last Restore drill from the cloud.
Its buttons send a copy now, drill a restore from the cloud, restore from it, stop sending, and delete every cloud copy.
8.8 The recovery code

The Recovery code opens encrypted backups on another computer:
- 1 Create a code creates the code and shows it once; the program does not keep it.
- Write the code down and keep it off the computer, then press I have kept it.
- Creating a new code with Create a new code makes the previous one useless.
No code is needed while the backups are not encrypted, which is the default (8.1 How the program saves the laboratory).
8.9 Restoring from a backup
A restore replaces all of the laboratory's current data with the backup's. That is why it is never a single button but a red window that asks for the laboratory's name.
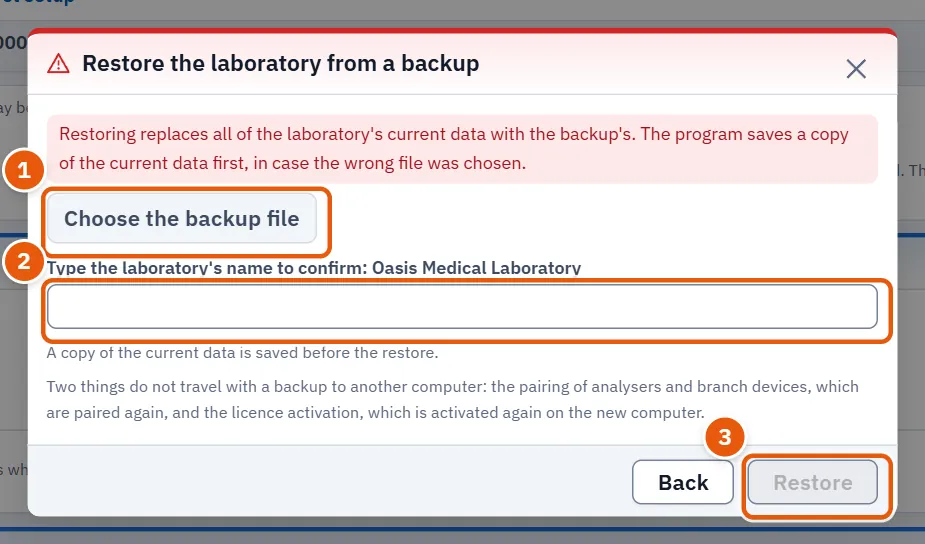
The steps:
- If the program is working, press Back up now first, so that you hold a copy of things as they are now.
- Press Restore from a backup in the On this computer card.
- 1 Press Choose the backup file and choose the file. The program accepts a
.clarus-backup.zipfile, a.postgres.dumpfile from the backups folder, or an export file from an earlier version. - 2 Type the laboratory's name as it is written above the field. If the laboratory has no name in Laboratory identity, write it there first.
- 3 Press Restore, and do not close the program until it finishes.
Before it starts, the program saves a safety copy of the current data, and never deletes it. If the wrong file was chosen, the data comes back from that copy.
After the restore the page reloads by itself, except in two cases, where the window stays open and says what happened:
- A file without attachments: the database came back, but the file chosen carries no pictures or documents. Choose the
.clarus-backup.zipfile to restore them. - An old export, salvaged: the program lists what came back from it and what did not, table by table, so no part of the laboratory is restored in silence.
Two things do not travel with a backup to another computer, and are done again on the new one:
- the pairing of analysers and branch devices, which are paired again as the analysers chapter describes;
- the licence activation, which is activated again as the licence chapter describes.
8.10 Moving the laboratory to a new computer
There are two ways. Both start from a recent, verified backup taken on the old computer.
8.10.1 The first way: through Setup
- On the old computer, press Back up now and then Verify it, then copy the whole backups folder to an external disk.
- On the new computer, copy the folder to
D:\Clarus\Clarus_prime-backupsbefore running Setup. - Run Setup. When it finds the data or the backups of an earlier installation it shows the page "A laboratory already on this computer", with three choices:
- use the laboratory's data found;
- restore the newest backup, naming its file;
- start a new laboratory, leaving the earlier data where it is.
- Choose "Restore the newest backup" and finish the installation.
Setup looks for the newest non-empty *.postgres.dump file in the backups folders on every fixed drive, and in the backups folder under ProgramData. Nothing is deleted, whichever is chosen.
8.10.2 The second way: from inside the program
- On the old computer, press Download a backup now and save the
.clarus-backup.zipfile on an external disk. - Install the program on the new computer as a new laboratory.
- On the Backups page, restore from the file as in 8.9 Restoring from a backup.
This way carries the attachments with the database in one file.
8.10.3 After the move, whichever way was used
- Activate the licence on the new computer.
- Pair the analysers and branch devices again.
- Correct The backups folder on this computer if it still names the old computer's folder.
- Set the second copy's folder again.
- Take a backup, then run Restore drill on it.
8.11 Problems and what to do
| What shows | Likely cause | What to do |
|---|---|---|
| No backup yet an hour after installation | The program is not running on the server, or the backups folder cannot be written to | Make sure the program is running on the server, then press Back up now and read the refusal if one appears |
| Not met: no recent backup | No successful backup for more than twenty-four hours | Read the last line of the list: a failed backup carries a red badge. The usual causes are a missing folder, a full disk, or a computer left off for long |
| A red badge on a backup | It could not be taken, and nothing was written | Correct the cause and take a new backup. A backup still "running" after six hours is closed as failed by itself, and its temporary file removed |
| Verification failed | The file changed after it was taken, was damaged on the disk, or its card was edited | Do not rely on this backup. Take a new one and verify it; if it happens again, check the disk |
| Restore drill failed | The restored copy does not match what was recorded when it was taken | Take a new backup and drill it. If it fails again, raise a case with support, giving the backup's time |
| The drill refused for lack of permission | The database administrator account is not set up | Run Setup again over the same installation |
| Off the machine not available | The external disk is unplugged, or the shared folder cannot be reached | Plug the disk in again, then press Copy the latest backup there now |
| A free-space note above the list | The disk is filling up | Move old backups to another medium, shorten the keeping, or move the backups folder to a larger disk |
| A message on restoring that the file holds no backup | The file chosen is not one of the program's backups | Choose the file whose name ends in .clarus-backup.zip |
| The database came back without attachments | The file chosen carries no pictures or documents | Restore again from the .clarus-backup.zip file |
8.12 A routine checklist for the technician
At every visit:
- Latest backup is less than a day old, and The most that may be lost reads Met.
- The latest backup is Verified.
- Off the machine is set and available.
Once a month:
- Restore drill on the newest backup, with the result Restore drill passed.
- The free space on the backups disk is enough for at least thirty more days.
After every update, move or restore:
- A new backup, verified, then drilled.
- The backups folder and the second copy's folder point to the right places on this computer.