Chapter 31Devices and printers
Menu: Devices and printers. Address: /setup/devices.
31.1 What this screen is for
This is where the laboratory tells the program which analyzers it owns, how each one talks to the computer, and which of the analyzer's test codes mean which of the laboratory's tests. It is also where the stations (the computers that serve an analyzer or a printer) are paired, and where each station is told which printer to use for labels, receipts and reports.
The screen has four pages, chosen by the bar The devices' pages: Analyzers, Test codes, Stations and printers and Library. The most important result of getting this screen right is simple: a result an analyzer sends lands on the right tube and the right test, with nobody retyping it.
31.2 Who sees it
| You can… | …if your role holds |
|---|---|
| Open the screen and use all four pages | Manage devices |
| See the analyzer's messages in full, with the patient's data (otherwise they are shown with the data hidden) | Read patient files |
The menu hides the screen from everyone else. The Test message command under More is offered only to Clarus's own support engineer; no laboratory role holds that right, so you will not see it.
31.3 The screen in a glance
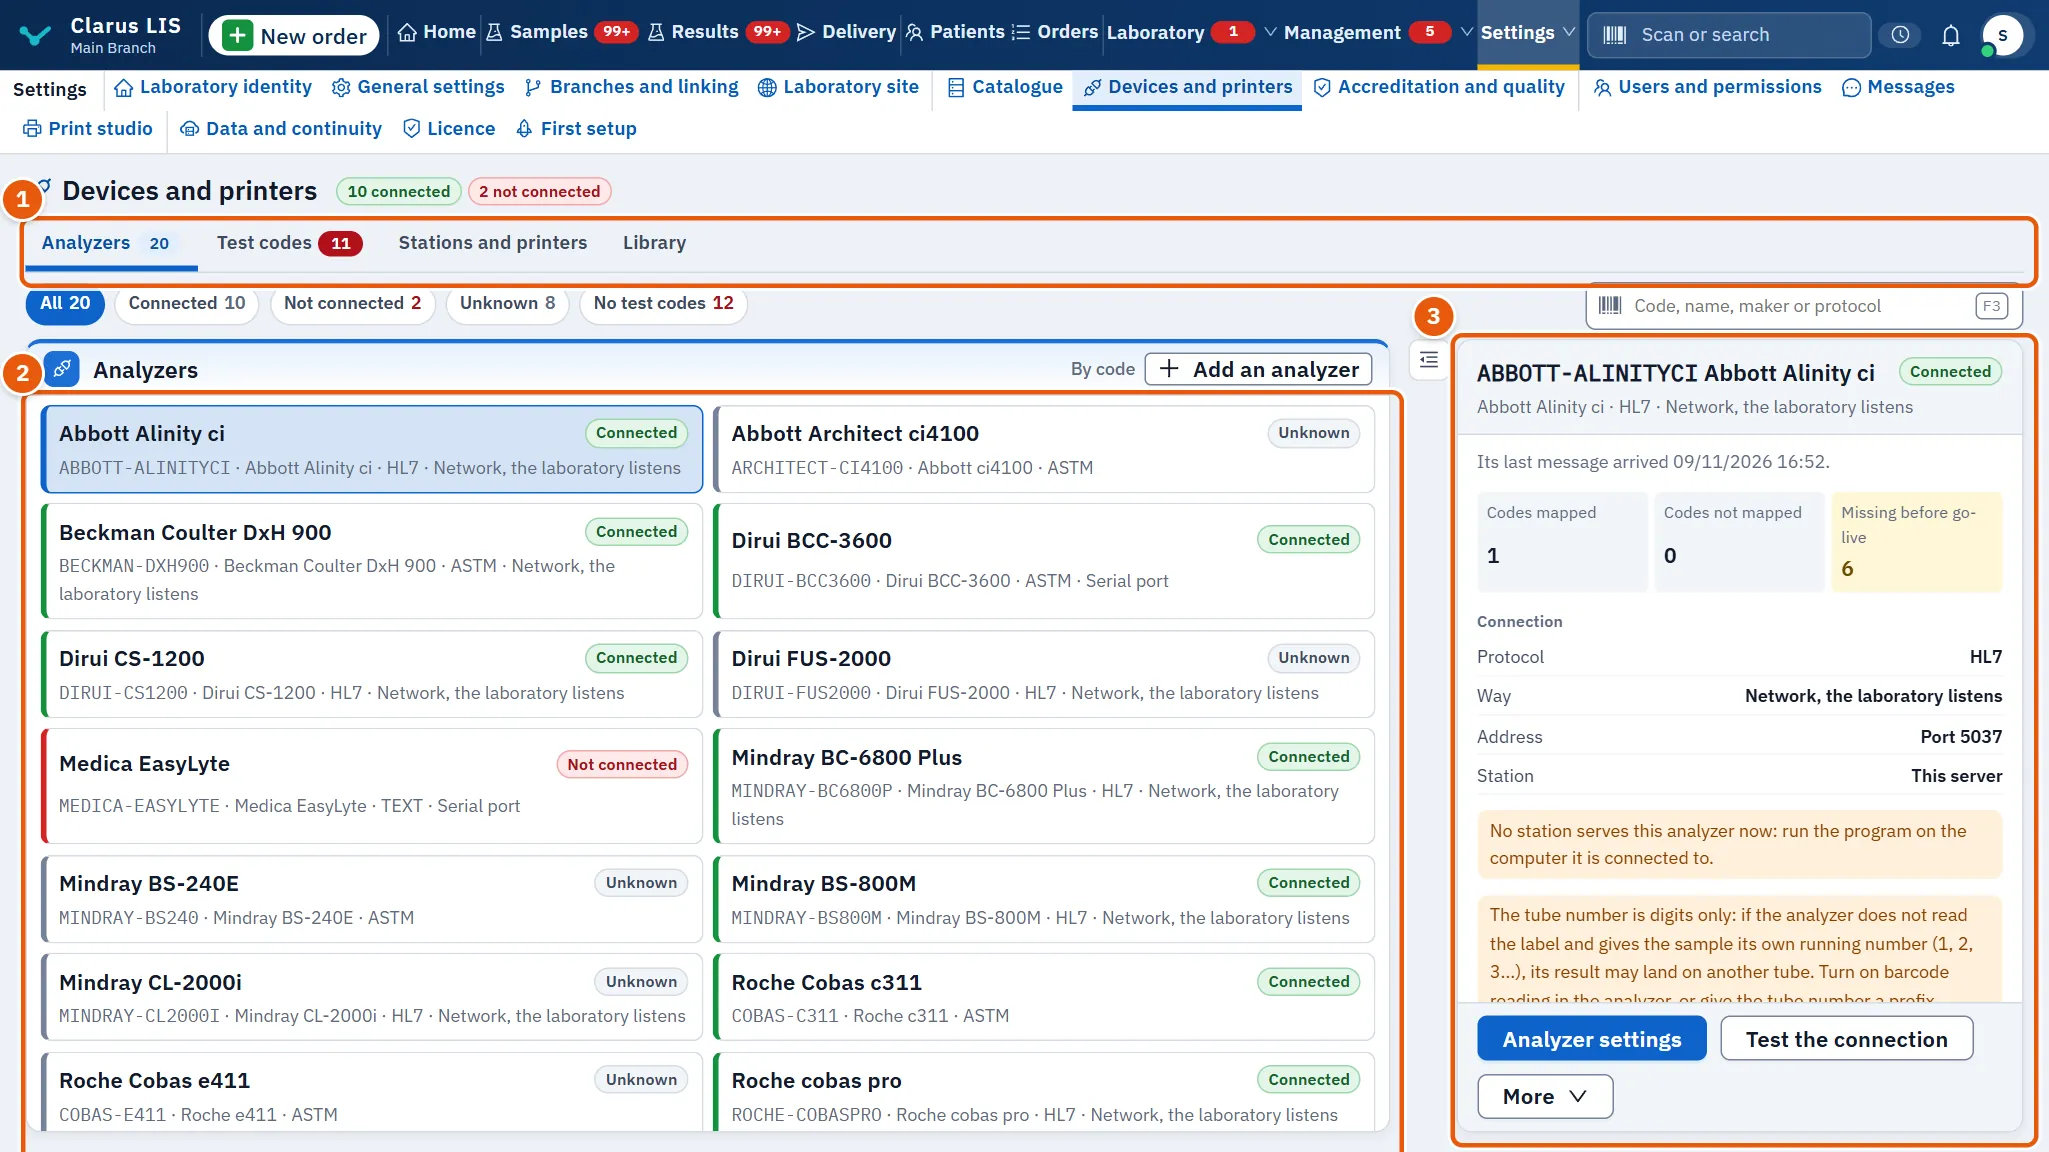
- The pages bar and, beside the title, how many analyzers are Connected and how many are not.
- The fleet: one card per analyzer, with the state filters and a search box.
- The chosen analyzer: its buttons, its link now, its figures, its connection, its work orders and flags, and its codes.
About the analyzers in the pictures. The analyzers shown in this manual's pictures are examples, from several makers and of several kinds. Any analyzer that speaks ASTM or HL7, or that exports its results as files, is linked the same way: you choose its way of connecting on its card.
31.4 The Analyzers page
31.4.1 The list
| Element | What it does |
|---|---|
| Search box | Finds an analyzer by its code, name, maker, protocol or connection. |
| Devices' state | All, connected, not connected, or No test codes. |
| Add an analyzer | Opens a blank Analyzer settings window. |
| A card | The analyzer's name and code, the maker and the way it connects, and a tag: Connected, Not connected or Unknown. Press it to choose it. |
If the laboratory has no analyzer yet the page says so: No analyzer is registered in this laboratory yet..
31.4.2 The chosen analyzer
| Element | What it does |
|---|---|
| Analyzer settings | Opens the settings window (see 31.9.1 Task 1 — Add an analyzer). |
| Test the connection | Asks the analyzer's station to try to reach the analyzer and shows what it found (see 31.9.4 Task 4 — Test the connection). |
| More | Save the link file, Open a link file, and Test message (Clarus support engineer only). |
| The sentence under the buttons | Why the link is called connected or not: when its last message arrived, or that the station is up but the analyzer itself has sent nothing, or that nothing has arrived yet. |
| Codes mapped, Codes not mapped, Missing before go-live | Three figures. A figure that needs attention is marked. |
| Connection | Protocol, Way, Address, the analyzer's own address when there is one, and Station: A paired gateway station or This server. |
| Missing before go-live | What still stands between this analyzer and going live (for example Test codes mapped, Validation on site, A rollback plan). Complete what is missing in «Analyzer setup» opens the settings. |
| The device's mapped codes and Codes that arrived unmapped | The first twelve of each. |
Below these the page may show more sections, depending on the analyzer: Work orders (what was sent to it and what came back), Analyzer flags, Device lists (only for a POCT1-A analyzer), Results files (only for an analyzer that writes a file) and Rack positions.
31.5 The link: what the analyzer sends
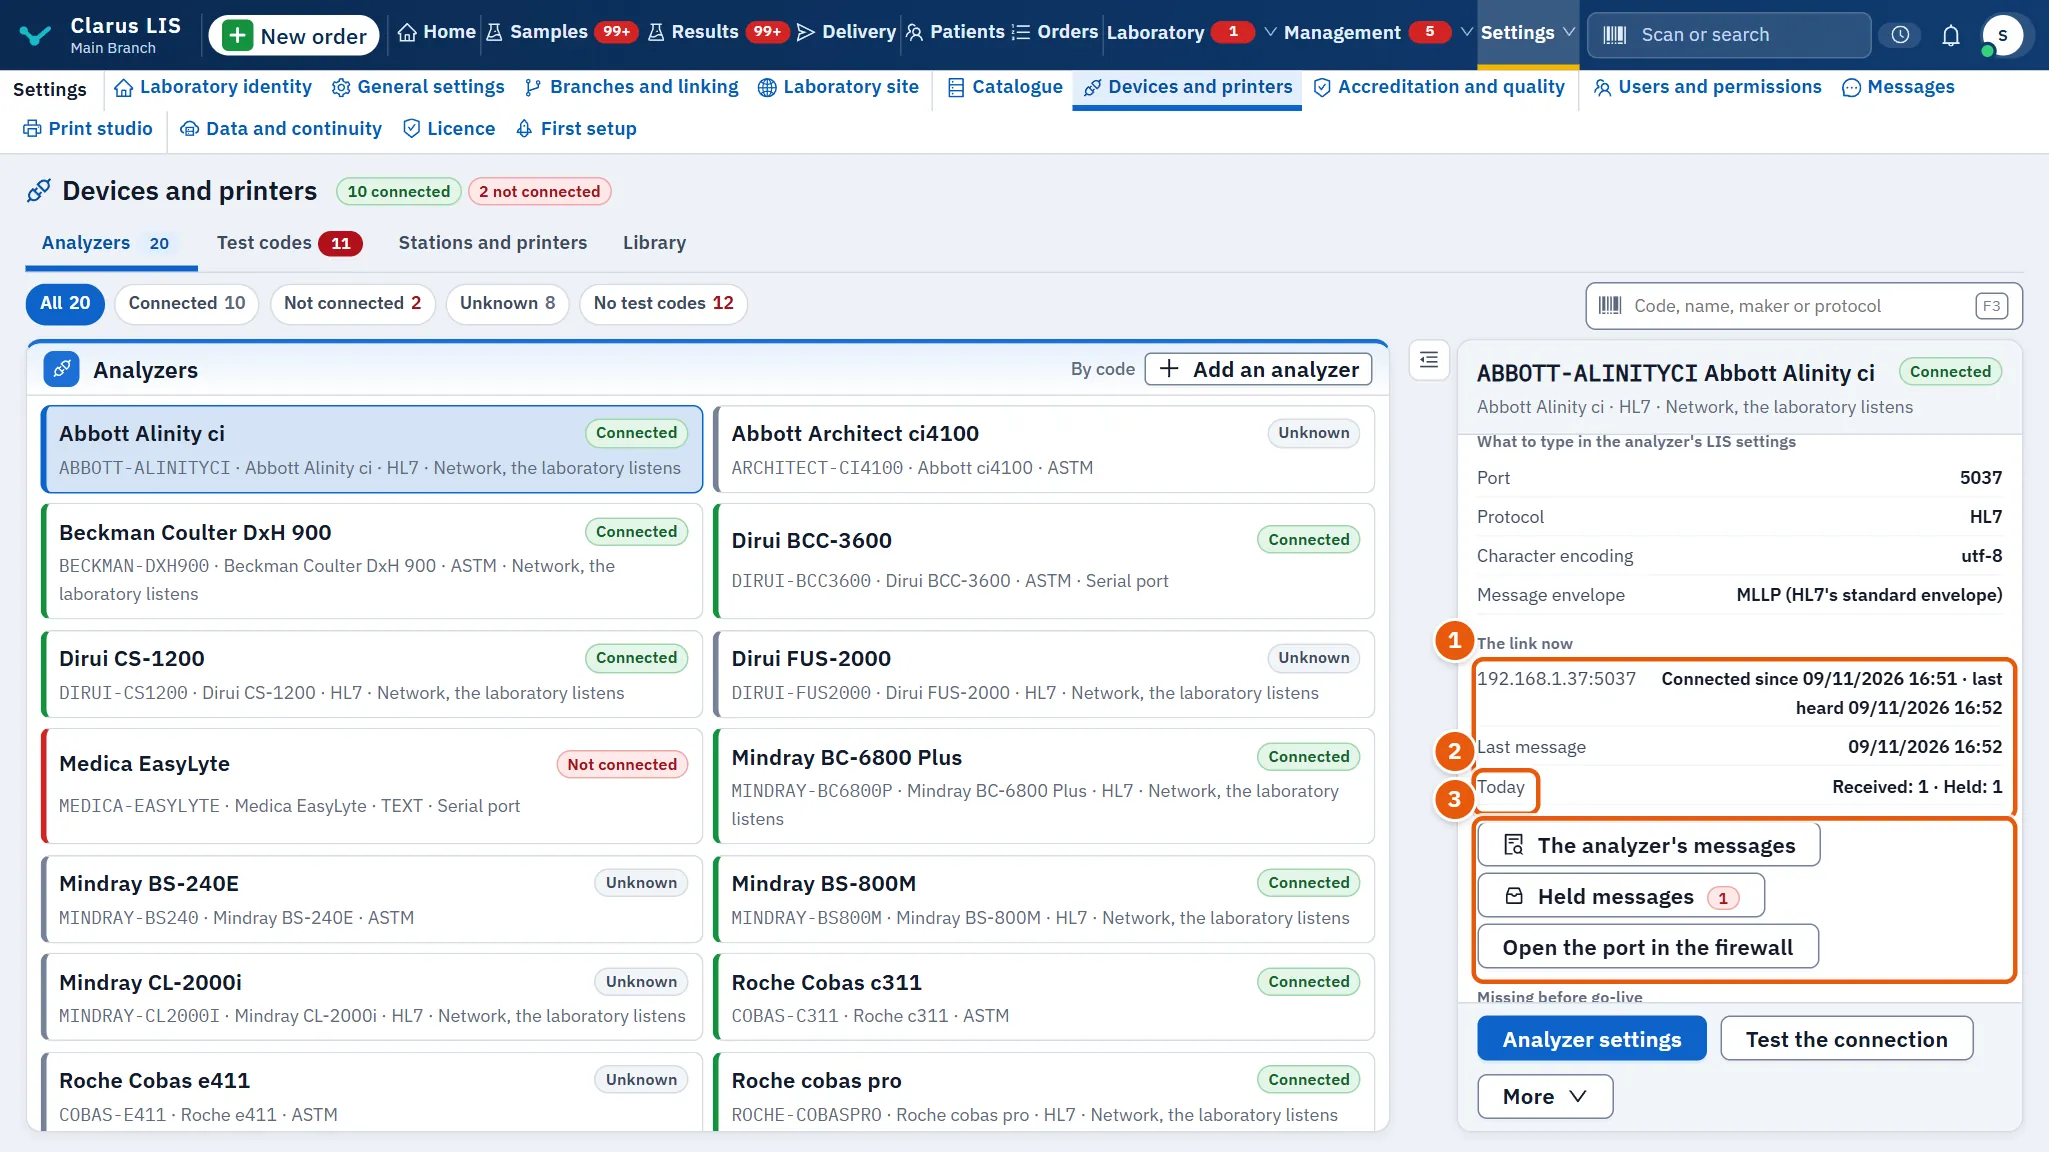
Under the connection the card The link now shows whether a link is open. With one open it says Connected since … · last heard …; with none, No link open now. It also shows Last message, Today (received and held counts), The station serving it, and What to type in the analyzer's LIS settings: the address and port, or the serial settings, to type in the analyzer's own LIS menu.
| Element | What it does |
|---|---|
| Link log | The latest eight events of the link, in words: Connected, Disconnected, Started listening, The analyzer could not be reached, The port is taken, The folder is missing, Files filed, and so on. |
| The analyzer's messages | What the analyzer sent and what was sent to it (Received or Sent). View chooses Patient data hidden or Complete; without the right to read patient files only the first is available. |
| Held messages | Rows the analyzer sent that could not be filed, each with its reason. Choose rows, fix the cause, then Process again. |
| Keep the value typed by hand | For a held row whose value someone has since typed by hand: keeps the typed value and settles the row. |
| Open the port in the firewall | Asks Windows to open the analyzer's port on the computer serving it. Shown only for an analyzer that connects to the program (the program listens). |
31.5.1 Why a message is held
A message is held when the program could not tell which tube or which test it belongs to: a code nobody mapped, or a sample number that matches no tube. Nothing is lost; the row waits. Map the code on the Test codes page, or correct the sample number in the settings, then choose the rows and press Process again. The result Filed: … · Still held: … tells you how many were filed and how many are still held.
31.6 The Test codes page
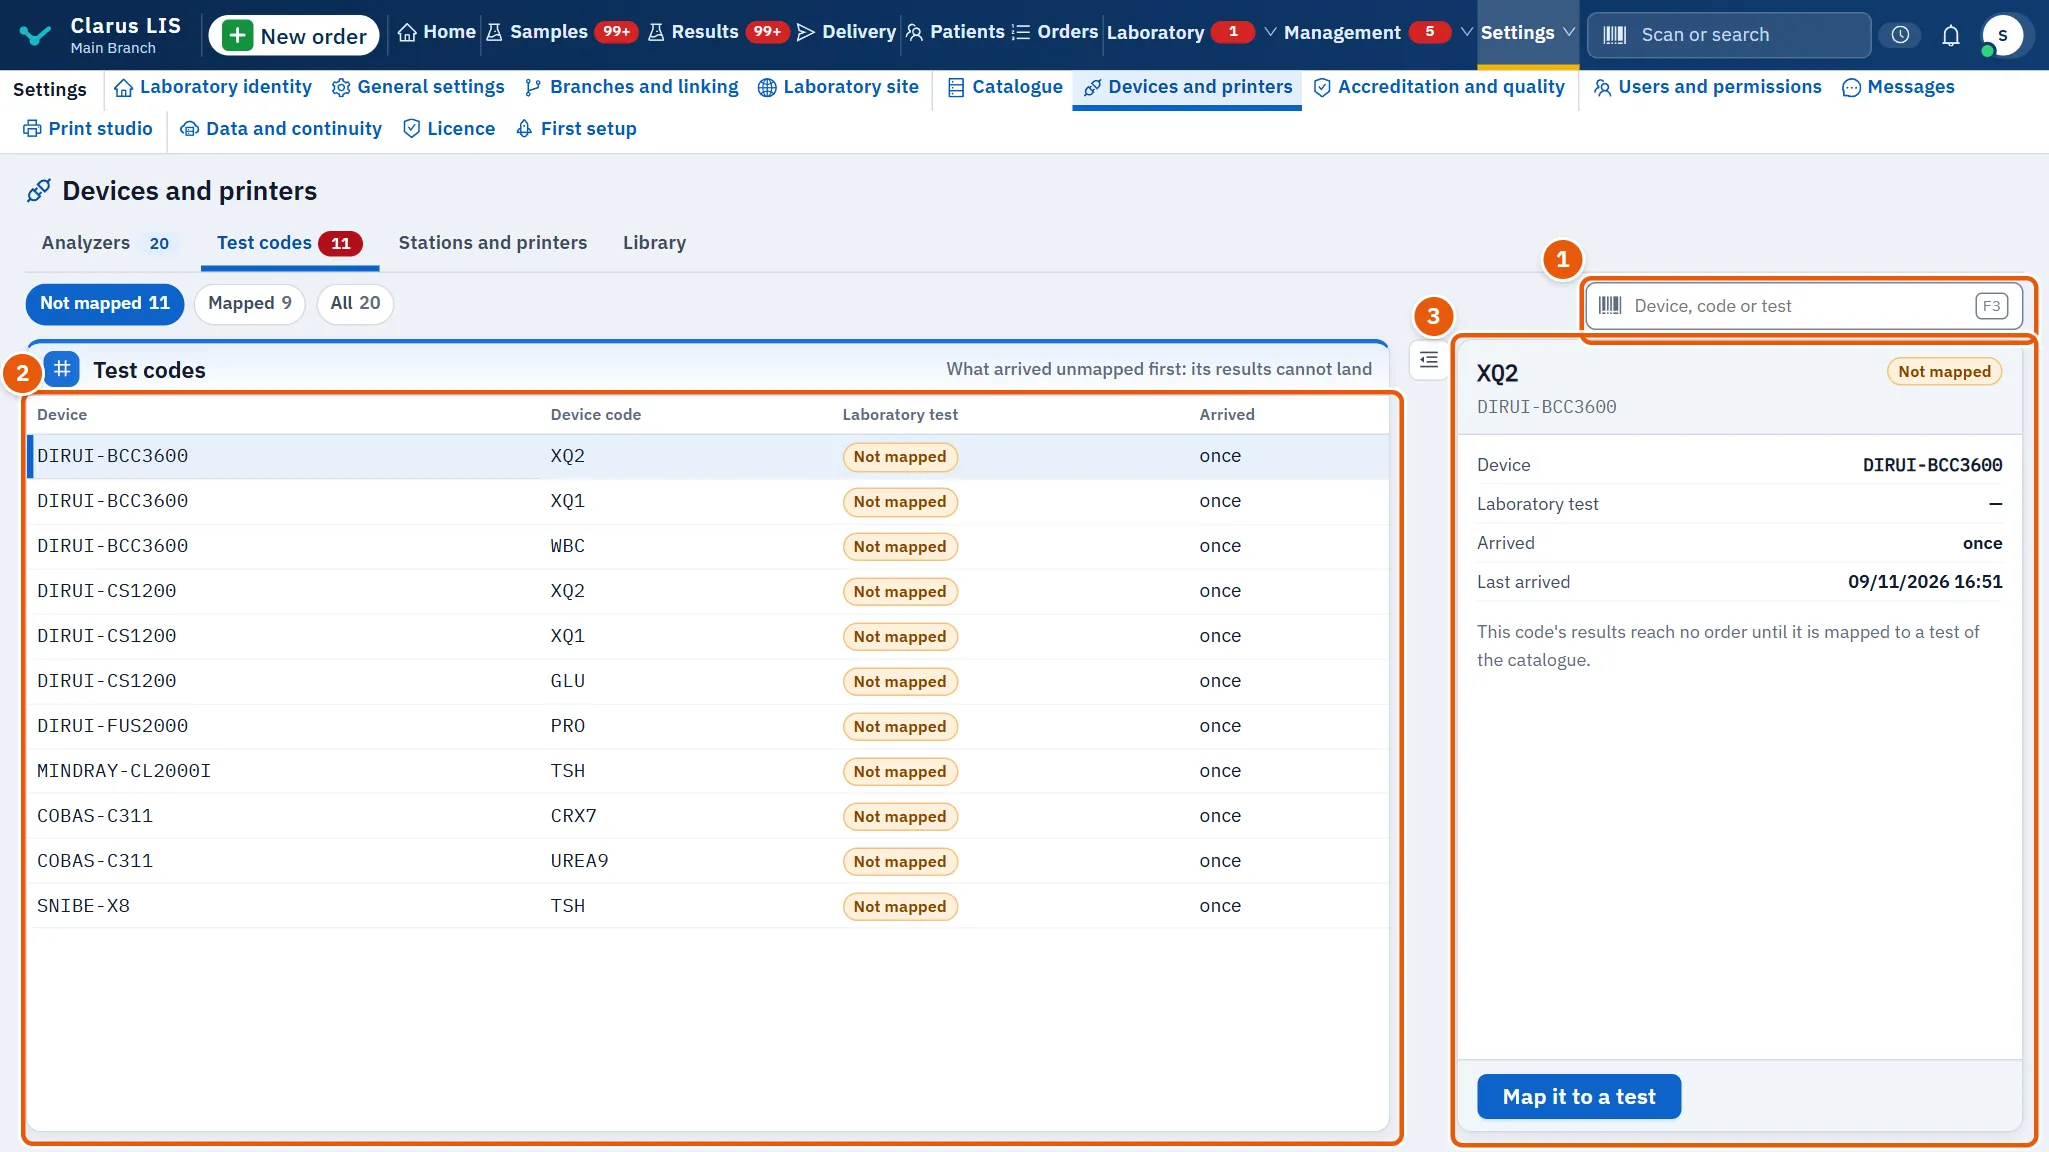
An analyzer names its tests with its own codes. This page lists every code that arrived, with Device, Device code, Laboratory test and Arrived. The page opens on the Not mapped filter, because codes that arrived without a mapping cannot land their results.
| Element | What it does |
|---|---|
| Codes' state | Not mapped (the one the page opens on), Mapped or All. |
| Search box | By device, code or test. |
| The chosen code | The chosen code, with Last arrived (when there is one). For an unmapped code it explains that its results reach no order until it is mapped. |
| Map it to a test / Change the test | In the details of the chosen code: the first for an unmapped code, the second for a mapped one. Opens the mapping window (31.9.3 Task 3 — Map a code to a test). |
| Remove the mapping | Removes the mapping, after asking: its results land on no test afterwards. |
31.7 The Stations and printers page
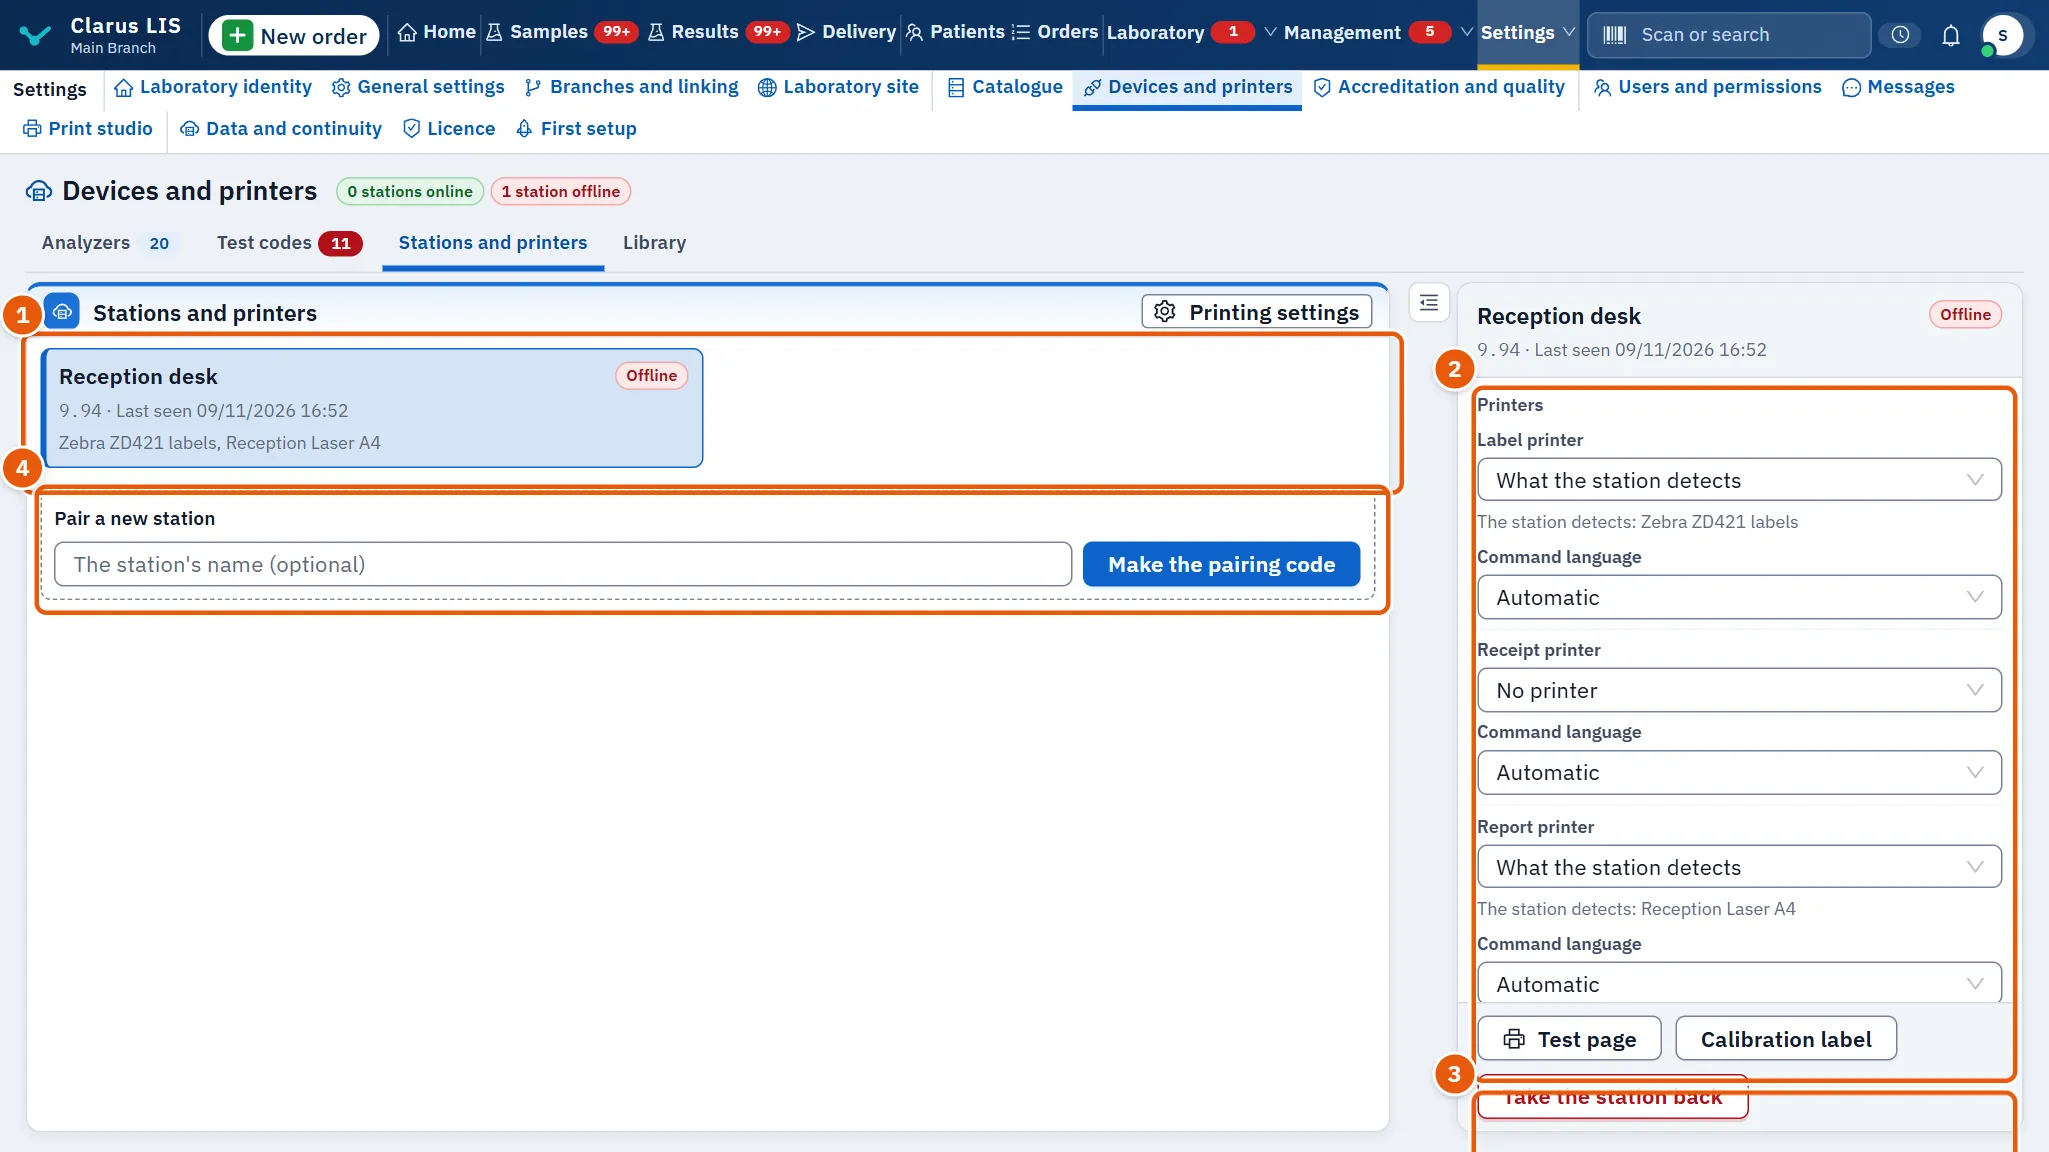
A station is the program running on a computer that has an analyzer cabled to it or a printer. The page counts the stations online and offline and names the latest version of the station program. A station that has been taken back is no longer listed.
| Element | What it does |
|---|---|
| A station's card | Its name and its state: Online, Offline, Updating or Unknown; when it was last seen; how many messages wait in its queue. |
| Printers | One choice for each role: Label printer, Receipt printer, Report printer. Beside each, What the station detects lists what the station sees, and Command language chooses the printer's command language (Automatic or Windows driver). Save the printers saves (it is dim until something is changed). If the station sees no printer, the section says so and offers nothing to choose. |
| Test page | Sends a test page to the printers chosen. Dim while the station sees no printer. |
| Calibration label | Prints a calibration label that shows the label's real edges; dim until the station has a label printer, chosen or detected. |
| Analyzers cabled to this station | Tick the analyzers cabled to this station's computer; an analyzer belongs to one station, so ticking it here takes it from any other. Save the analyzers saves. |
| Latest jobs | The latest jobs sent to the station and their state: Waiting, At the station, Done, Failed or Timed out. |
| Take the station back | Takes the station back, after asking. |
| Printing settings | Opens the printing settings (see 31.9.7 Task 7 — Choose a station's printers and test them). |
| Pair a new station | Makes a pairing code for a new station (see 31.9.6 Task 6 — Pair a new station). |
31.8 The Library page
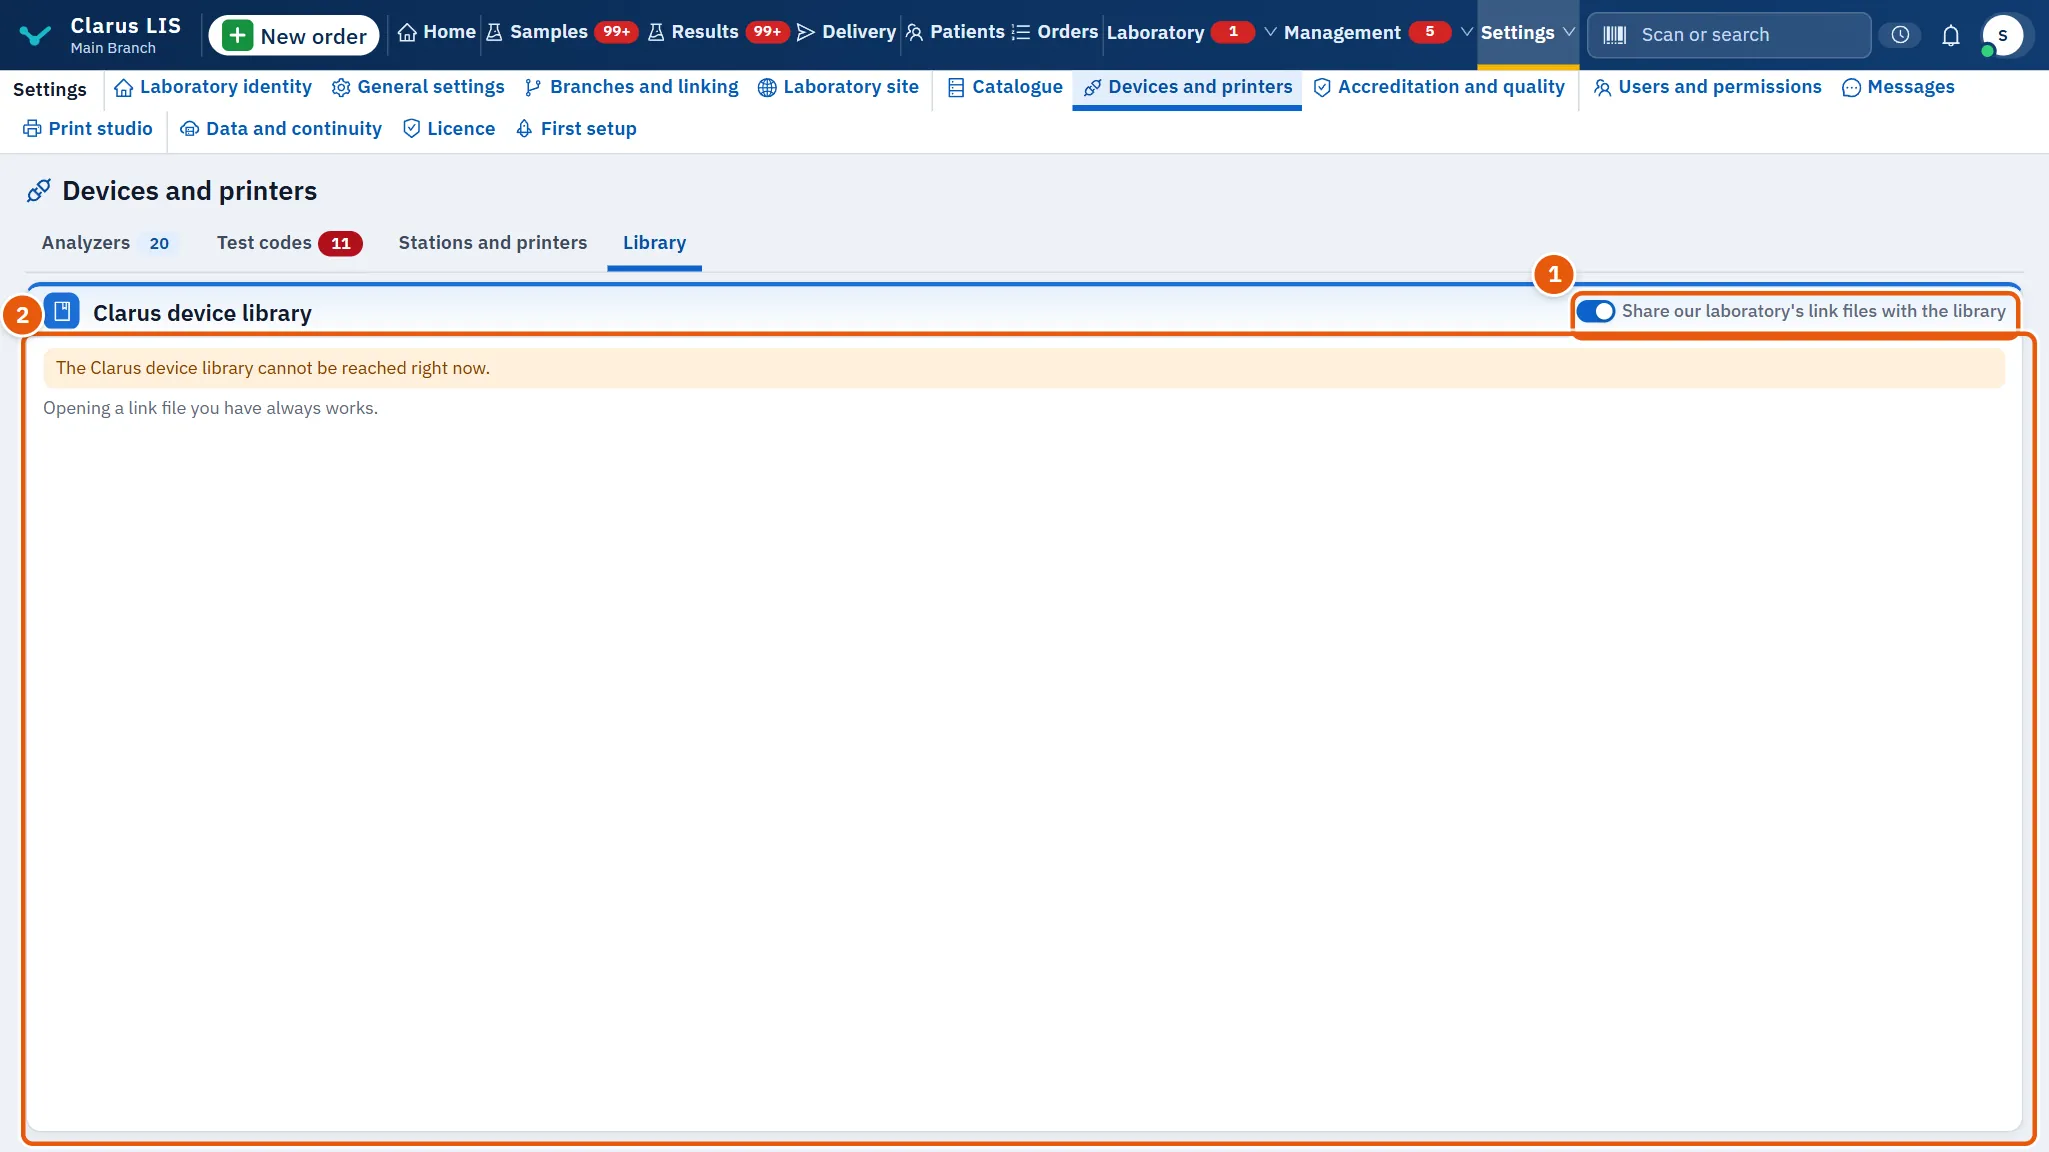
Clarus device library offers link files that Clarus has prepared for common analyzers: the codes an analyzer uses and the tests they mean. A file is marked Tried on a real analyzer when it was tried on a real analyzer, or Written from a document — review it when it was prepared from the maker's document and must be reviewed.
| Element | What it does |
|---|---|
| Share our laboratory's link files with the library | A switch: whether this laboratory's own link files may be shared with the library. |
| Take it | Opens a window for the file (see 31.9.10 Task 10 — Use a link file, from the library or from a file): first the choice of analyzer and the button Review what it would change. |
| Review what it would change | Shows what the file would change on the device: new codes, codes that already mean another test, codes naming tests the laboratory does not have (not applied), codes already the same. |
| Apply these codes | Writes the codes; dim when there is nothing new or changed. Nothing is written before this button. |
If the library is closed to this copy or cannot be reached, the page says why instead of the list. Opening a link file you already hold always works, even when the library cannot be reached (Opening a link file you have always works.).
31.9 Tasks, step by step
31.9.1 Task 1 — Add an analyzer
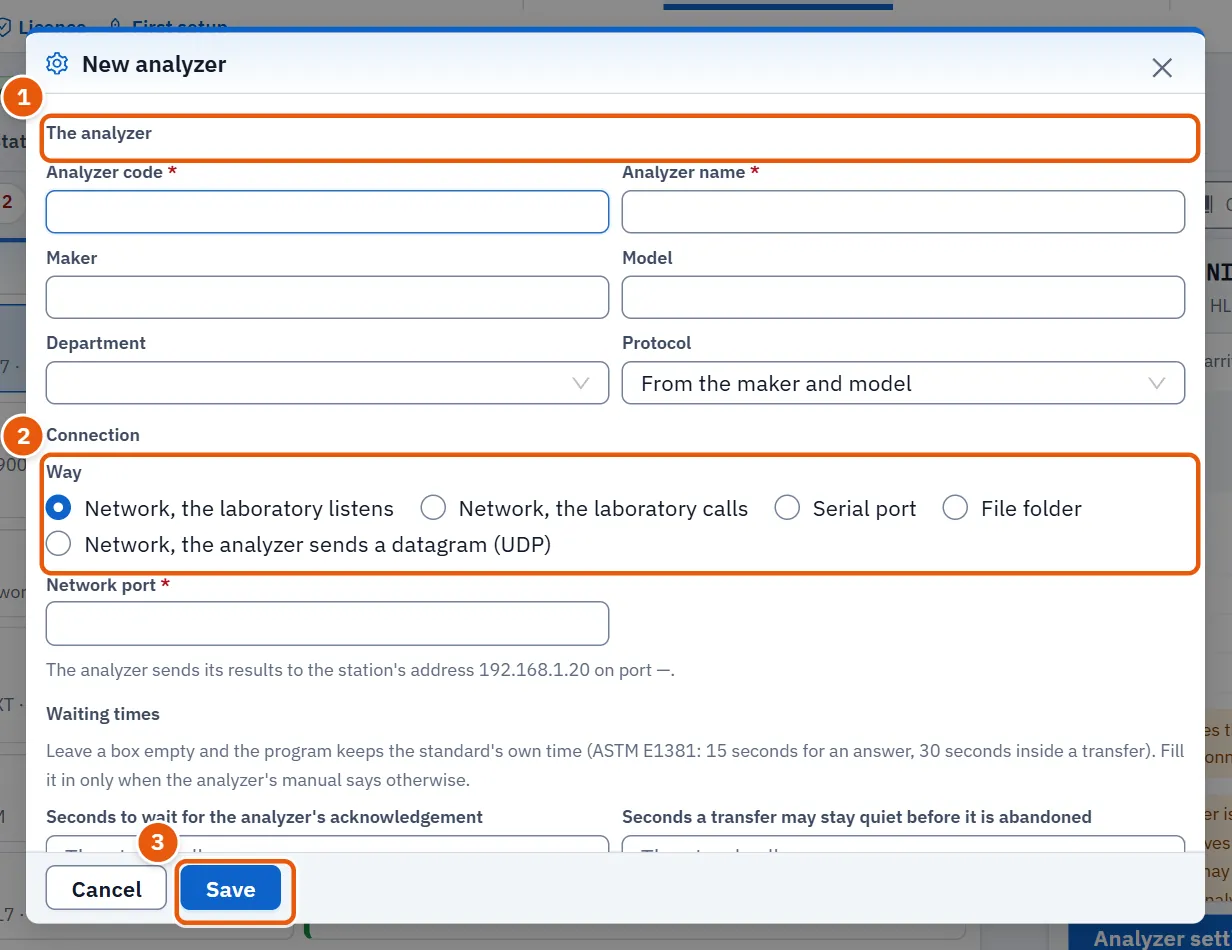
- On the Analyzers page press Add an analyzer. The window New analyzer opens.
- Under The analyzer fill Analyzer code and Analyzer name, then Maker, Model and Department. The protocol is taken from the maker and model (From the maker and model).
- Choose the way it connects. The choices are Network, the laboratory listens, Network, the laboratory calls, Serial port, File folder and, for some, Network, the analyzer sends a datagram (UDP). The window then asks only for what that way needs: a Network port (network ways; the The analyzer's network address only when the program connects out to the analyzer, and a UDP port for UDP), the Serial port with its Line speed, Data bits, Parity and Stop bits, or the The folder the analyzer exports its results to.
- A required field left empty shows This field is required.; a wrong port shows Type a port number between 1 and 65535..
- Press Save. The page says «The settings of … were saved».
For a network analyzer the window tells you what to type in the analyzer's own menu (The analyzer sends its results to the station's address … on port ….). For a serial analyzer the list of ports comes from the stations; if it is empty the window says No station has reported a serial port yet. Plug the cable into the station's computer, then open this window again..
31.9.2 Task 2 — Set up how the link reads the analyzer
The same window has more groups. Most laboratories change few of them; follow the analyzer's guide (The analyzer's guide: what to set in its menus, with Where a link usually stumbles and How to check once it is set) when one is shown.
| Group | What it holds |
|---|---|
| Reading | Character encoding, Message envelope, The analyzer's network address, Where the sample number is in the message, Where the specimen sits in HL7 messages, Codes the analyzer sends that are not filed, A prefix the analyzer puts before the sample number and The analyzer adds zeros before the sample number. |
| Two-way work | Both directions: How the analyzer asks about a tube, and Send work orders to the analyzer automatically as tubes arrive with Work-order message. |
| Waiting times | Waiting times. Leave them empty unless the analyzer's manual says otherwise. |
| Microbiology | For analyzers that send organisms and susceptibilities. |
| Alert | Minutes of silence before the alert while work waits (0 switches it off). |
| Results | This analyzer's results are approved automatically when they pass every approval check, and Send quality-control results to the quality module. |
| On-site validation and go-live | The records that complete «Missing before go-live»: the date and the person who validated, the document, the owners, the network, the rollback plan, and Go-live approval: the analyzer was validated on site, and its results may be approved automatically. |
| The analyzer's graphs on the report | Which of the analyzer's graphs print on the report, and their size. |
| Message template (JSON) | A template that tells the program where in a message the results are. Try it on the last message tries it on the last message and says how many results it read. |
31.9.3 Task 3 — Map a code to a test
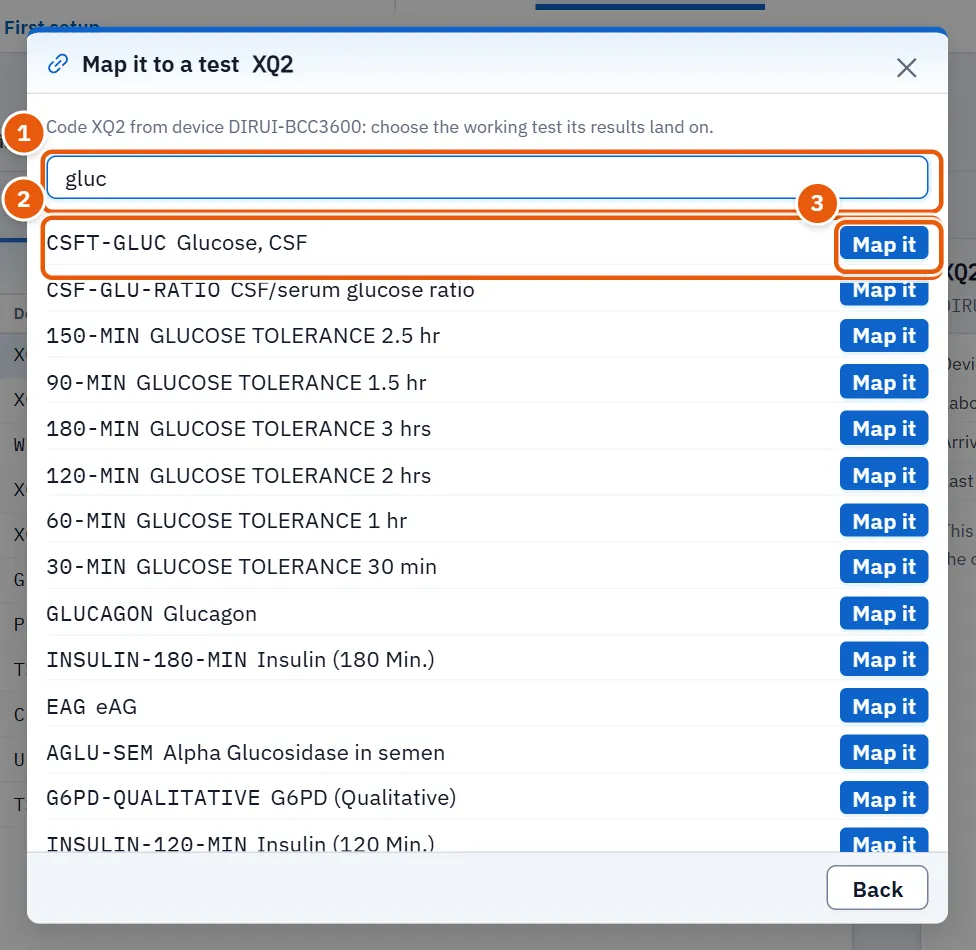
- Open the Test codes page and choose a code marked Not mapped. (The list Codes that arrived unmapped on the Analyzers page only shows codes; it cannot be pressed.)
- Press Map it to a test (or Change the test for an already mapped code). In the search box type at least two letters of the test's code or name.
- Press Map it on the test found (the window offers it only after two letters are typed); if the code was already mapped, this replaces its earlier test. To keep the earlier test, press Add it too instead (offered only for an already mapped code); the result then lands on whichever the tube carries.
- The page says «Code … is mapped to …». If nothing matches, it says that no working test matches your search.
- To undo, choose the code and press Remove the mapping, then confirm.
Then go back to the analyzer's held messages and process the rows again.
31.9.4 Task 4 — Test the connection
- Choose the analyzer and press Test the connection.
- The station serving it tries to reach the analyzer; the page says The station is testing the connection to the analyzer.
- The answer appears: Station «…» reached the analyzer: … or Station «…» did not reach the analyzer: …, with the detail the station found.
If the button is dim, the reason is written under the buttons: no station serves the analyzer, or no station is marked as cabled to it (No station has been marked as cabled to this analyzer yet: tick it on its station in «Stations and printers».), or the station is no longer paired. If the station does not answer within a minute: The station did not answer within a minute. Make sure it is running, then test again.
31.9.5 Task 5 — The firewall step and what a person sees when a link is down
When the laboratory listens for the analyzer, Windows Firewall on the serving computer must let the analyzer in.
- Choose the analyzer and look at the link log.
- If it says Waiting for the firewall rule, press Open the port in the firewall.
- Within two minutes accept Windows' request on the computer that serves the analyzer (Opening the port was asked: accept Windows' request on the computer serving the analyzer within two minutes.). If the permission was refused or lapsed the log says so; press the button again.
The program never opens a port to public networks. If the computer is on a network Windows calls Public, the card warns you and explains that the network must be made Private by that computer's administrator.
What a person sees when a link is down:
- the analyzer's card shows Not connected and the count at the top shows it;
- the sentence under the buttons says when the last message arrived, or that nothing has;
- the log names the cause, such as Disconnected, The analyzer could not be reached, The port is taken or The folder is missing;
- warnings on the card give the likely fix, for example that no station serves the analyzer now, or that the file format is not set;
- results stop arriving, but nothing already received is lost, and any row that could not be filed waits among the held messages.
31.9.6 Task 6 — Pair a new station
- Open the Stations and printers page.
- In Pair a new station type the station's name if you wish (The station's name (optional)) and press Make the pairing code.
- The code appears with the time until which it is valid. Press Copy.
- Type the code into the station's program when it is installed on the other computer.
The code is valid only until the time shown, and is not shown again once the page is closed. Then choose the new station and set its printers and its cabled analyzers.
31.9.7 Task 7 — Choose a station's printers and test them
- On the Stations page choose the station.
- Under Printers choose a printer for each role, then press Save the printers.
- Press Test page. The page says to how many printers a test page was sent.
- For the label printer, press Calibration label to see the label's real edges; then in Printing settings adjust the offsets if the print sits off.
Printing settings holds How the program prints: Silent printing through the stations (each station prints on its chosen printer with no dialog; a role with no printer chosen opens the browser's dialog) or The browser's print dialog. It also holds the label's Label printer resolution and Print direction, and offsets and sizes for the label, the receipt and the report. These corrections apply on paper only and never change the PDF a patient receives.
31.9.8 Task 8 — Cable an analyzer to a station
- Choose the station.
- Under Analyzers cabled to this station tick the analyzers cabled to that computer.
- Press Save the analyzers.
31.9.9 Task 9 — Take a station back
- Choose the station and press Take the station back.
- Read the question and confirm. The station will not print or receive from analyzers until it is paired again.
31.9.10 Task 10 — Use a link file, from the library or from a file
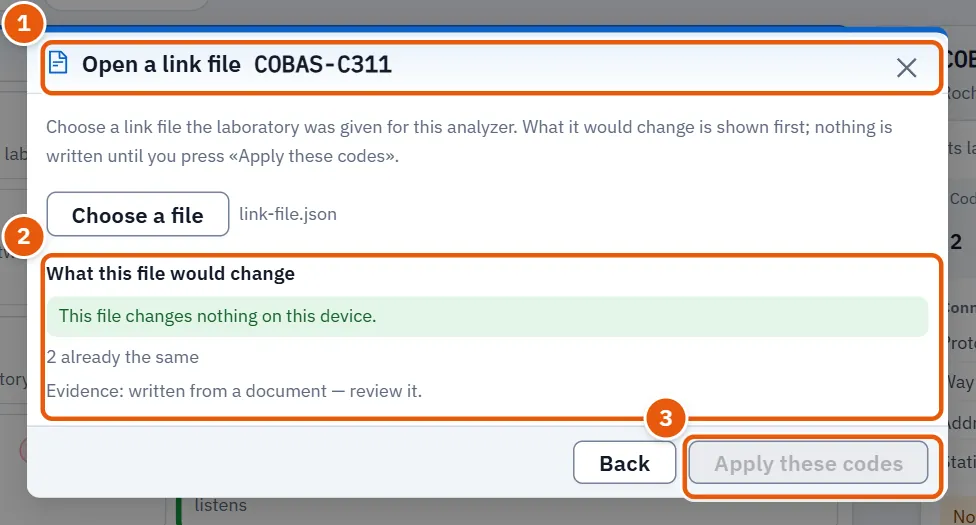
- On the Library page press Take it on a file, or, on an analyzer, press More then Open a link file and Choose a file.
- If asked For which of your devices?, choose the analyzer. If the laboratory has none, add it first (Add the device first, then take its link file from the library.).
- Press Review what it would change and read What this file would change. Codes can differ between laboratories, so check the list against your own analyzer.
- Press Apply these codes. Press Back to leave without changing anything.
To keep this laboratory's own codes as a file, press More then Save the link file.
31.10 Messages and what to do
| The screen says | It means | What to do |
|---|---|---|
| No analyzer is registered in this laboratory yet. | No analyzer has been added. | Press Add an analyzer. |
| No link open now | The analyzer is not connected at this moment. | Check the cable or network, then Test the connection. |
| The analyzer has sent no messages yet. | Nothing has arrived from the analyzer yet. | Send a test from the analyzer, or check the settings it was given. |
| This code's results reach no order until it is mapped to a test of the catalogue. | The code is not mapped. | Map it (31.9.3 Task 3 — Map a code to a test). |
| No station serves this analyzer to test the connection: run the program on the computer it is connected to. | No station serves this analyzer. | Run the program on the computer it is connected to. |
| No station has been marked as cabled to this analyzer yet: tick it on its station in «Stations and printers». | No station is marked as cabled to it. | Tick it on its station (31.9.8 Task 8 — Cable an analyzer to a station). |
| The computer that serves this analyzer is on a network Windows classes as Public, so Windows Firewall keeps the analyzer out and its results do not arrive. How a network is classed is a security setting for the computer's owner, and the program does not change it: if this is the laboratory's trusted network, make it Private with an administrator's account: Settings > Network & internet > network properties > Private network; or ask the computer's administrator. The program does not open the analyzer's port to public networks: it would then be open on every network the computer joins. | The serving computer is on a Public network. | Ask the computer's administrator to make it Private. |
| This analyzer's file format is not set yet, so its files will not be read: set it under «Results files» below the card. | The analyzer's file format is not set. | Set it under Results files. |
| The tube number is digits only: if the analyzer does not read the label and gives the sample its own running number (1, 2, 3...), its result may land on another tube. Turn on barcode reading in the analyzer, or give the tube number a prefix. | The tube number is digits only and the analyzer may number samples itself. | Turn on barcode reading in the analyzer, or give the tube number a prefix. |
| The file could not be taken: either the library cannot be reached now, or the file does not carry the Clarus signature and was refused. Nothing was changed. | The library could not be reached, or the file lacks the Clarus signature. | Nothing changed; try again later or use a file you hold. |
| No gateway station is paired with this laboratory. | No station is paired. | Pair one (31.9.6 Task 6 — Pair a new station). |
| No printer is bound on this station yet — choose one for each role first. | No printer is chosen on the station. | Choose one for each role first. |
| Every attempt to update the station failed: install the newest version on it by hand. | Every attempt to update the station failed. | Install the newest version on it by hand. |
31.11 See also
- Results: where the results an analyzer sends are checked and approved.
- Samples: the tubes a result lands on.