Chapter 29Laboratory site
Menu: Laboratory site. Address: /setup/site.
29.1 What this screen is for
This is where the laboratory builds its public website and decides how patients reach their results through it. You write the home page sections, the identity and contact details, the look and the languages; you decide whether and under what conditions a result opens from the site; and you choose the site's address and publish it.
Beside every page of settings there is a live preview of the site. Nothing you change reaches the published site until you press the publish button. The site is hosted on Clarus's server, so the laboratory's own computer is never opened to the internet.
29.2 Who sees it
Whoever holds Manage settings. The menu hides the screen from everyone else.
| You can… | …if your role holds |
|---|---|
| Open the screen, edit all four pages, save, publish, take or change the address, and link a domain | Manage settings |
29.3 The screen at a glance
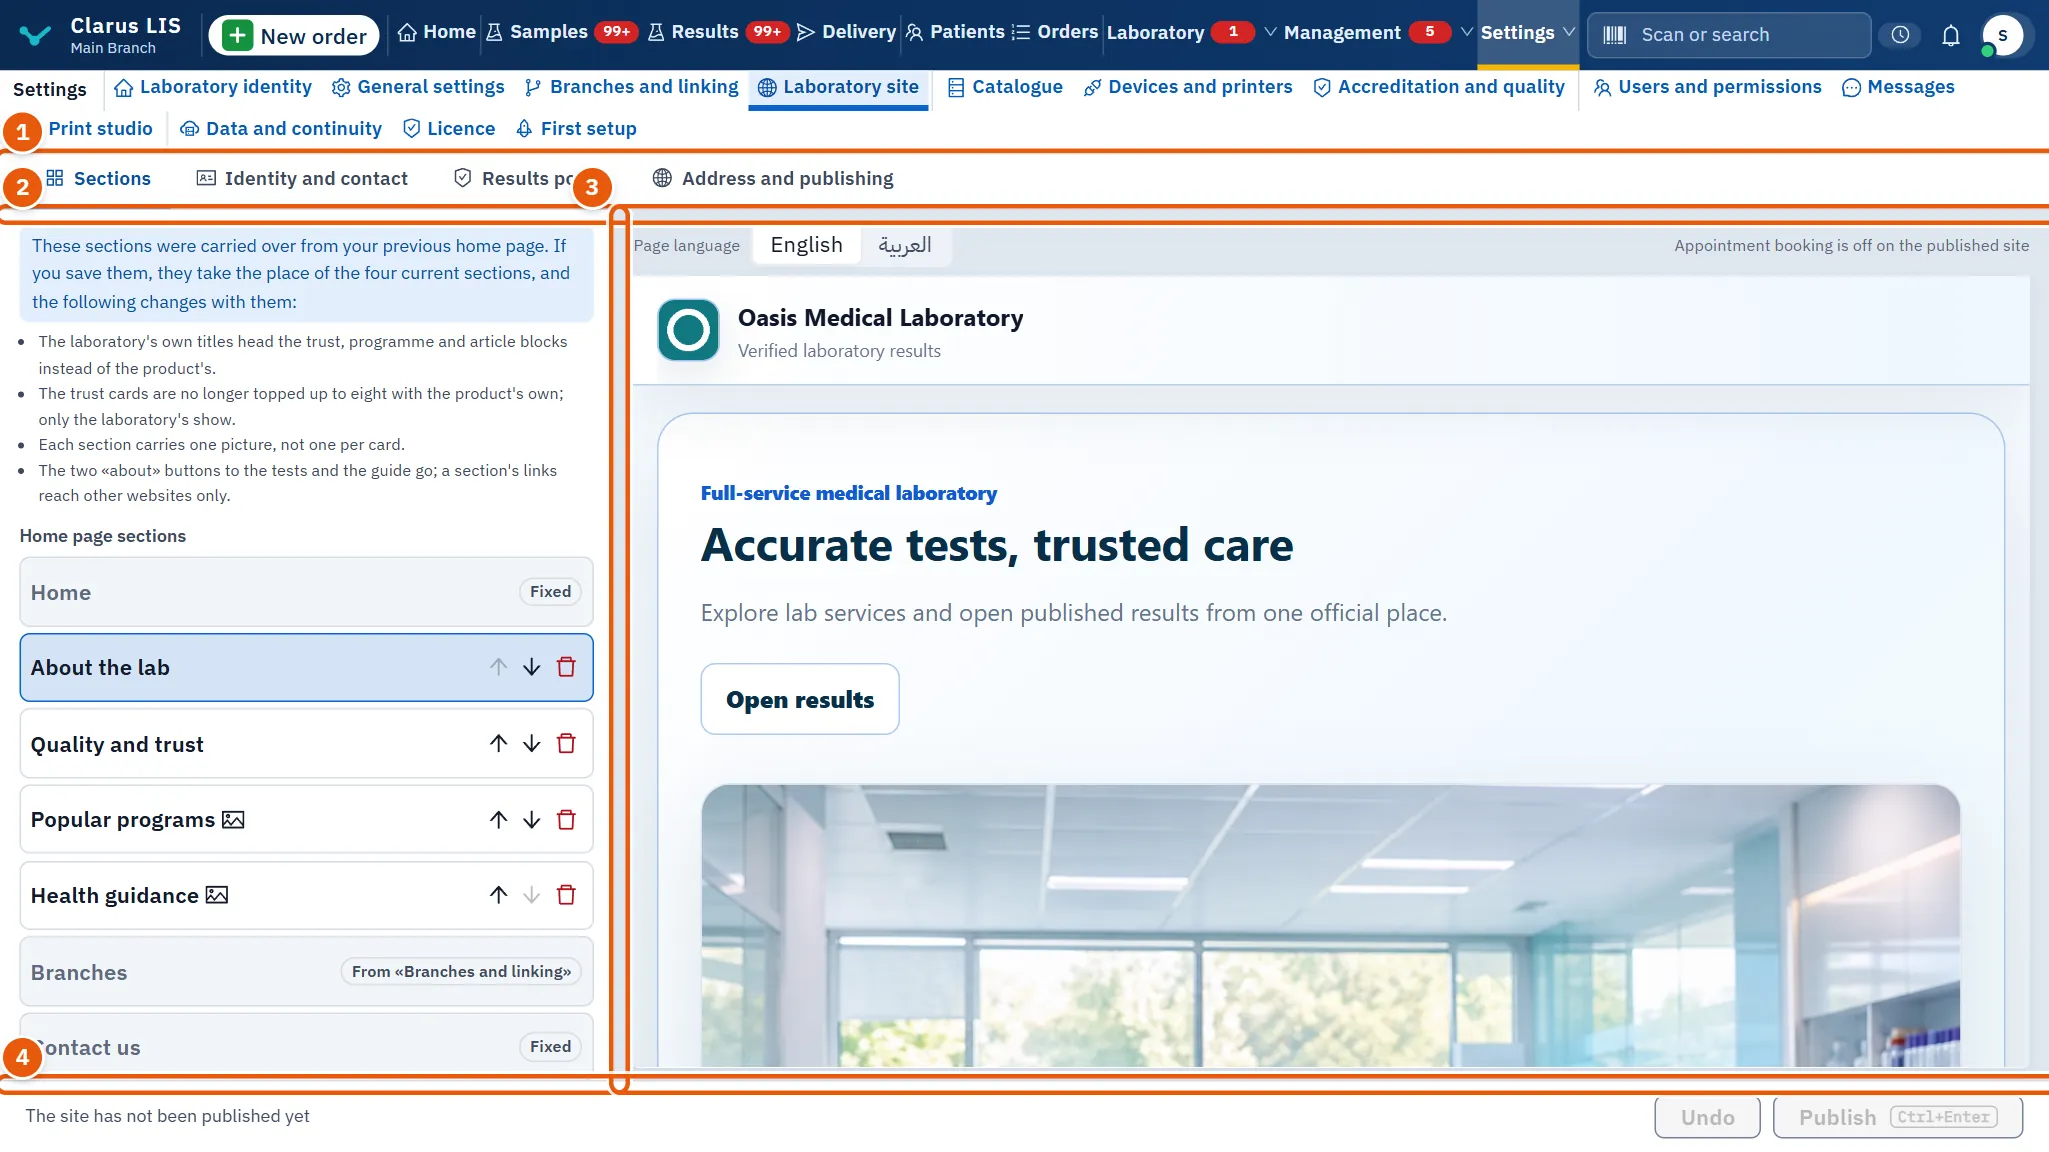
- The four pages: Sections, Identity and contact, Results portal and Address and publishing. Beside them the site's address is shown, or The site has no address yet. A page with unsaved changes is marked.
- The settings of the open page.
- The preview: the site as it will be drawn. Above it you choose Page language. A note reminds you that Appointment booking is off on the published site.
- The foot: while something has changed, the list of what has changed and not yet been saved; otherwise a status line (such as when the site was last published). Then the undo button and the main button: Publish once the site has an address, Save before that. Both are dim while nothing has changed.
29.4 Page 1: Sections
29.4.1 The list of sections
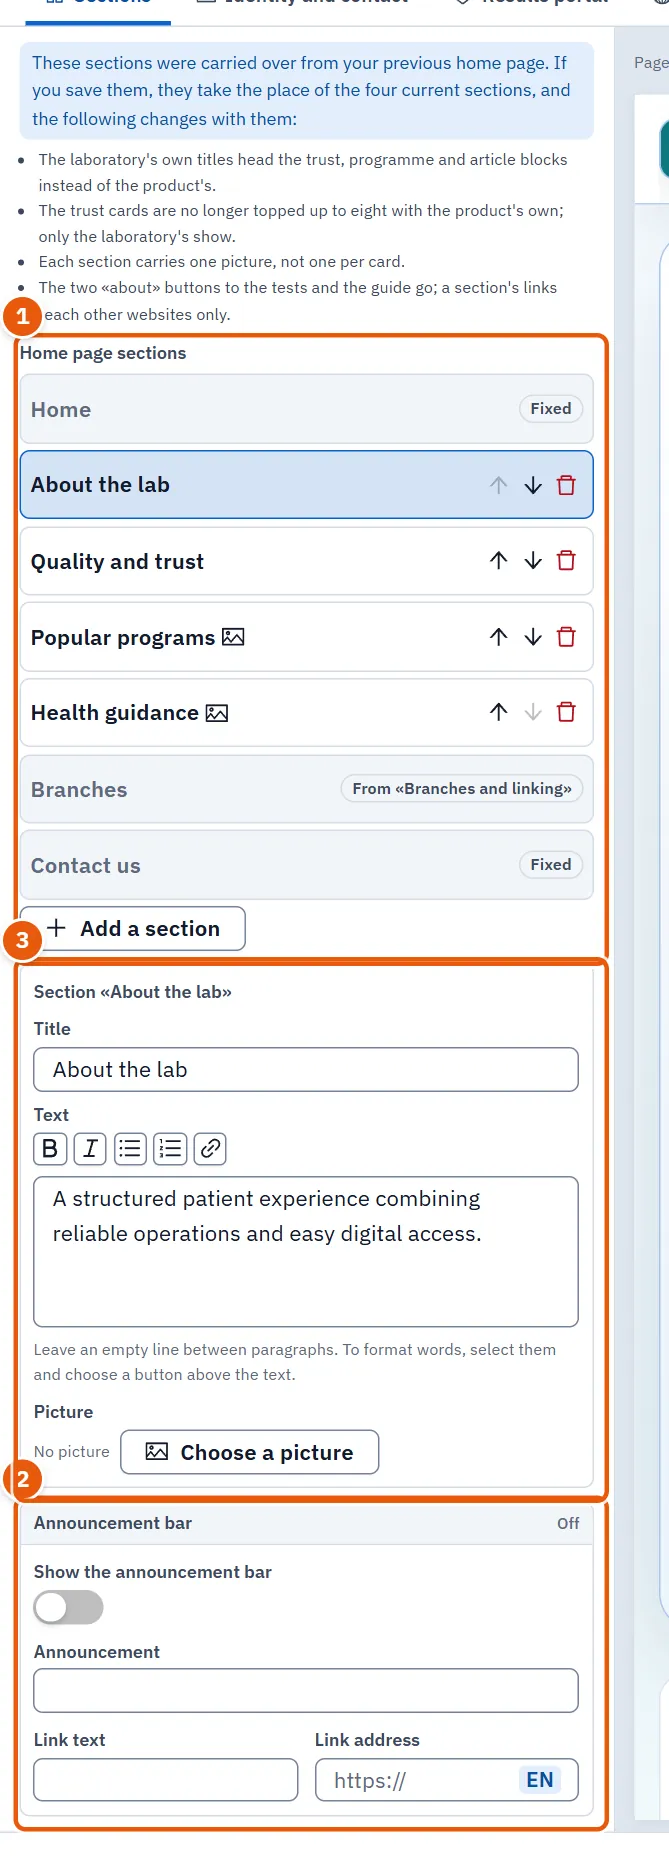
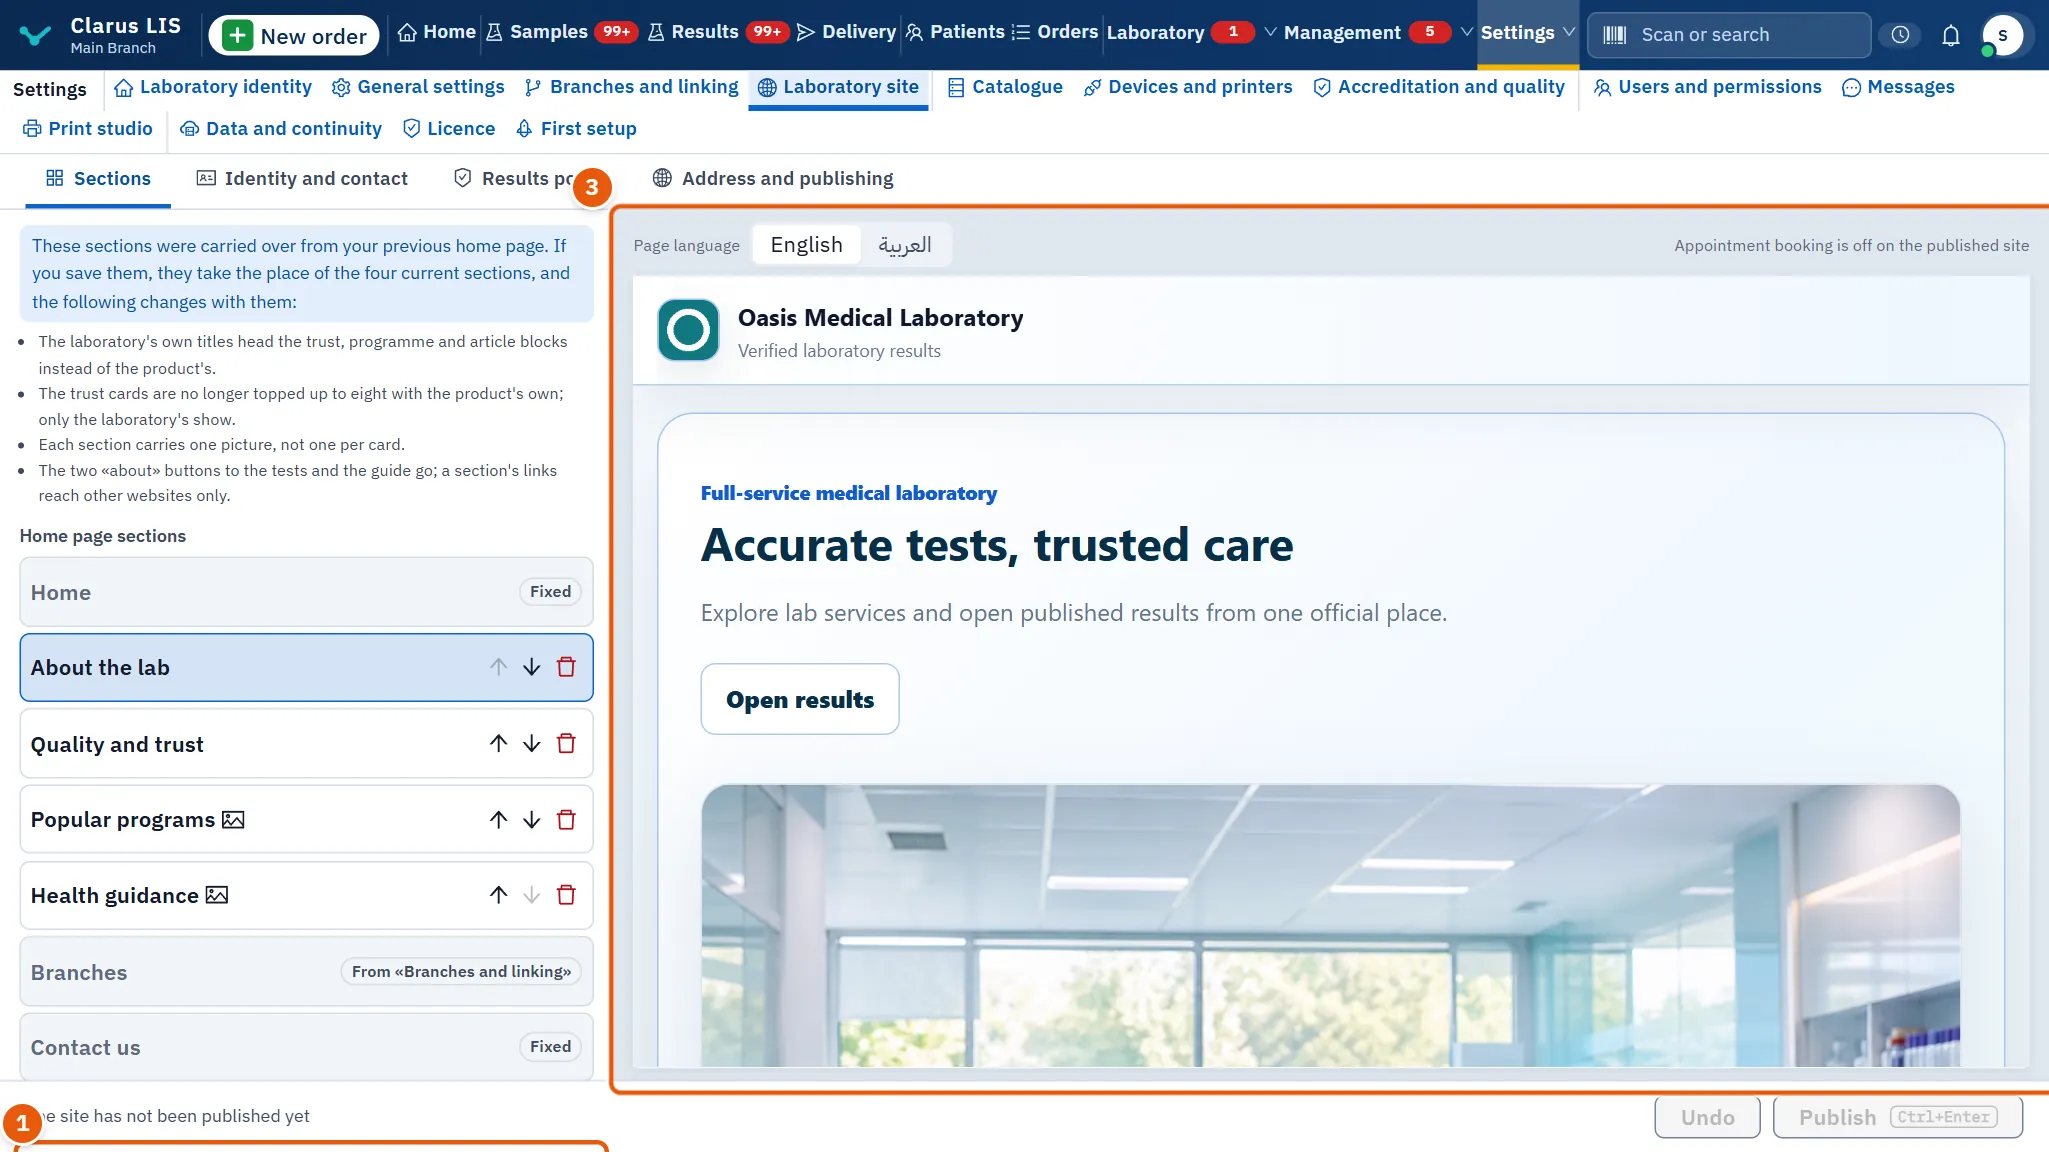
Under Home page sections, the home page is a list of blocks. Some are fixed (Home, Branches which comes from «Branches and linking», and Contact us) and carry the mark Fixed.
| Element | What it does |
|---|---|
| A section's line | Opens it for editing. A section with no title shows Untitled section; one with an image shows Has a picture. |
| Move up / Move down | Changes the section's place. The first cannot go up and the last cannot go down. |
| Remove | Deletes the section from the page. |
| Add a section | Adds a section. At 24 sections it is dim and the screen says the maximum number of sections. |
If the site was carried over from the previous home page, a notice explains that saving the carried sections replaces the four current ones and lists what changes with them.
29.4.2 The open section
| Field | What it does |
|---|---|
| Title | The section's heading. |
| Text | The body. Leave an empty line between paragraphs. The formatting buttons above the text apply to the words you select. |
| Picture | Choose a picture, then Change the picture or Remove the picture. A picture larger than 1.5 MB is refused. |
29.4.3 Formatting the text
Select the words, then press a button in Text formatting.
| Button | What it does |
|---|---|
| Bold | Makes the selected words bold. |
| Italic | Makes them italic. |
| Link | Turns them into a link. |
| Bulleted list | Makes the selected lines a bulleted list. |
| Numbered list | Makes them a numbered list. |
29.4.4 The announcement bar
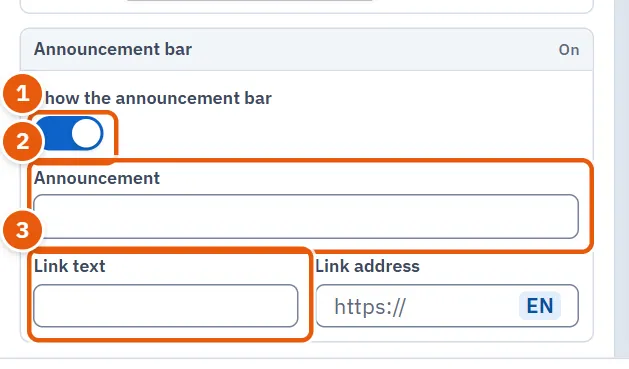
Announcement bar is a strip shown on the site; its state reads On or Off.
| Field | What it does |
|---|---|
| Show the announcement bar | Turns the bar on or off. |
| Announcement | The message. |
| Link text | The words of the link at the end of the message. |
| Link address | Where the link goes. |
29.5 Page 2: Identity and contact
| Group | Element | What it does |
|---|---|---|
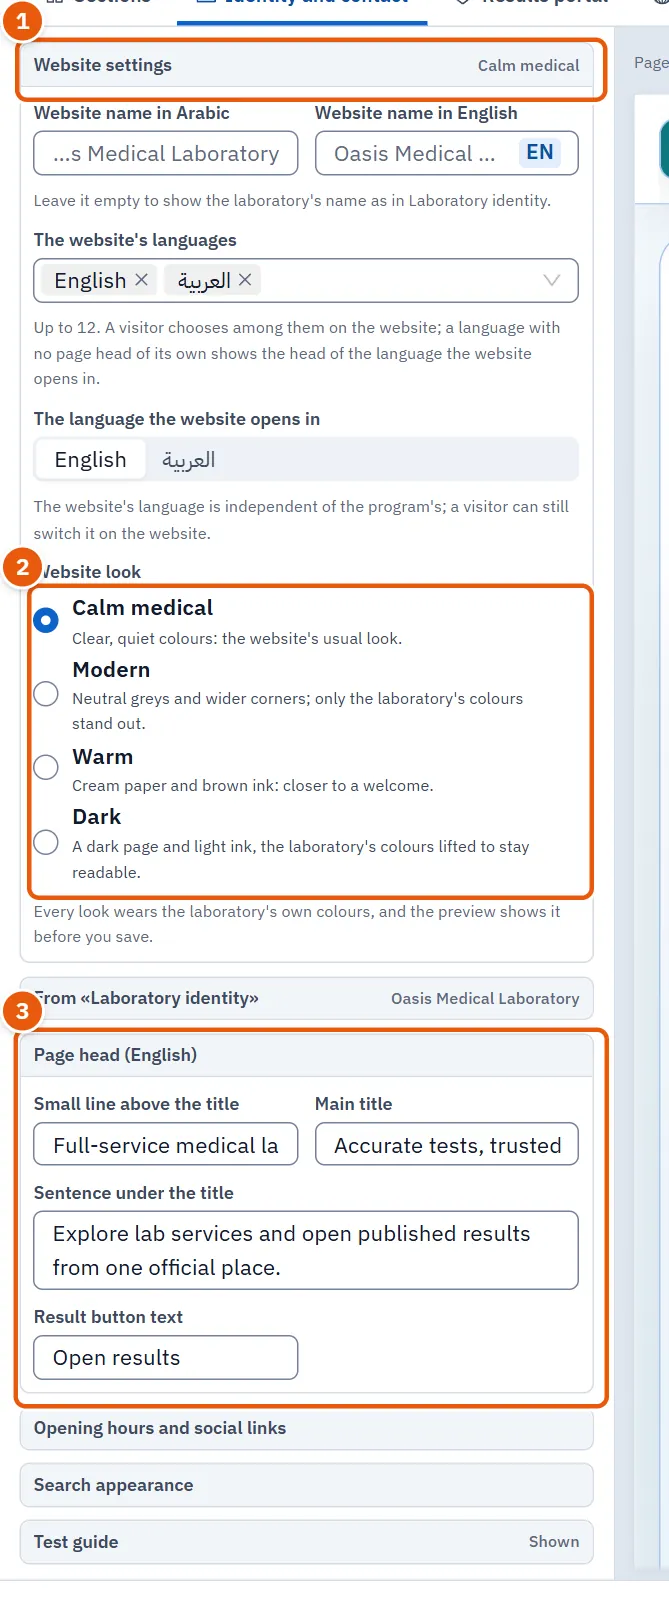
| Website settings | Website name in Arabic, Website name in English | The website's name. Empty means the laboratory's name from «Laboratory identity». |
| The website's languages | The languages the site offers, up to 12. A language with no page head of its own shows the head of the opening language. | |
| The language the website opens in | The language the site opens in. It is independent of the program's language. | |
| Website look | Calm medical, Warm, Modern or Dark. Each wears the laboratory's own colours, and the preview shows it before you save. | |
| From «Laboratory identity» | Name, Tagline, Phone, WhatsApp, E-mail, Address | Shown for reading only: they are written in «Laboratory identity» so that the site, reports and receipts agree. Open laboratory identity goes there. |
| Page head (…) | Small line above the title, Main title, Sentence under the title, Result button text | The top of the home page, written for the language being previewed. |
| Opening hours and social links | Opening hours, Facebook, Instagram, LinkedIn, Location on the map | Opening hours and the links to the laboratory's pages. |
| Search appearance | Page title in search results, Page description in search results | How the site appears in search engines. Left empty, both are written from the laboratory's name and the page head when you publish. |
| Test guide | Show the test guide, Show prices in the guide | Shows the test guide, built from the laboratory's active tests at every publish. The prices switch is dim while the guide is off. |
29.6 Page 3: Results portal
| Element | What it does |
|---|---|
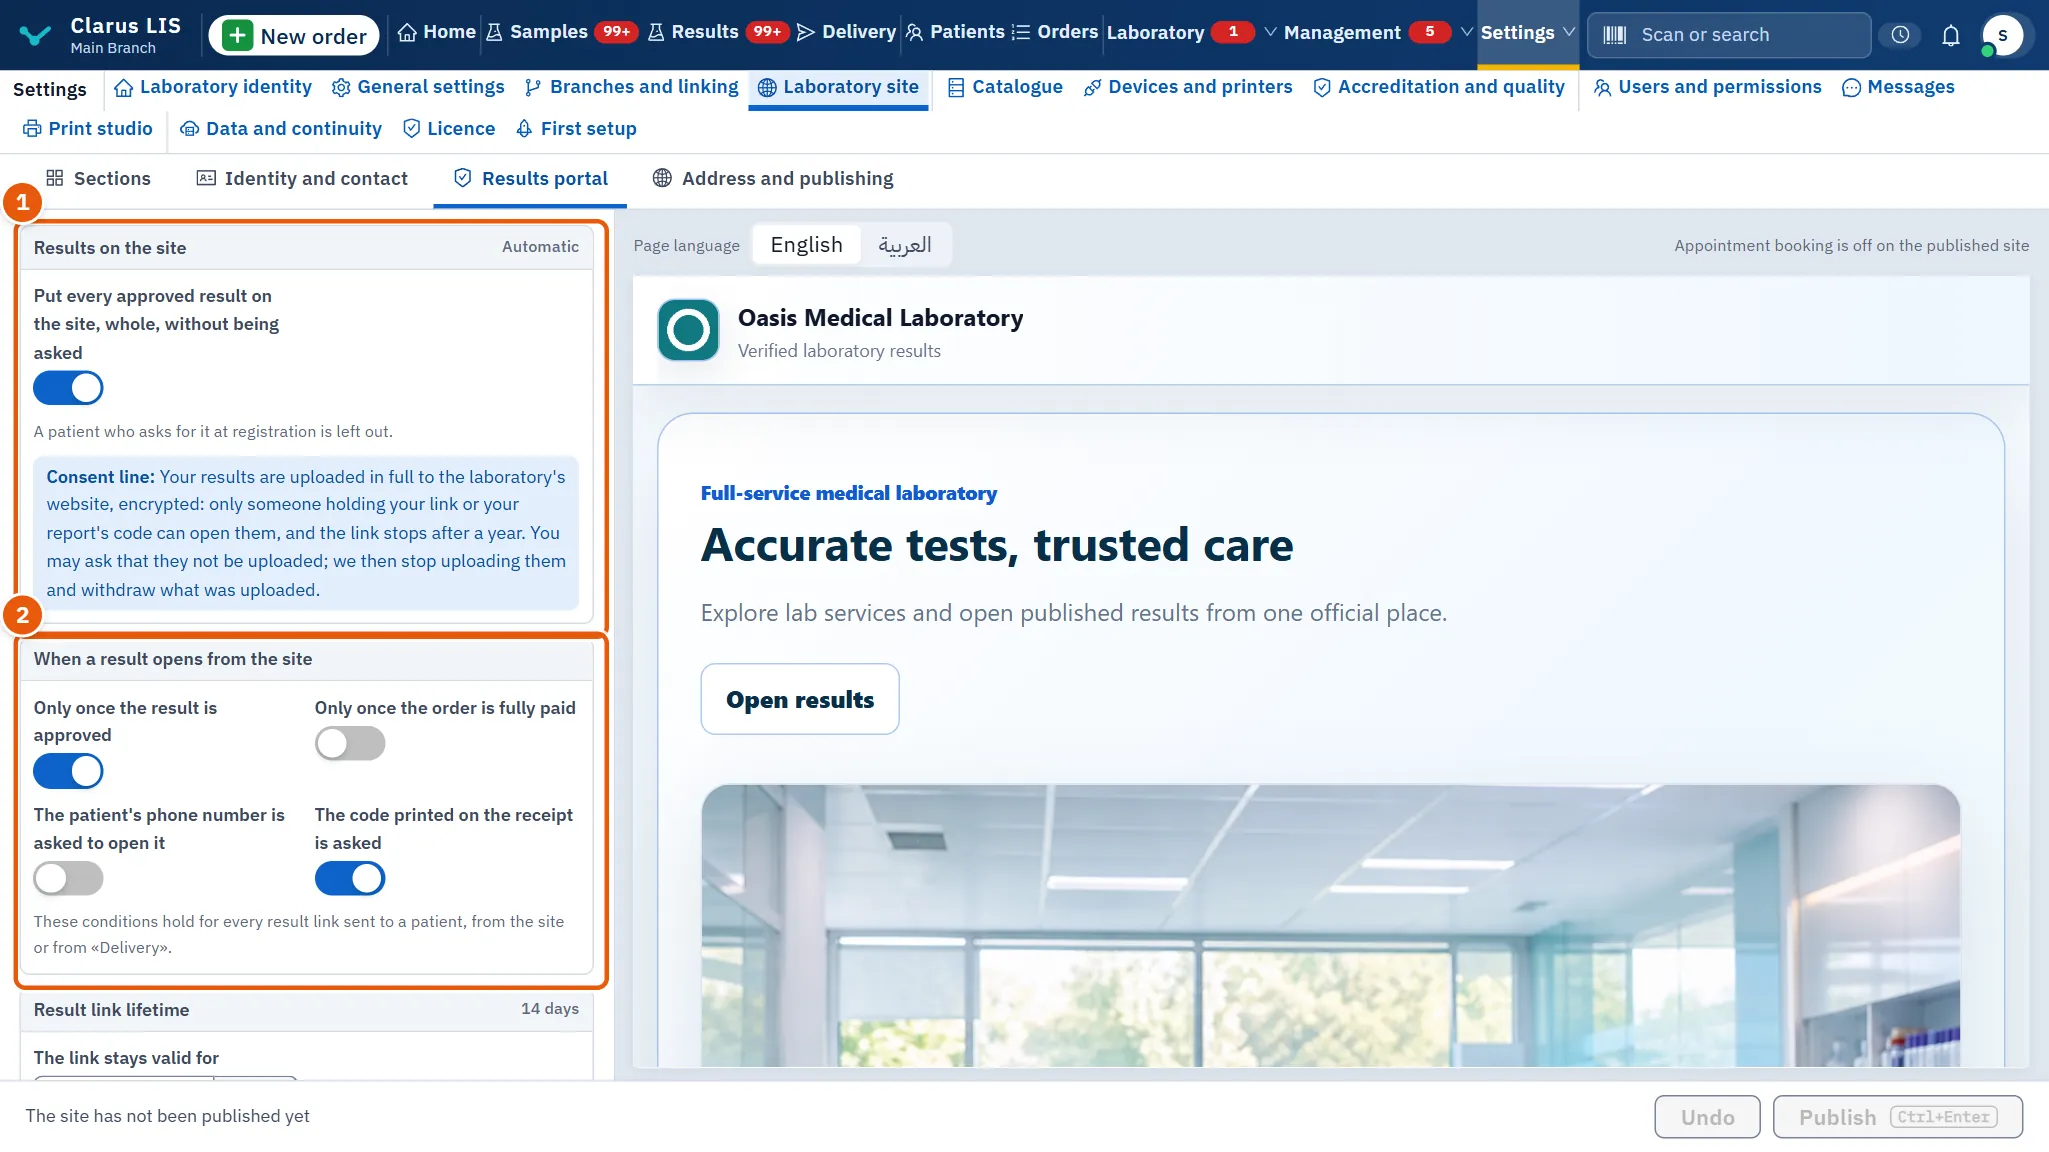
| Results on the site | The state reads Automatic or On request. The switch Put every approved result on the site, whole, without being asked chooses between them. A patient who asked at registration not to have it is left out. The consent line the program uses is shown beneath. |
| When a result opens from the site | The conditions a result link must meet: The patient's phone number is asked to open it, The code printed on the receipt is asked, Only once the order is fully paid, Only once the result is approved. They hold for every result link sent to a patient, from the site or from «Delivery». |
| Result link lifetime | The link stays valid for: after this the link no longer opens, and a new one is sent when needed. At most 90 days. |
29.7 Page 4: Address and publishing
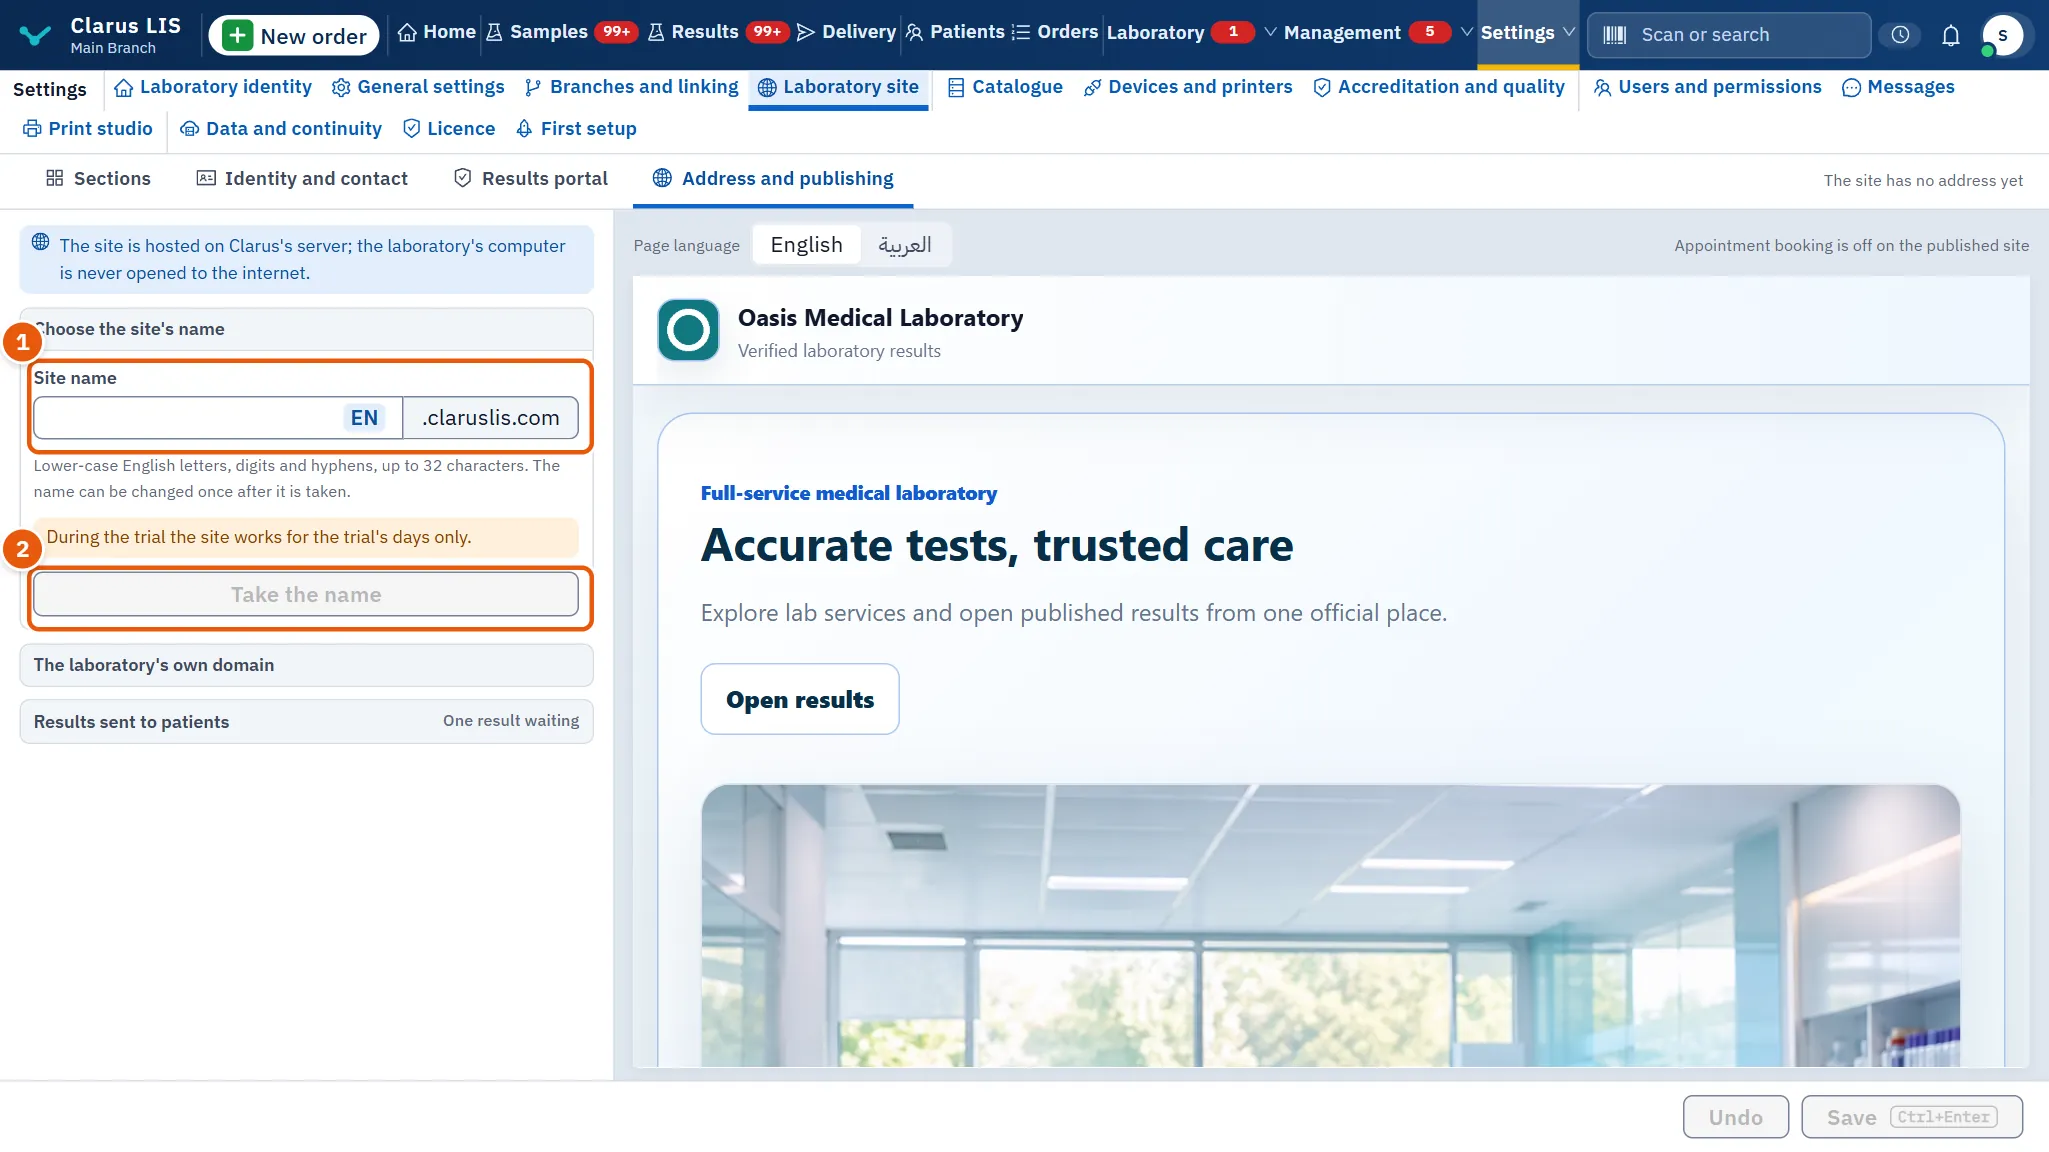
A note says the site is hosted on Clarus's server. Then the page shows what applies to the laboratory now.
29.7.1 Before the site has an address
Under Choose the site's name:
| Element | What it does |
|---|---|
| Site name | Lower-case English letters, digits and hyphens, up to 32 characters, followed by .claruslis.com. A suggestion is filled in. |
| Take the name | Takes the name. It is dim while the field is empty. |
During the trial the site works for the trial's days only. If a name was not taken automatically, the screen says why.
29.7.2 After the site has an address
Under The site (marked Not published when it is not live):
| Element | What it shows or does |
|---|---|
| Address | The site's address, as a link. |
| Address on claruslis.com | The address on claruslis.com. |
| Last published | The last publish, or Not published yet. |
| Renews on | The renewal date. The site is free for its first year, then renewed a year at a time. |
| Publish now | Publishes the site as it is saved. |
| Change the name | Opens the rename window. Shown only when the site has a name and has not been renamed before. |
If the website service is not reached, the page says that what it shows is what this computer knows.
29.7.3 If the website service no longer has the site
Sometimes the website service no longer holds a site that was given to this computer. The page then does not show the site as taken: it shows Choose the site's name again, with the name this computer held already filled in, and Change the name is gone. Press Take the name to create the site again under the same name, then publish (29.8.4 Task 4 — Publish). Nothing on this computer is deleted meanwhile: the pages you wrote stay saved. If you press Publish or try to change the name before creating the site again, the screen refuses with the sentence in the table of messages below.
29.7.4 The laboratory's own domain
Shown only when the website host serves laboratories' own domains (it does in this version). Under The laboratory's own domain, whose state reads Linked or Not checked:
| Element | What it does |
|---|---|
| Domain | The domain the laboratory bought, for example alnour-lab.com. |
| Save the domain | Saves it. Dim while the field equals the saved domain. |
| Check the link | Checks that the domain points at the website host. Dim until the typed domain is the saved one. |
| The records table | The two records (Type, Name, Value) to type where the domain was bought. Copy copies a value. @ means the domain itself. |
29.7.5 Results sent to patients
Shown when the program has the results figures. Under Results sent to patients: how many results are Waiting to arrive and how many Could not be sent, with the last error if there is one. When a patient says they scanned the code and found no result, start here.
29.8 Tasks step by step
29.8.1 Task 1 — Write and preview a section
- Open Sections.
- Press Add a section, or select an existing section.
- Fill Title and Text. Select words and use the formatting buttons.
- Optionally Choose a picture.
- Look at the preview. Change Page language to see another language.
29.8.2 Task 2 — Show an announcement
- In Sections, find Announcement bar.
- Turn on Show the announcement bar.
- Type Announcement, and if you want a link, Link text and Link address.
- Publish (29.8.4 Task 4 — Publish).
29.8.3 Task 3 — Take the site's address
- Open Address and publishing.
- Type the name in Site name, or keep the suggestion.
- Press Take the name. The screen confirms the address.
If you press Save before taking a name, your changes are saved and the screen moves you to this page.
29.8.4 Task 4 — Publish
- Make your changes on any page.
- Press Publish at the foot. It saves what changed and publishes the site; the screen confirms with the address.
- Or, with nothing changed, press Publish now on Address and publishing.
Publishing is not photographed in this manual, because it changes the live site.
29.8.5 Task 5 — Change the site's name
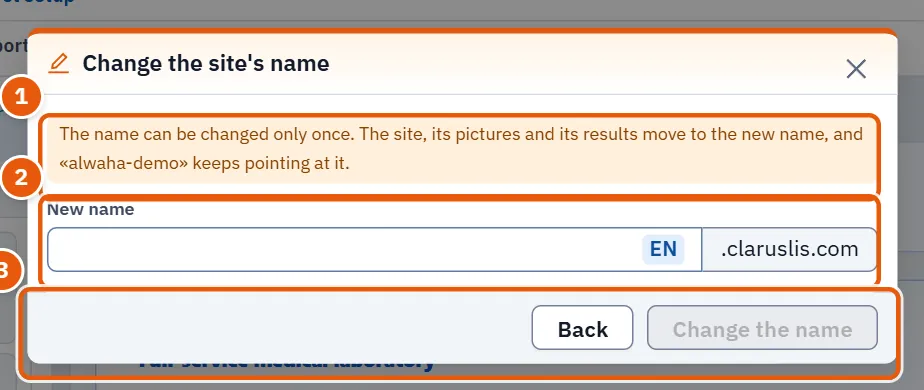
The name can be changed only once.
- Open Address and publishing and press Change the name.
- In Change the site's name, type New name. The site, its pictures and its results move to the new name, and the old name keeps pointing at it.
- Press Change the name, or Back to leave.
29.8.6 Task 6 — Link the laboratory's own domain
- Open Address and publishing and find The laboratory's own domain.
- Type the domain in Domain and press Save the domain.
- Where you bought the domain, type the two records from the table. Use Copy for each value. They can take a few hours to appear.
- Press Check the link. The state becomes Linked when the domain points at the website host.
Verification is not photographed, because it depends on a real domain.
29.9 Messages and what to do
| The screen says | Meaning | What to do |
|---|---|---|
| The laboratory site could not be loaded. | The data did not arrive. | Press the retry button. |
| Changes saved. Choose an address for the site to publish it. | Saved, but there is no address yet. | Take a name on Address and publishing. |
| The site is published at … | The publish succeeded. | Open the address to check. |
| Could not save or publish. | The save or publish failed. | Read any reason shown beside it and try again. |
| The picture is larger than 1.5 MB. | The picture is refused. | Choose a smaller one. |
| The name could not be taken. | The name is unavailable or invalid. | Choose another name. |
| The website service no longer has this website. Create it again from the website settings, under the same name. | Publishing or renaming was refused: the website service no longer holds this site. | Open Address and publishing, check the name offered and press Take the name. |
| The domain could not be found. | The check found no such domain. | Check its spelling and its records. |
| The domain does not point at the website host yet. | The records are missing or not yet visible. | Type the records, wait, and check again. |
| The preview could not be drawn. | The preview failed. | Press its retry button. |
29.10 See also
- Laboratory site depends on the laboratory's name and phones, written in «Laboratory identity».
- Result links sent from «Delivery» follow the conditions on Results portal.