Chapter 27Branches and linking
Menu: Branches and linking. Address: /setup/branches.
27.1 What this screen is for
This is where the laboratory's branches are kept: each branch's code, name, type and contact details, who may sign in to it, and whether it is working or stopped. When a branch runs on another installation, the same screen shows how it is linked to this one and lets you exchange work with it.
The screen has up to three pages, shown as tabs when more than one is available: Branches, Branch devices (the computers that joined this branch's server) and Samples sent (tests one branch sent another to analyse). With only one page available, there are no tabs.
27.2 Who sees it
| You can… | …if your role holds |
|---|---|
| Open the screen and read the branches | Manage the laboratory's structure: branches, numbering, first run, external laboratories |
| Add a branch, edit it, set who reaches it, stop or start it | Manage the laboratory's structure: branches, numbering, first run, external laboratories |
| Open the laboratory's network to the devices, and give a certificate authority | Manage settings |
| See the Branch devices page and allow a new computer's licence number | Manage settings |
| See the invitation box, the exchange line and the link controls of a branch on another installation | Manage branches and linking |
| See the Samples sent page | Read orders |
| Accept, return or cancel a sent sample | Create orders |
The invitation box, the exchange line and the link controls appear only to someone who holds Manage branches and linking. If these parts are missing, ask the person who manages roles. The laboratory's network line needs Manage settings instead.
27.3 The screen in a glance
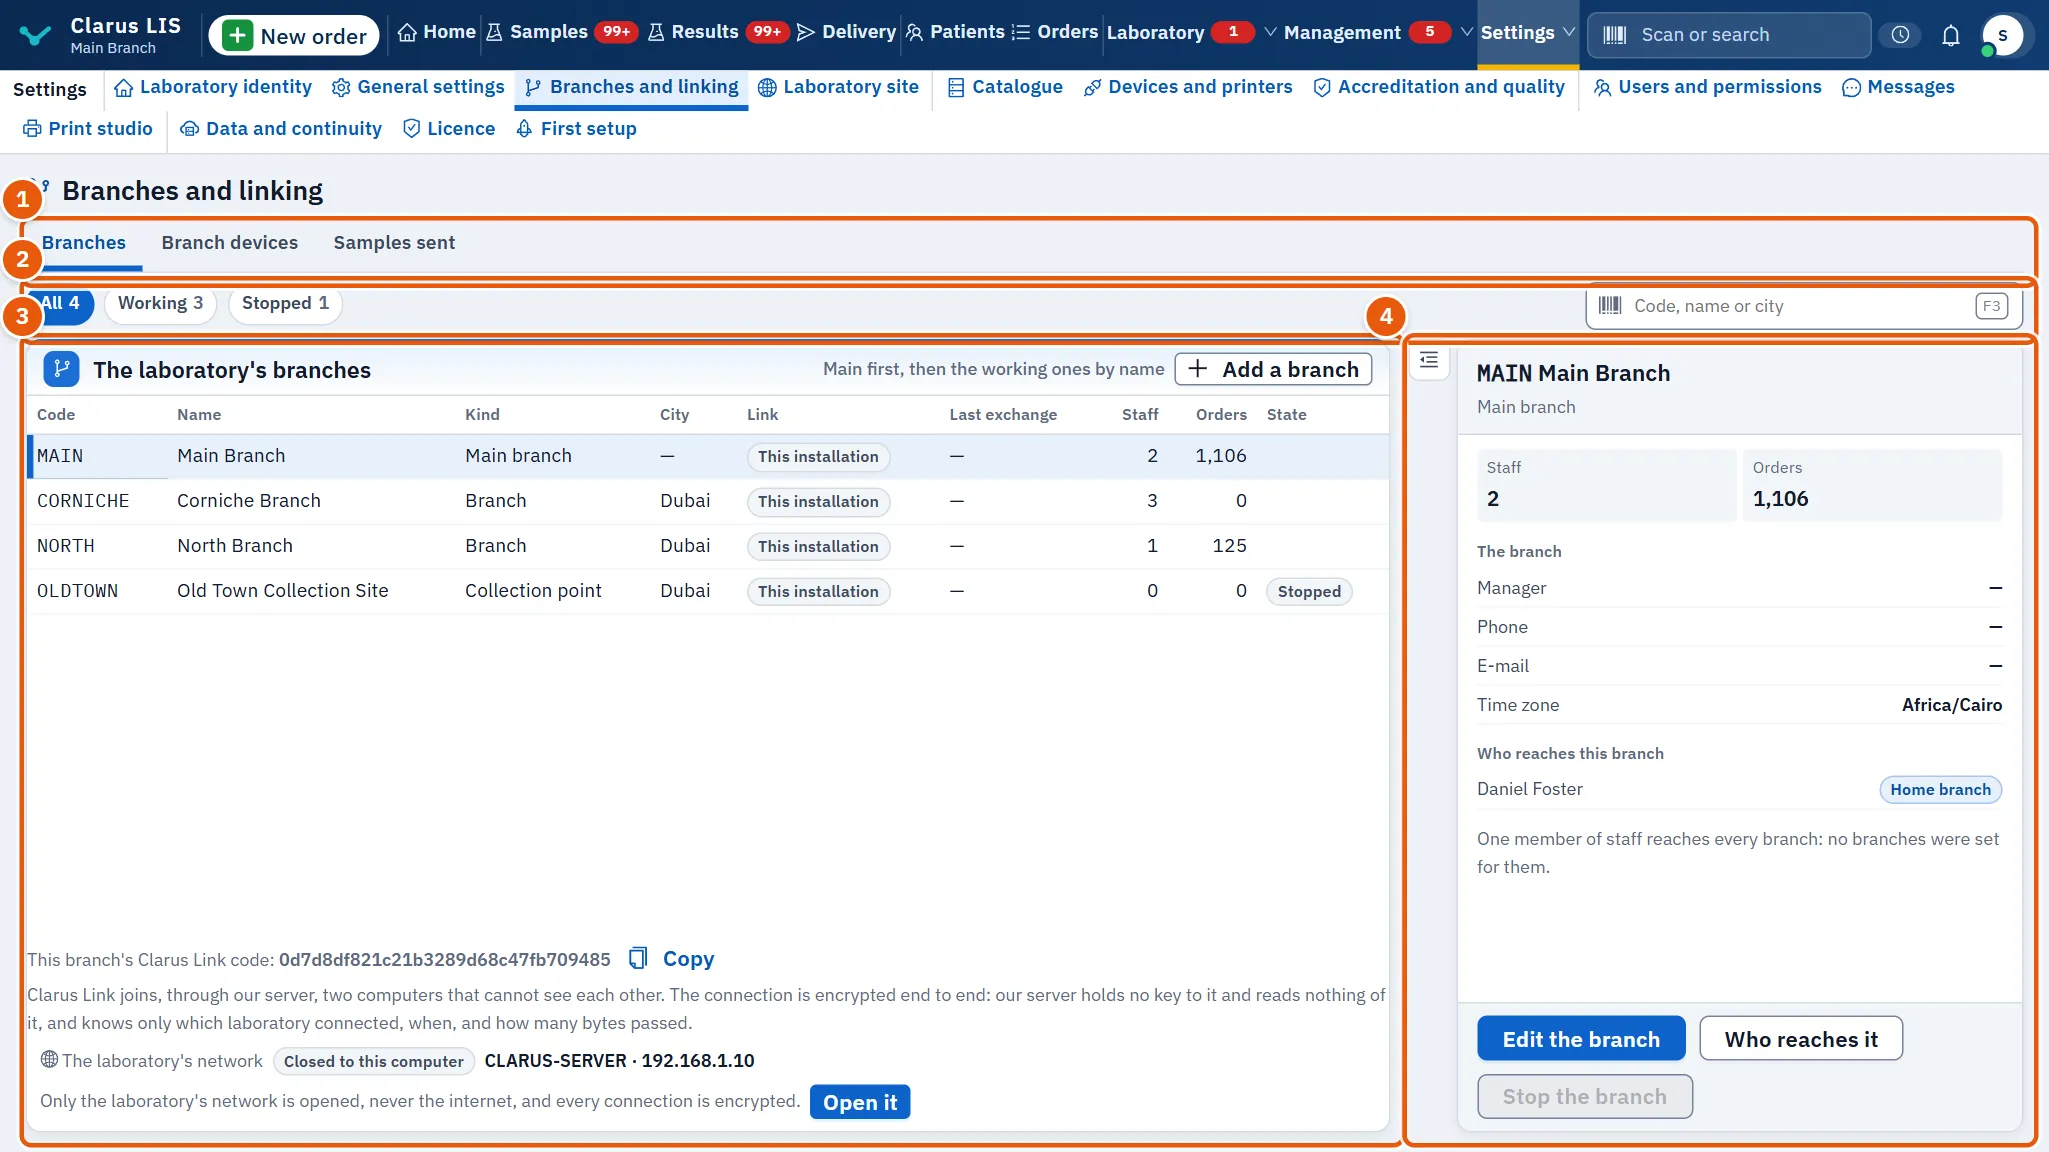
- The tabs: the pages available to you.
- The filters and search: All, Working and Stopped, each with its count, and a box to search by code, name or city.
- The list: The laboratory's branches, one row per branch.
- The details: the branch you chose, with the buttons to act on it.
Beside the title, when other branches are linked, small tags say how many are linked (… branches linked), how many are late to exchange and how many links are failing. They appear only when the program measured something to report.
27.4 The branches page
27.4.1 The list
| Column | What it shows |
|---|---|
| Code | The branch code. |
| Name | The branch name. |
| Kind | Main branch, Branch, Centre or Collection point. |
| City | The city. |
| Link | Whether the branch is on this installation or linked from another one. |
| Last exchange | How long ago the link last exchanged work; shown in orange when it is late. A dash means this branch has no link to report. |
| Staff | How many staff may sign in to it. |
| Orders | How many orders it holds. |
| State | A mark for the primary branch, and Stopped when the branch is stopped. |
The button Add a branch sits above the list. It is dim, with the note The current licence allows no more branches., when the licence allows no more branches.
27.4.2 The details of the chosen branch
| Element | What it does |
|---|---|
| Edit the branch | Opens the branch's form. |
| Who reaches it | Opens the list of people who may sign in to this branch. |
| Stop the branch / Start the branch | Stops the branch after a confirmation, or starts it again. The primary branch cannot be stopped. |
| Staff, Orders | The two counts. |
| The branch | Manager, Phone, E-mail, Address (when filled) and Time zone. |
| Who reaches this branch | The people who reach this branch; a tag marks those whose home branch it is (Home branch). |
| The link | For a branch on another installation: the link's state, route, number in the chain and last exchange, with the link controls described below. |
The three buttons appear only to whoever holds Manage the laboratory's structure: branches, numbering, first run, external laboratories. If some staff have no branch set, the page notes that they reach every branch.
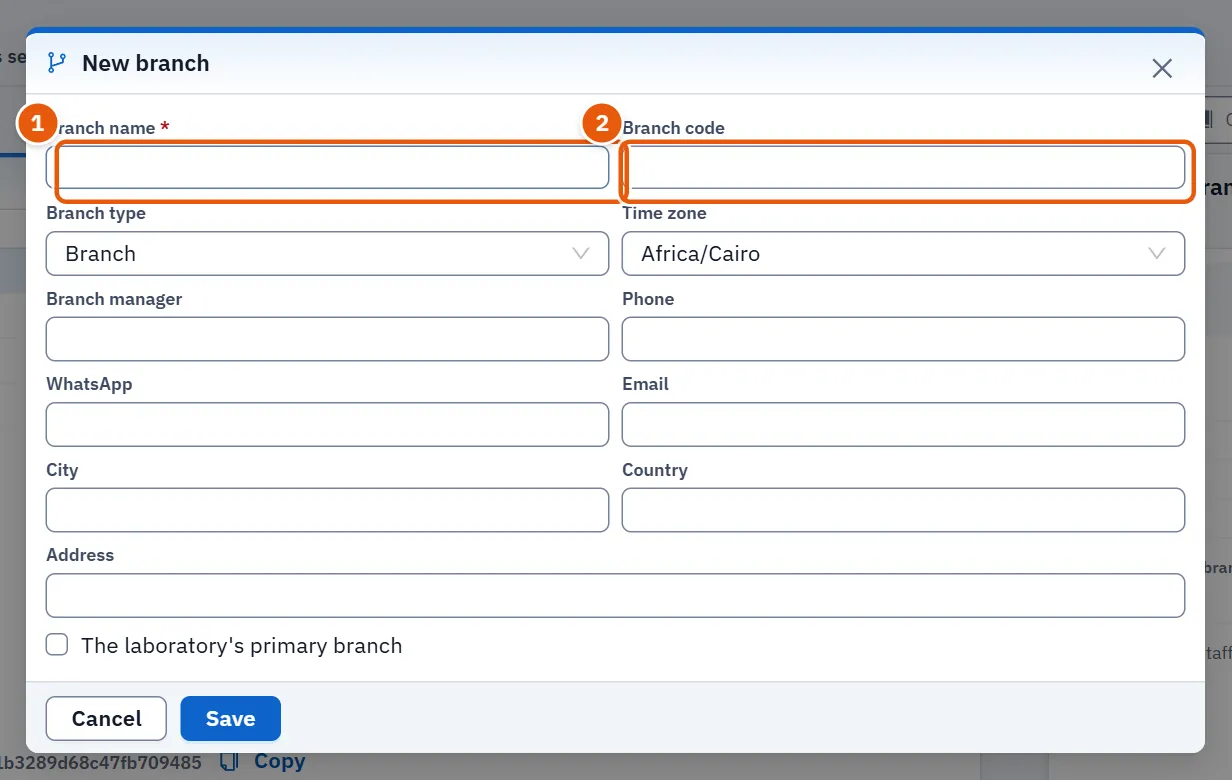
27.4.3 The branch form
| Field | What it holds |
|---|---|
| Branch name | Required. |
| Branch code | The branch code. |
| Branch type | The kind of branch. |
| Time zone | The branch's time zone; one choice is The computer's time. |
| Branch manager, Phone, WhatsApp, Email | Contact details. |
| City, Country, Address | Where the branch is. |
| The laboratory's primary branch | Marks the primary branch. |
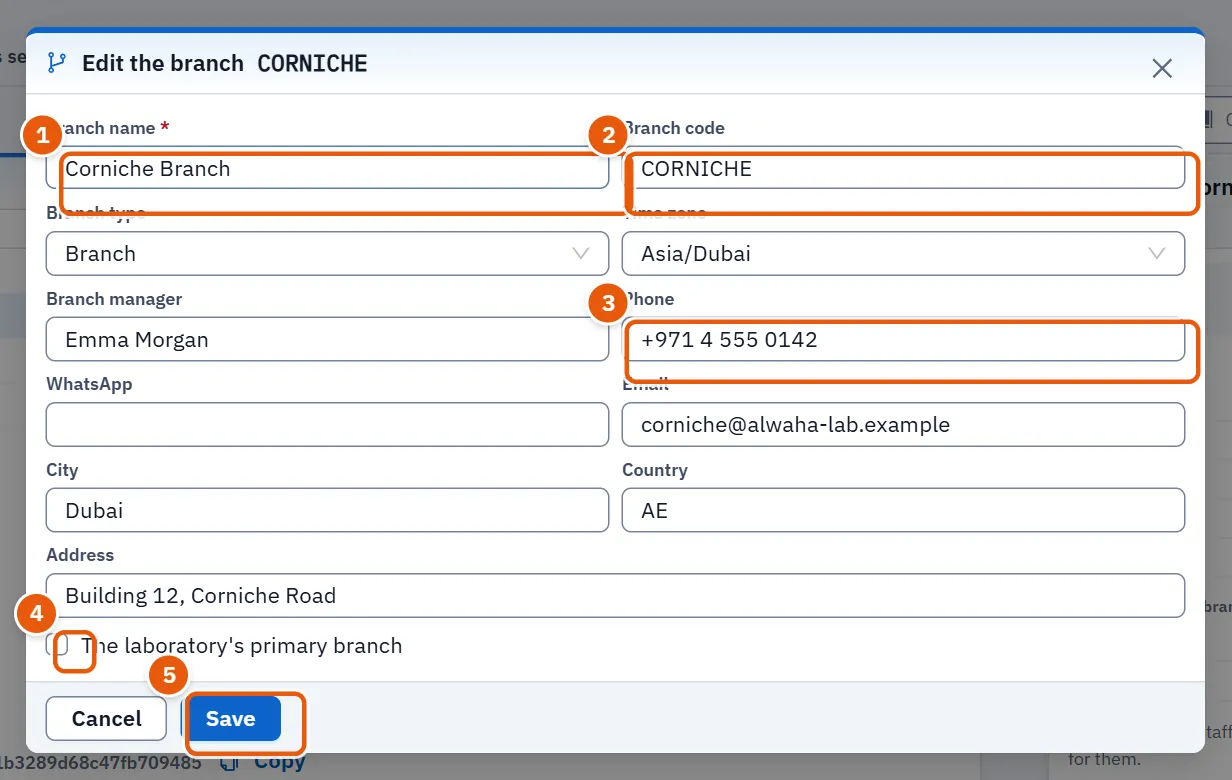
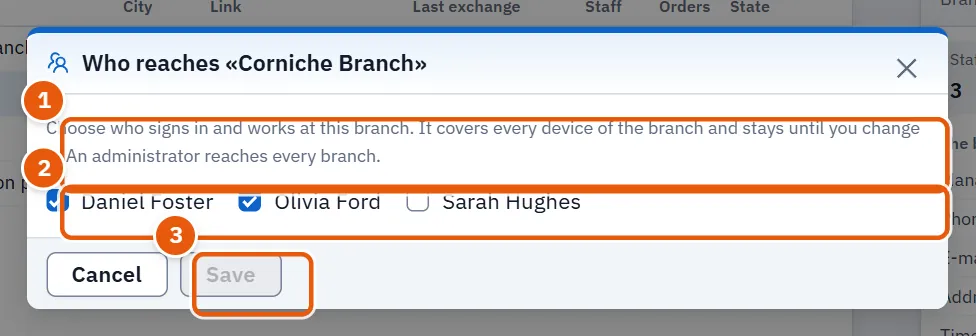
27.4.4 The access window
Who reaches «…» lists every user with a box. A ticked user signs in and works at this branch, on all its devices, until you change it. An administrator reaches every branch anyway.
27.5 The branch devices page
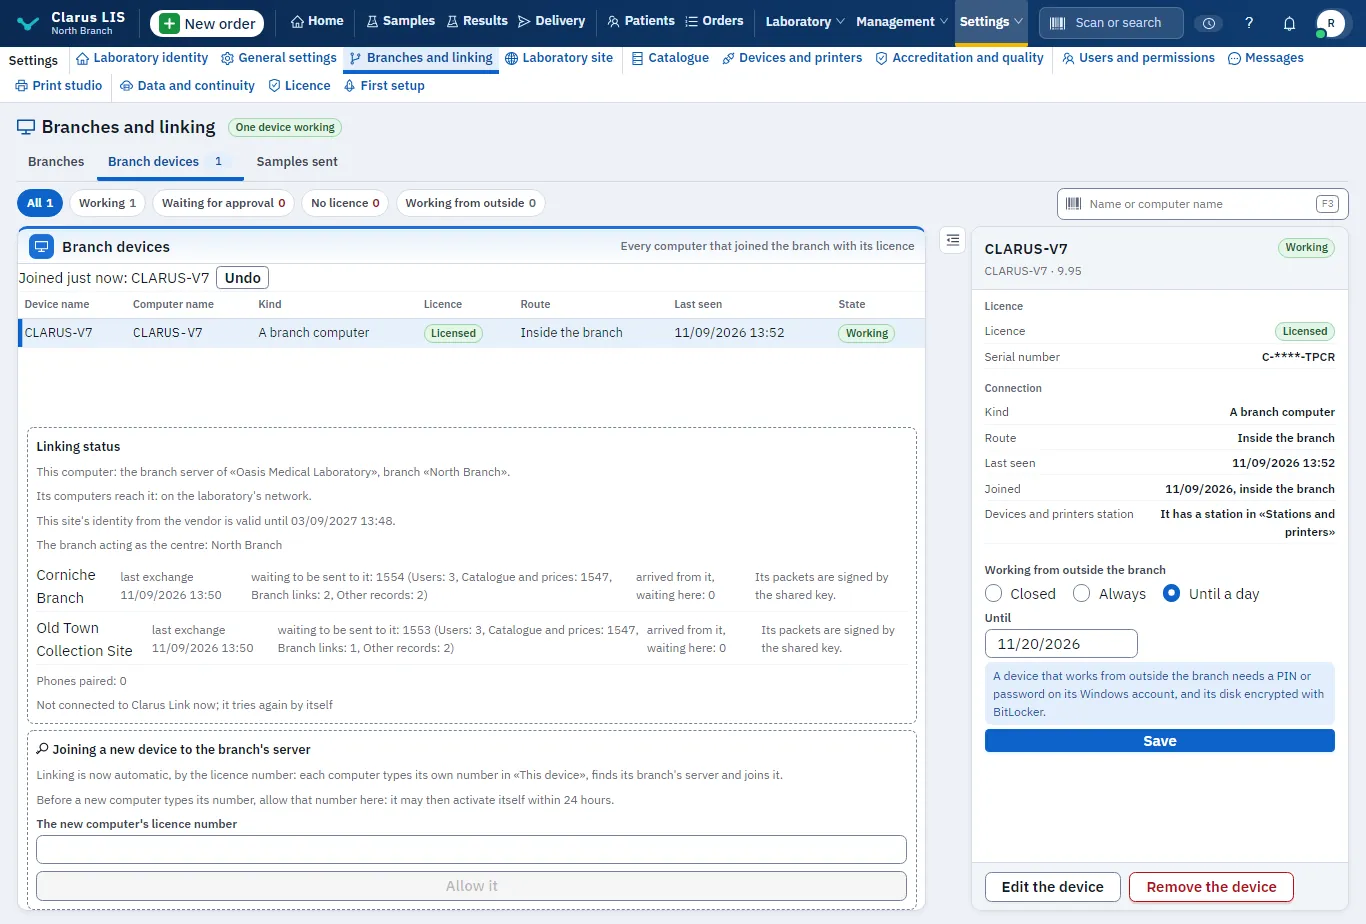
This page appears only when the server answers it. Its tab shows how many devices have joined.
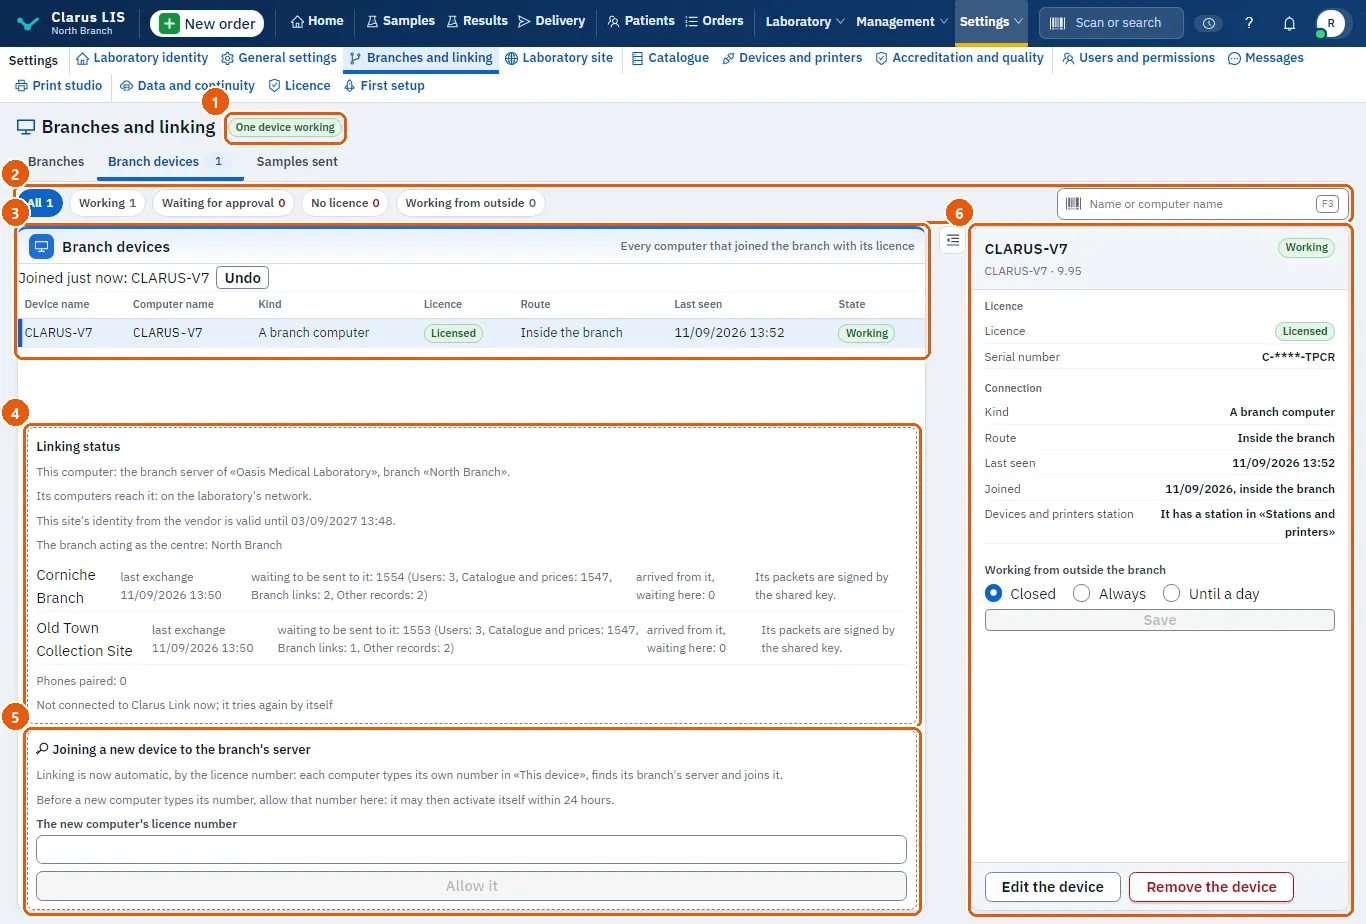
27.5.1 The list
| Element | What it does |
|---|---|
| Counts at the top | Devices working, waiting for approval and without a licence (the last two shown only when not zero). |
| Device state | All, Working, Waiting for approval, No licence, Working from outside. |
| Name or computer name | Searches by device name or computer name. |
| Columns | Device name, Computer name, Kind, Licence, Route, Last seen, State. |
| Joined just now: | A device that joined from inside the branch a moment ago, with Undo while it may be taken back. |
27.5.2 The chosen device
| Element | What it does |
|---|---|
| Approval | Shown while the device is Waiting for approval; approves its joining. |
| Edit the device | Opens a window to change its name, its kind (A branch computer or A personal device) and Another address it is reached at. |
| Remove the device | Removes it after a confirmation. Its sessions end at once, and it does not work until it joins again with its licence number. |
| Licence | The licence state, the serial number (masked) and Expires on. A working device without a licence gets a warning to enter its serial number on its own «This device» screen. |
| Connection | Kind, route, another address, last seen, when and how it joined, and whether it has a station. |
| Working from outside the branch | For a working device: Closed, Always or Until a chosen day, then Save. A note repeats the condition for working from outside. |
| Trusted device: its signature is the second factor | A box offered only for a working device of the laboratory kind (A branch computer) that is allowed to work from outside right now (always, or until a day not yet past); never for a personal device. |
27.5.3 Linking status, failed joins and joining a new device
Under the list, the page shows:
- Linking status: this computer's place in the chain, the road its computers reach it by, whether the vendor's identity for this site is valid, the branches it exchanges with (last exchange, what waits to be sent and to be applied, and whether the other site's clock agrees), and the phones paired. The program says in words what to do when a clock is off by two minutes or more.
- Joins that failed (seven days) (the last seven days): each failed join with its cause, what to do, the address it came from, the road and when. The program tells seven causes apart: too many attempts from one address (wait ten minutes); the computer does not hold this branch's number; the join was not signed with this branch's secret; the number is for another branch; the computer did not prove it holds its key; the computer had already joined (remove it here first to join it afresh); and any other failure.
- Joining a new device to the branch's server: joining is automatic by licence number. Each computer types its own number in «This device», finds its branch's server and joins. When the server is not yet open to the laboratory's computers, or Windows lacks the rule that lets them find it, the button Open the server to the laboratory's computers appears and opens it after a confirmation. To let a new computer activate itself, someone who holds the settings right types its number in The new computer's licence number and presses Allow it; the number may then activate itself within 24 hours.
27.6 The samples sent page
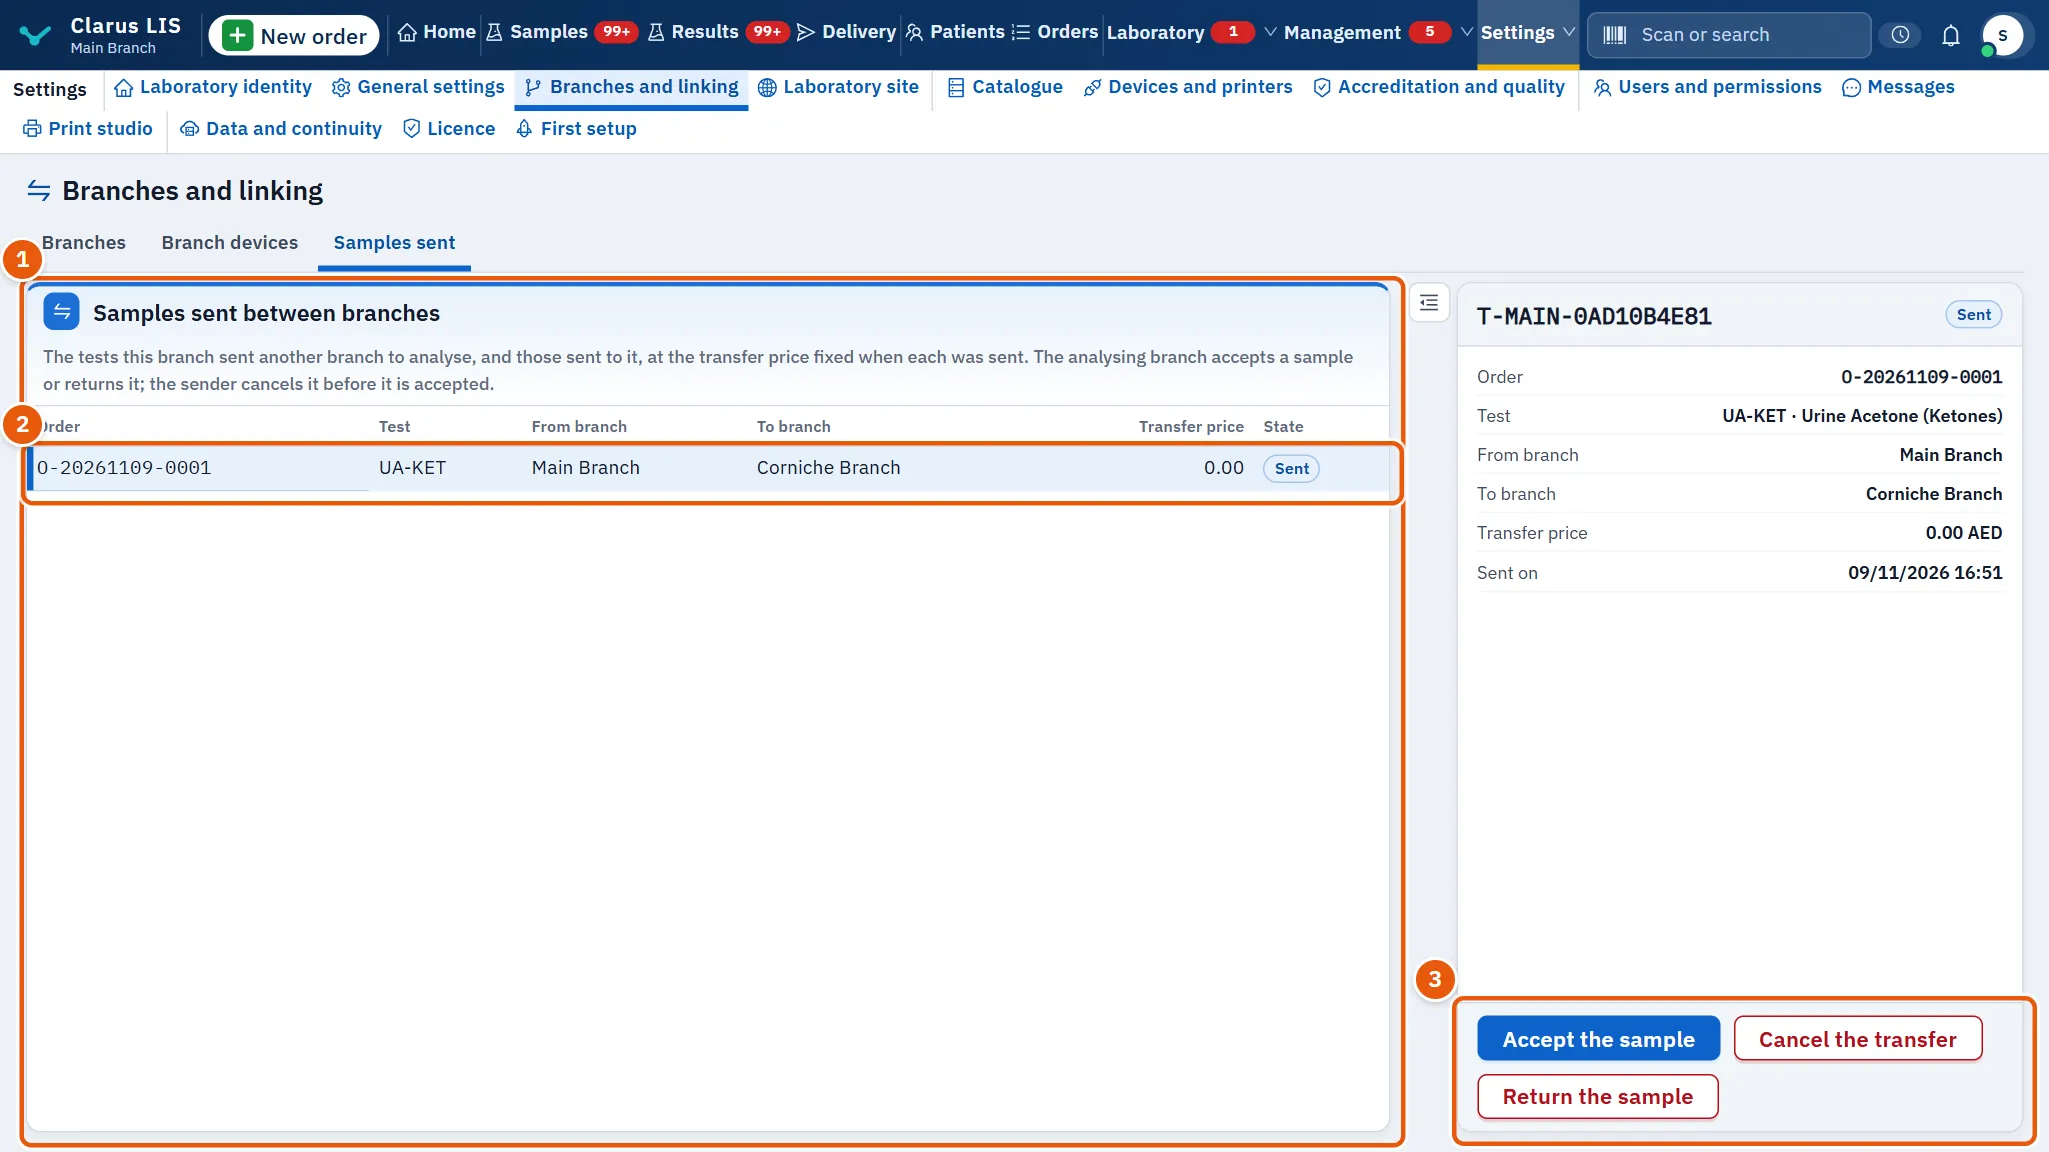
This page lists the tests this branch sent another branch to analyse, and those sent to it, at the transfer price fixed when each was sent.
| Element | What it does |
|---|---|
| Columns | Order, Test, From branch, To branch, Transfer price, State (Sent, Accepted, Returned, Cancelled). |
| Accept the sample | The analysing branch accepts the sample; its transfer price is recorded as that branch's internal revenue. |
| Return the sample | The analysing branch returns the sample to the sender. |
| Cancel the transfer | The sender cancels before acceptance; the test comes back to the sender. |
The buttons appear only for whoever holds Create orders, and only the ones the transfer's state allows. Each asks for a confirmation first: accepting says the transfer price is recorded as this branch's internal revenue; returning asks whether to return the sample to the branch that sent it; cancelling says the test comes back to this branch. Sending a test is not done here; it is done from the test itself, in the patient's file.
27.7 The linking tools under the list
These parts appear below the branches list, each to whoever holds the matching right.
27.7.1 The invitation box
Invite a branch to the chain appears only while an invitation made earlier is still open or waiting, and never otherwise; a new invitation cannot be made from it (see Chapter 28: Linking branches and computers). Each line shows the branch and a state tag: Open or Waits for your approval. For a branch waiting, Approve confirms its joining, after which it receives the chain's history. For an open invitation, Withdraw the invitation makes its key stop working.
27.7.2 The exchange line
| Element | What it does |
|---|---|
| Exchange now | Exchanges with the linked branches now; through Clarus Link it can take a while. The result is said under the button. |
| Import a file | Takes in a file saved from another branch. A file that is not from a branch of this laboratory is refused. |
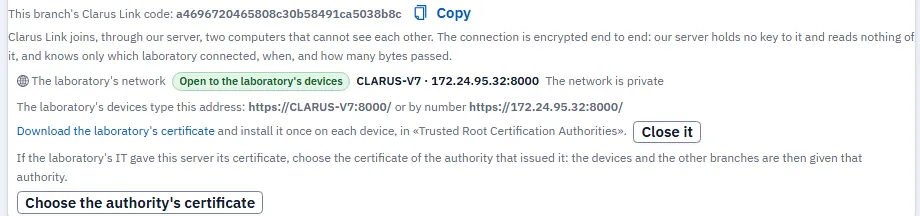
| This branch's Clarus Link code: | This branch's Clarus Link code, with Copy. Clarus Link joins two computers that cannot see each other through our server; the connection is encrypted between the two ends and our server reads nothing of it. |
| Service line | Says whether Clarus Link is provided, enabled or in trial, and until when. If Clarus Link refuses the connection, a warning gives the reason. |
27.7.3 The link of a branch on another installation
Choose such a branch to see The link: State (Linked, Paused, Link ended or Waiting for the key), Route, Its number in the chain and Last exchange.
| Button | When it appears and what it does |
|---|---|
| Save a file for the branch | While linked: saves a file of what waits, to carry to the other branch. |
| Pause the link / Resume the link | Pause shows while the link is not paused or ended; Resume shows when it is paused or ended. |
| End the link | Shown until the link is ended. After a confirmation, ends the link; nothing travels between the two until they are linked again. |
27.7.4 The laboratory's network
The laboratory's network appears to whoever holds the settings right. It shows whether the program is open to the laboratory's devices. Opening and closing are done on the server computer itself; on another computer the line only tells you to open the page there.
| State | What you see |
|---|---|
| Closed | The address to use (a choice, if the computer has several), a note that only the laboratory's network is opened and every connection is encrypted, and Open it. Without a network connection you are told to connect by cable or Wi-Fi and press Check now. |
| Waiting for Windows | A window appears on the server computer; choose Yes. The state is read again by itself, or press Check now. |
| Applied | A button to start the program again; the page then moves to its new address by itself. |
| Open | The address the devices type (by name, or by number), a link Download the laboratory's certificate to install once on each device, and Close it after a confirmation that says only this computer will reach the program afterwards. If Windows classes the network as public, Make this network private is offered; if the certificate names an old address, Renew the certificate is offered. |
27.7.5 The IT authority
When the server serves a certificate, or one is already chosen, a line appears about the certificate authority the laboratory's IT gave the server. Choose the authority's certificate takes a certificate file (.crt, .pem or .cer), never its key; the program uses it only if that authority issued the certificate the server serves, and otherwise says so and gives the program's own authority. Stop using it stops giving it to the devices and the other branches, after a confirmation.
27.8 Tasks step by step
27.8.1 Task 1: Add a branch
- Press Add a branch.
- Type Branch name and fill the other fields you need.
- Press Save. The message The branch was added. appears.
27.8.2 Task 2: Decide who reaches a branch
- Choose the branch in the list.
- Press Who reaches it.
- Tick the users who may sign in and work there, and untick the others.
- Press Save. The page says how many users' access changed.
27.8.3 Task 3: Stop a branch and start it again
- Choose the branch and press Stop the branch, then confirm. While it is stopped nobody signs in to it and no orders are recorded there.
- To bring it back, choose it and press Start the branch.
27.8.4 Task 4: Approve a device that wants to join
- Open the Branch devices tab.
- Choose the Waiting for approval filter and choose the device.
- Check its name and computer name, then press Approval.
- If the device has no licence, ask its user to enter the serial number on «This device», or allow the number first as described above.
27.8.5 Task 5: Let a device work from outside the branch
- Choose a working device in the Branch devices tab.
- Under Working from outside the branch, choose Always, or Until and pick the day.
- Press Save. The device must have a PIN or password and BitLocker, as the note says.
27.8.6 Task 6: Accept or return a sent sample
- Open the Samples sent tab and choose the transfer.
- Press Accept the sample or Return the sample and confirm.
27.8.7 Task 7: Approve or withdraw an invitation
- In the invitation box, find the branch.
- For one that Waits for your approval, press Approve and confirm.
- For an open one you no longer want, press Withdraw the invitation and confirm.
27.8.8 Task 8: End a link with a branch
- Choose the linked branch in the list.
- Under The link, press End the link and confirm.
- To link again later, press Resume the link, then read the state: while it waits for the key, there is nothing to type; the key of each link comes from the laboratory's signed list alone (see Chapter 28: Linking branches and computers).
27.8.9 Task 9: Open the laboratory's network to the devices
- On the server computer, find The laboratory's network.
- Press Open it and confirm.
- When Windows asks on that computer, choose Yes.
- If asked, start the program again and wait for the page to move to its new address.
- Give each device the address shown, and install the laboratory's certificate once on each.
27.9 Messages and what to do
| The screen says | Meaning | What to do |
|---|---|---|
| The current licence allows no more branches. | The licence allows no more branches. | Stop or reuse an existing branch, or ask about the licence. |
| The branches could not be loaded. | The list did not load. | Press the retry button on the list. |
| The branch could not be saved. | The branch was not saved. | Read the reason under the form and correct it. |
| This device does not work until it is licensed: enter its serial number on its «This device» screen. | The device is working but has no licence. | Enter its serial number on its own screen. |
| This file is not a file from another branch of the laboratory. | The imported file is not from this laboratory's branch. | Import the right file. |
| This computer is not connected to the laboratory's network. Connect it by cable or Wi-Fi, then check. | The server computer has no network. | Connect it, then press Check now. |
| Windows classes this network as public, so its firewall keeps the devices out. Make it private on this computer. | Windows classes the network as public. | Press Make this network private. |
| The certificate names an address this computer no longer has. Renew it, then start again; the devices keep trusting it. | The certificate names an address the computer no longer has. | Press Renew the certificate, then start again. |
| Clarus Link refused this branch's connection. | Clarus Link refused this branch. | Read the reason under it; it says what to do. |
| The authority's certificate could not be saved. | The authority's certificate was not saved. | Choose the authority's certificate again, not the key. |
27.10 See also
- Devices and printers: the stations and printers of a device.
- Patients: the patient's file, from which a test is sent to another branch.