Chapter 36Print studio
Menu: Print studio (in the setup group). Address: /setup/studio.
36.1 What this screen is for
This is where the laboratory designs what it prints: the result report, the payment receipt, the sample label, and the settings of the report engine that decides which parts a report draws. Each design is its own document, so each tab has its own save, and a change in one tab never saves another.
Next to the settings there is always a preview, drawn by the same server that prints. What you see is what the printer receives with the settings you have typed, even before you save them.
36.2 Who sees it
Whoever holds Manage settings. The menu hides the screen from everyone else.
| You can… | …if your role holds |
|---|---|
| Open the four tabs, change the designs and save them | Manage settings |
36.3 The screen at a glance
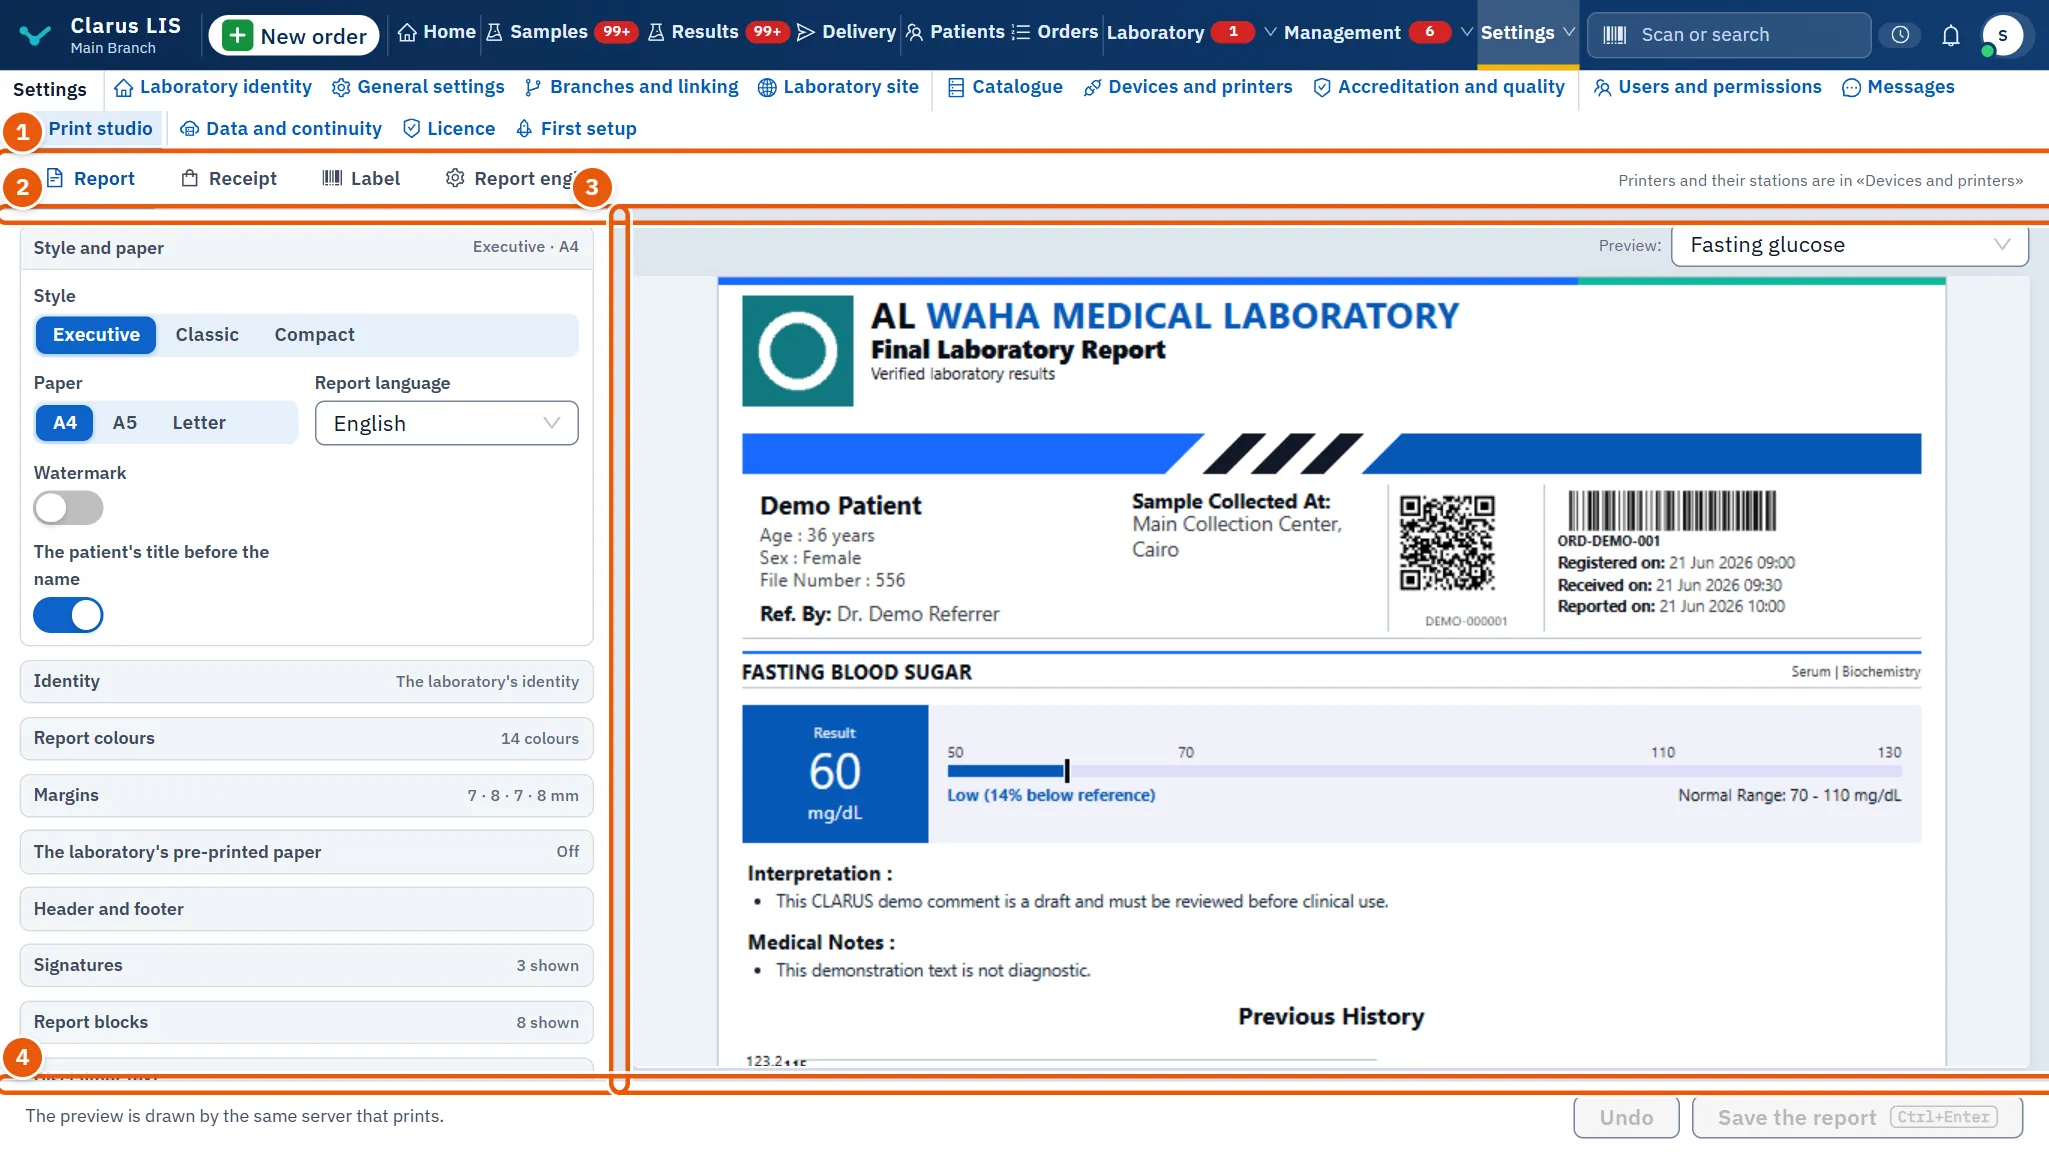
- The tabs: Report, Receipt, Label and Report engine. A small dot on a tab says it holds a change not yet saved. Switching tabs keeps every draft. Beside the tabs, a line reminds you that «Printers and their stations are in «Devices and printers»».
- The settings: groups of controls for the open tab.
- The preview: the design as it prints.
- The bar: the changes waiting, Undo, and the save button of the open tab.
36.3.1 The bar, the preview and saving
| Element | What it does |
|---|---|
| The changed-fields list | Names the fields you changed in the open tab and how many changes are unsaved. |
| Undo | Throws away the unsaved changes of the open tab only. Dim when there is nothing to undo. |
| The save button | Save the report, Save the receipt, Save the label or Save the engine, according to the tab. It also answers to Ctrl+Enter, even while the cursor is in a field, but only when the tab holds a change. Dim when the tab holds no change. |
| The preview | Follows your typing after a short pause. While it is being drawn: «The server is drawing the preview». If it cannot be drawn: «The preview could not be drawn.» with a retry. |
| Preview: (report and engine tabs) | A choice of sample report to draw: Fasting glucose, Lipid profile, Liver function, Kidney function, Urine culture, Critical notice. |
After a successful save a message says that the design was saved. If the server refuses, the reason appears in a red note in the bar and nothing is lost: the draft stays. Before the design loads the screen says «Loading the design»; if it cannot load: «The design could not be loaded.».
36.4 The report tab
The tab Report designs the printed result report.
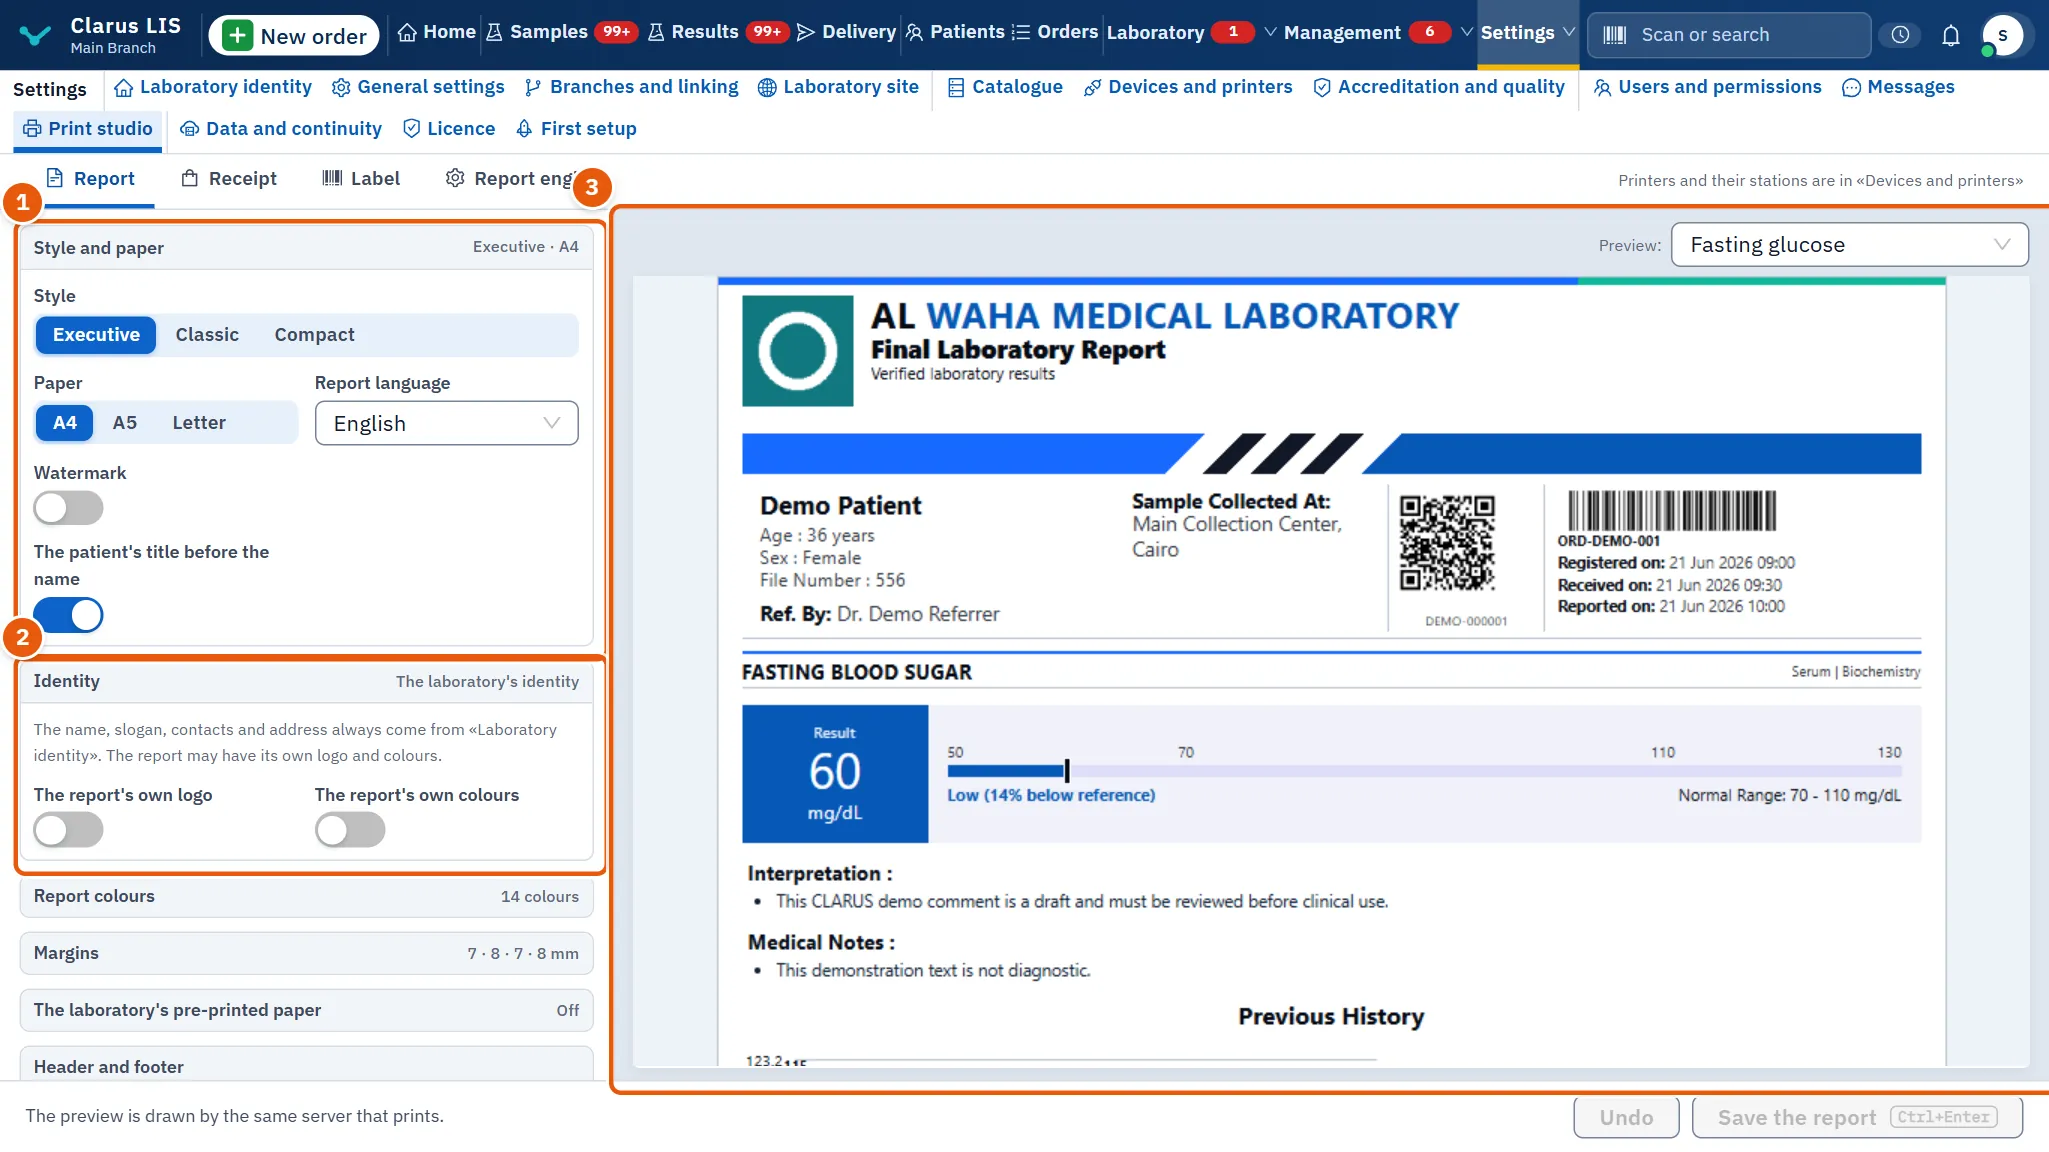
36.4.1 Style and paper, identity, colours
| Element | What it does |
|---|---|
| Style | Executive, Classic or Compact. |
| Paper | A4, A5 or Letter. |
| Report language | The language the report prints in. |
| Watermark | A switch. When on, a field The watermark's text appears; left empty, the laboratory's name is printed. |
| The patient's title before the name | A switch. |
| The report's own logo / The report's own colours | The name, slogan, contacts and address always come from Laboratory identity. These two switches let the report have its own logo and colours. With colours on, Primary colour and Accent colour appear. |
| Black and white for printing | The report prints without colours; the PDF that is sent stays in colour. |
| Colour fields under Report colours | Fourteen colours: Highlight, Header text, Secondary text, Borders, Paper, Section background, Table header, Low result, Normal result, High result, Critical result, Reference range track, Earlier results line, Footer. |
36.4.2 Margins, header and footer
| Element | What it does |
|---|---|
| Margins | Top, Bottom, Right, Left, in mm, from 0 to 45. |
| Header height (0 to 80 mm), Header alignment | The header's height and alignment (Left, Centre, Right). |
| Logo in the header, Contacts in the header | Switches for the header. |
| Footer height (0 to 60 mm), Footer alignment | The footer's height and alignment. |
| Signature in the footer, Disclaimer in the footer | Switches for the footer. |
| Disclaimer text | The text printed as the disclaimer. |
36.4.3 The laboratory's pre-printed paper
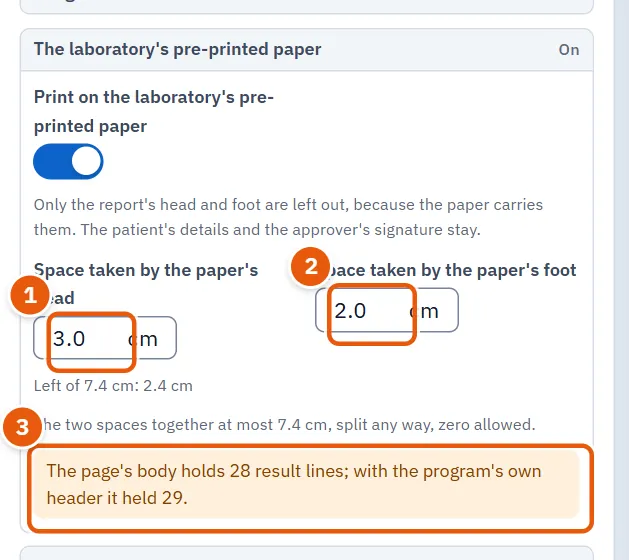
The group The laboratory's pre-printed paper appears when the program offers it. Switch on Print on the laboratory's pre-printed paper and the report leaves out its own head and foot, because the paper carries them; the patient's details and the approver's signature stay. Then give the space the paper's head takes (Space taken by the paper's head) and its foot (Space taken by the paper's foot) in cm. The two spaces together may not pass a limit that the screen shows, split any way, zero allowed; a line shows how much is left. A note under the fields tells you how many result lines the page body holds compared with the program's own header, and warns in red if the page would have no room for the results.
36.4.4 Signatures
The group Signatures lists three signatories: Authorised signatory, Clinical pathologist and Medical lab technician.
| Element | What it does |
|---|---|
| The switch of each signatory | Shows or hides that signature. With it off, that signatory's name, job-title and picture controls are dim. |
| The name and job-title fields, each in Arabic and in English | Each line prints in the report's language. A line written in one language only prints on both reports. |
| Upload the signature's picture | Takes a PNG or JPEG picture up to 700 KB, on a transparent or white background, wider than tall. Then Replace the picture and Remove the picture. A picture that is too big, or not PNG or JPEG, is refused in words. |
| Signature picture height | From 6 to 12.7 mm; the most is twice the old size, which is the default. The picture takes the space above the footer, so the results lose no room. |
36.4.5 Blocks
Under Report blocks each block of the report has a switch: Laboratory identity, Patient details, Order details, Sample summary, Report status, Clinical notes, Authorised signature, Disclaimer. The Result table has no switch: a report always prints its results.
36.5 The receipt tab
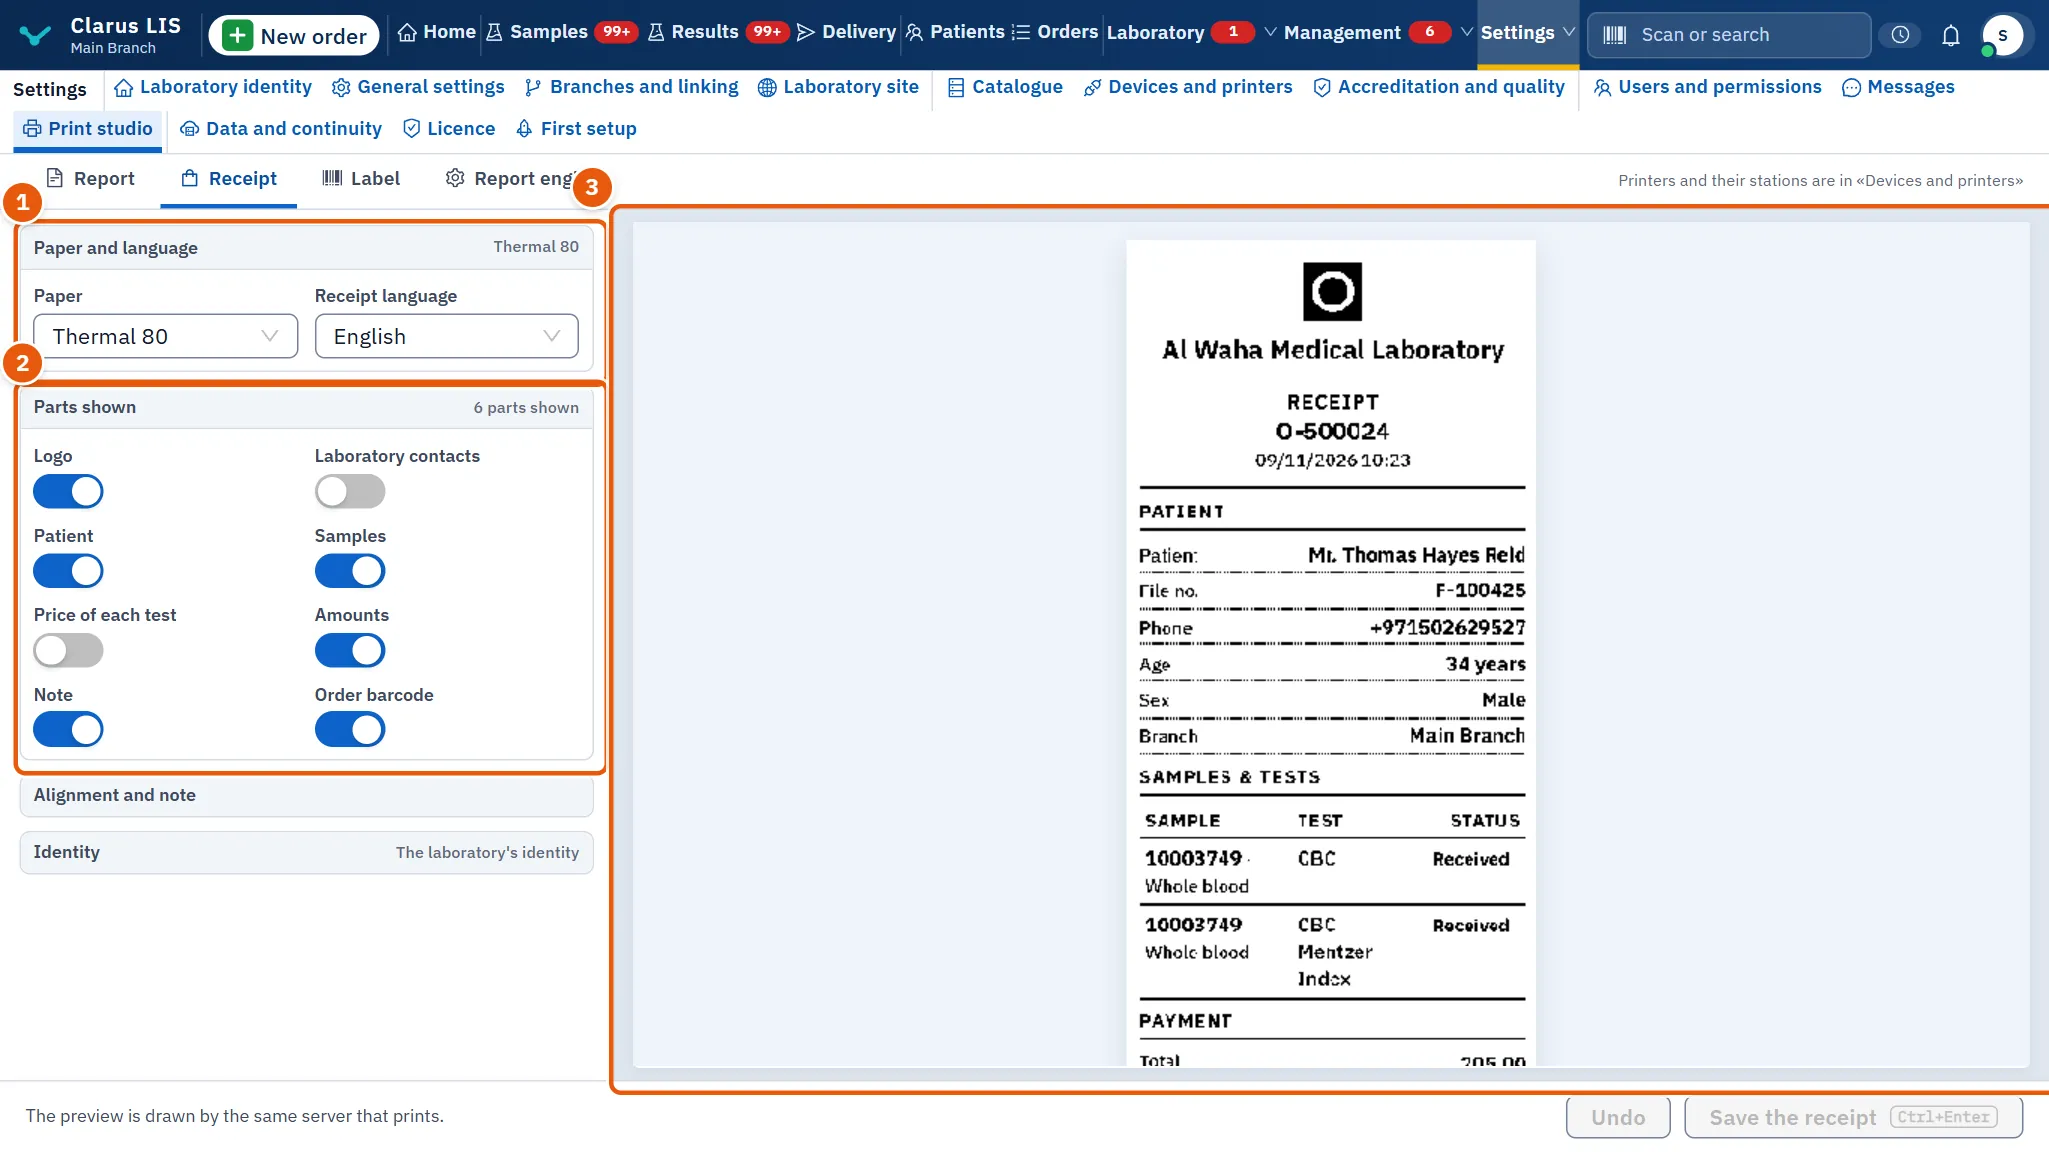
The tab Receipt designs the payment receipt. The preview is the receipt as it prints.
| Element | What it does |
|---|---|
| A4, A5, Thermal 80, Thermal 58 under Paper | The receipt's paper. |
| Receipt language | The receipt's language. |
| Parts shown | Switches: Logo, Laboratory contacts, Patient, Samples, Price of each test, Amounts, Order barcode, Note. The group's summary counts the parts shown. |
| Alignment and note | Header alignment and Note alignment (line start, centre, line end), the Note title and the Default note text. |
| Identity | The receipt's own logo and The receipt's own colour; with the colour on, Accent colour appears. The name and contacts still come from Laboratory identity. |
36.6 The label tab
The tab Label designs the sample label. The preview shows the label at its real size and printing resolution, as the printer receives it.
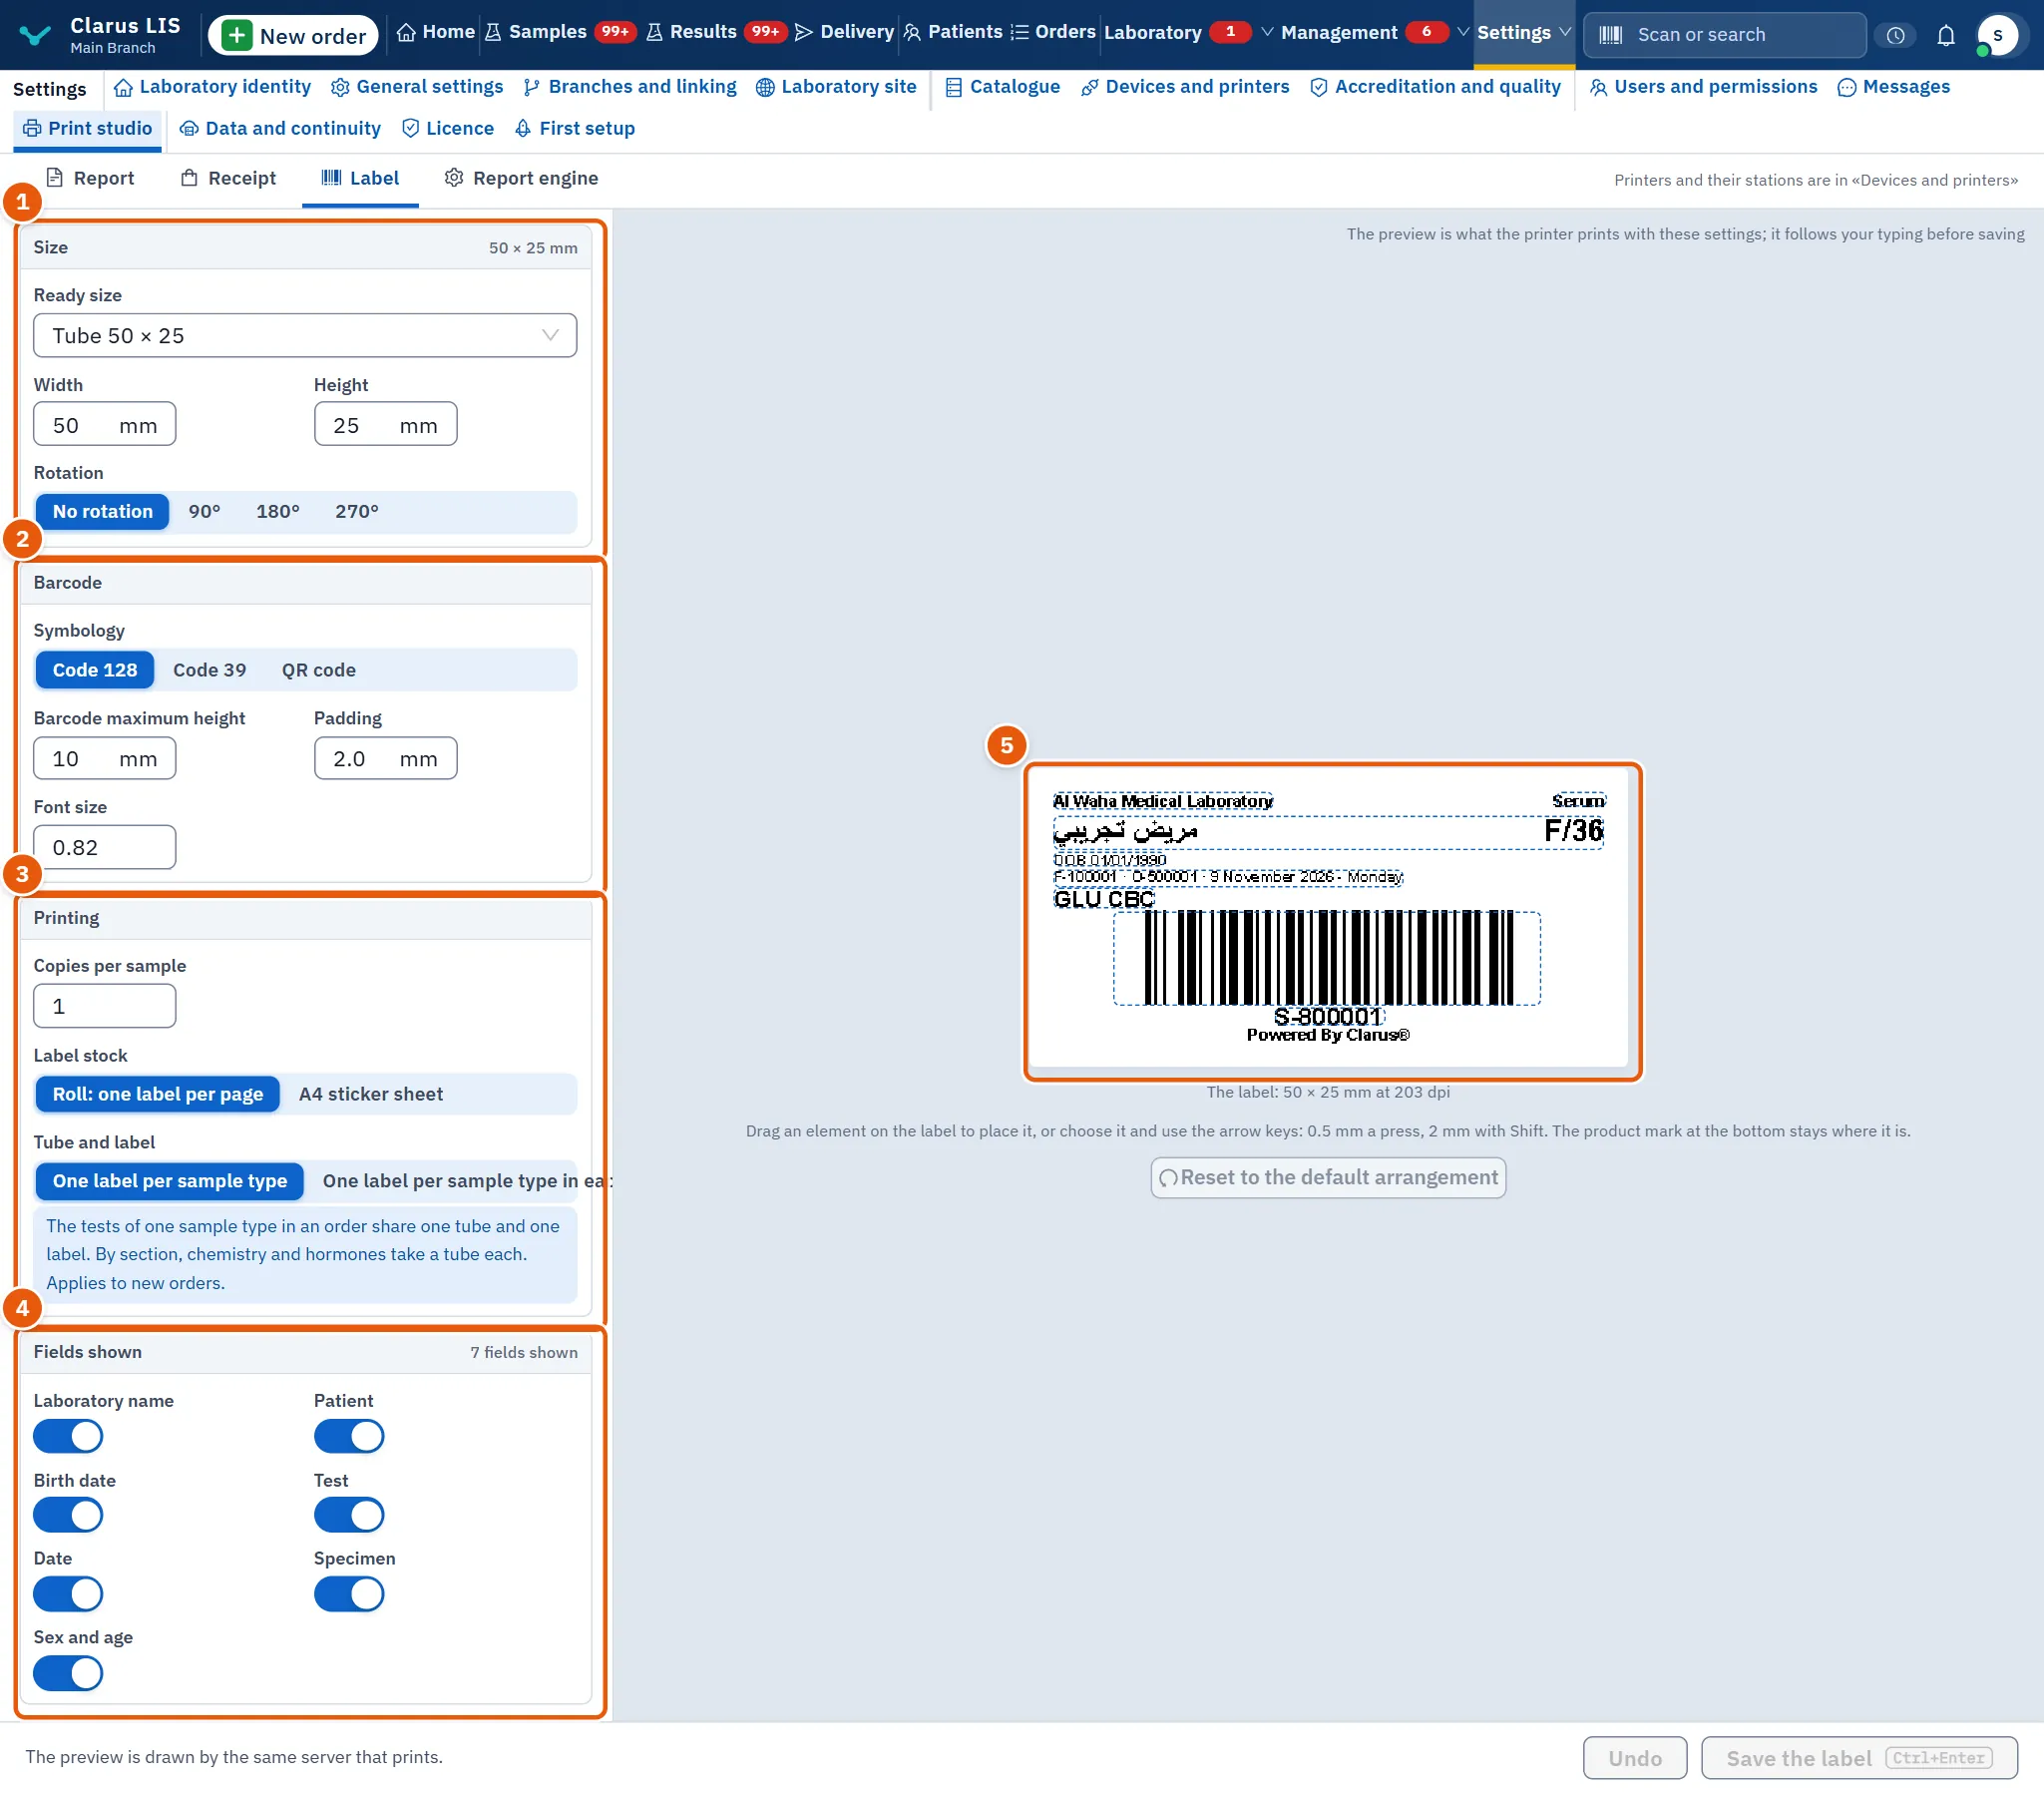
| Group | Controls |
|---|---|
| Size | Ready size (tube and slide sizes, or a custom size when you type your own), Width (20 to 110 mm), Height (10 to 80 mm), Rotation (none, 90, 180 or 270 degrees). |
| Barcode | Symbology (Code 128, Code 39, QR code), Barcode maximum height (4 to 40 mm), Padding (0.5 to 6 mm), Font size (0.55 to 1.35). |
| Printing | Copies per sample (1 to 10); Label stock: Roll: one label per page or A4 sticker sheet; Tube and label: one label per sample type, or per sample type in each section (it applies to new orders). With the A4 sheet three more fields appear: Sheet columns (1 to 8), Gap between labels and Page margin. |
| Fields shown | Switches: Laboratory name, Patient, Birth date, Test, Date, Specimen, Sex and age. |
36.6.1 Arranging the elements on the label
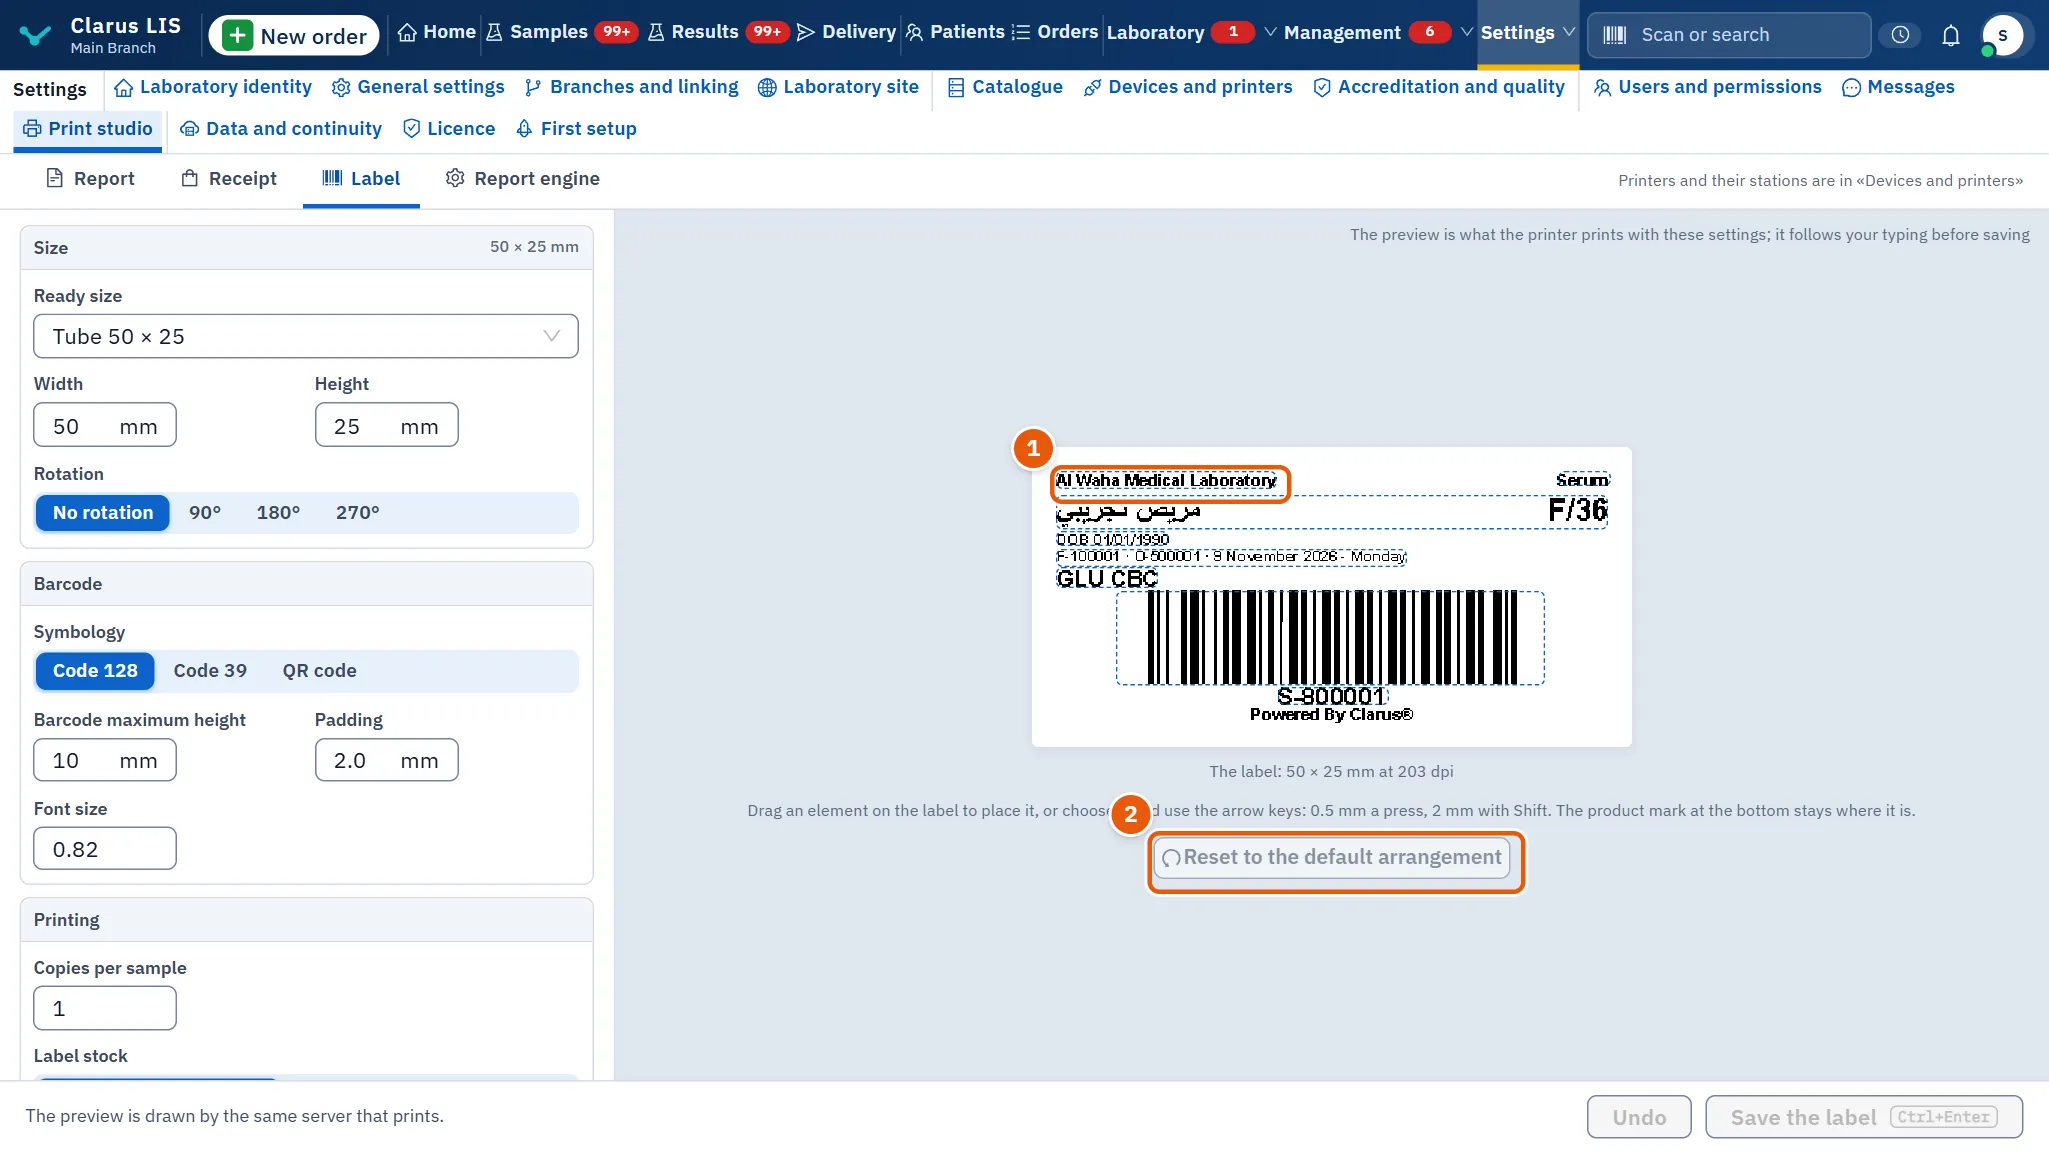
The preview is also a stage. Drag any element to place it, or choose it and move it with the arrow keys: half a millimetre a press, 2 mm with Shift. The product mark at the bottom stays where it is. If two elements cover each other the screen names them and asks you to move one. Reset to the default arrangement returns the default arrangement; it is dim while no element has been placed by hand. There is no "restore the shipped design" button on this screen.
36.7 The engine tab
The tab Report engine does not draw a design: it decides which parts the report engine draws. Its preview is the report's own, drawn with these settings and with the report tab's current draft, and you can pick the sample report as in the report tab.
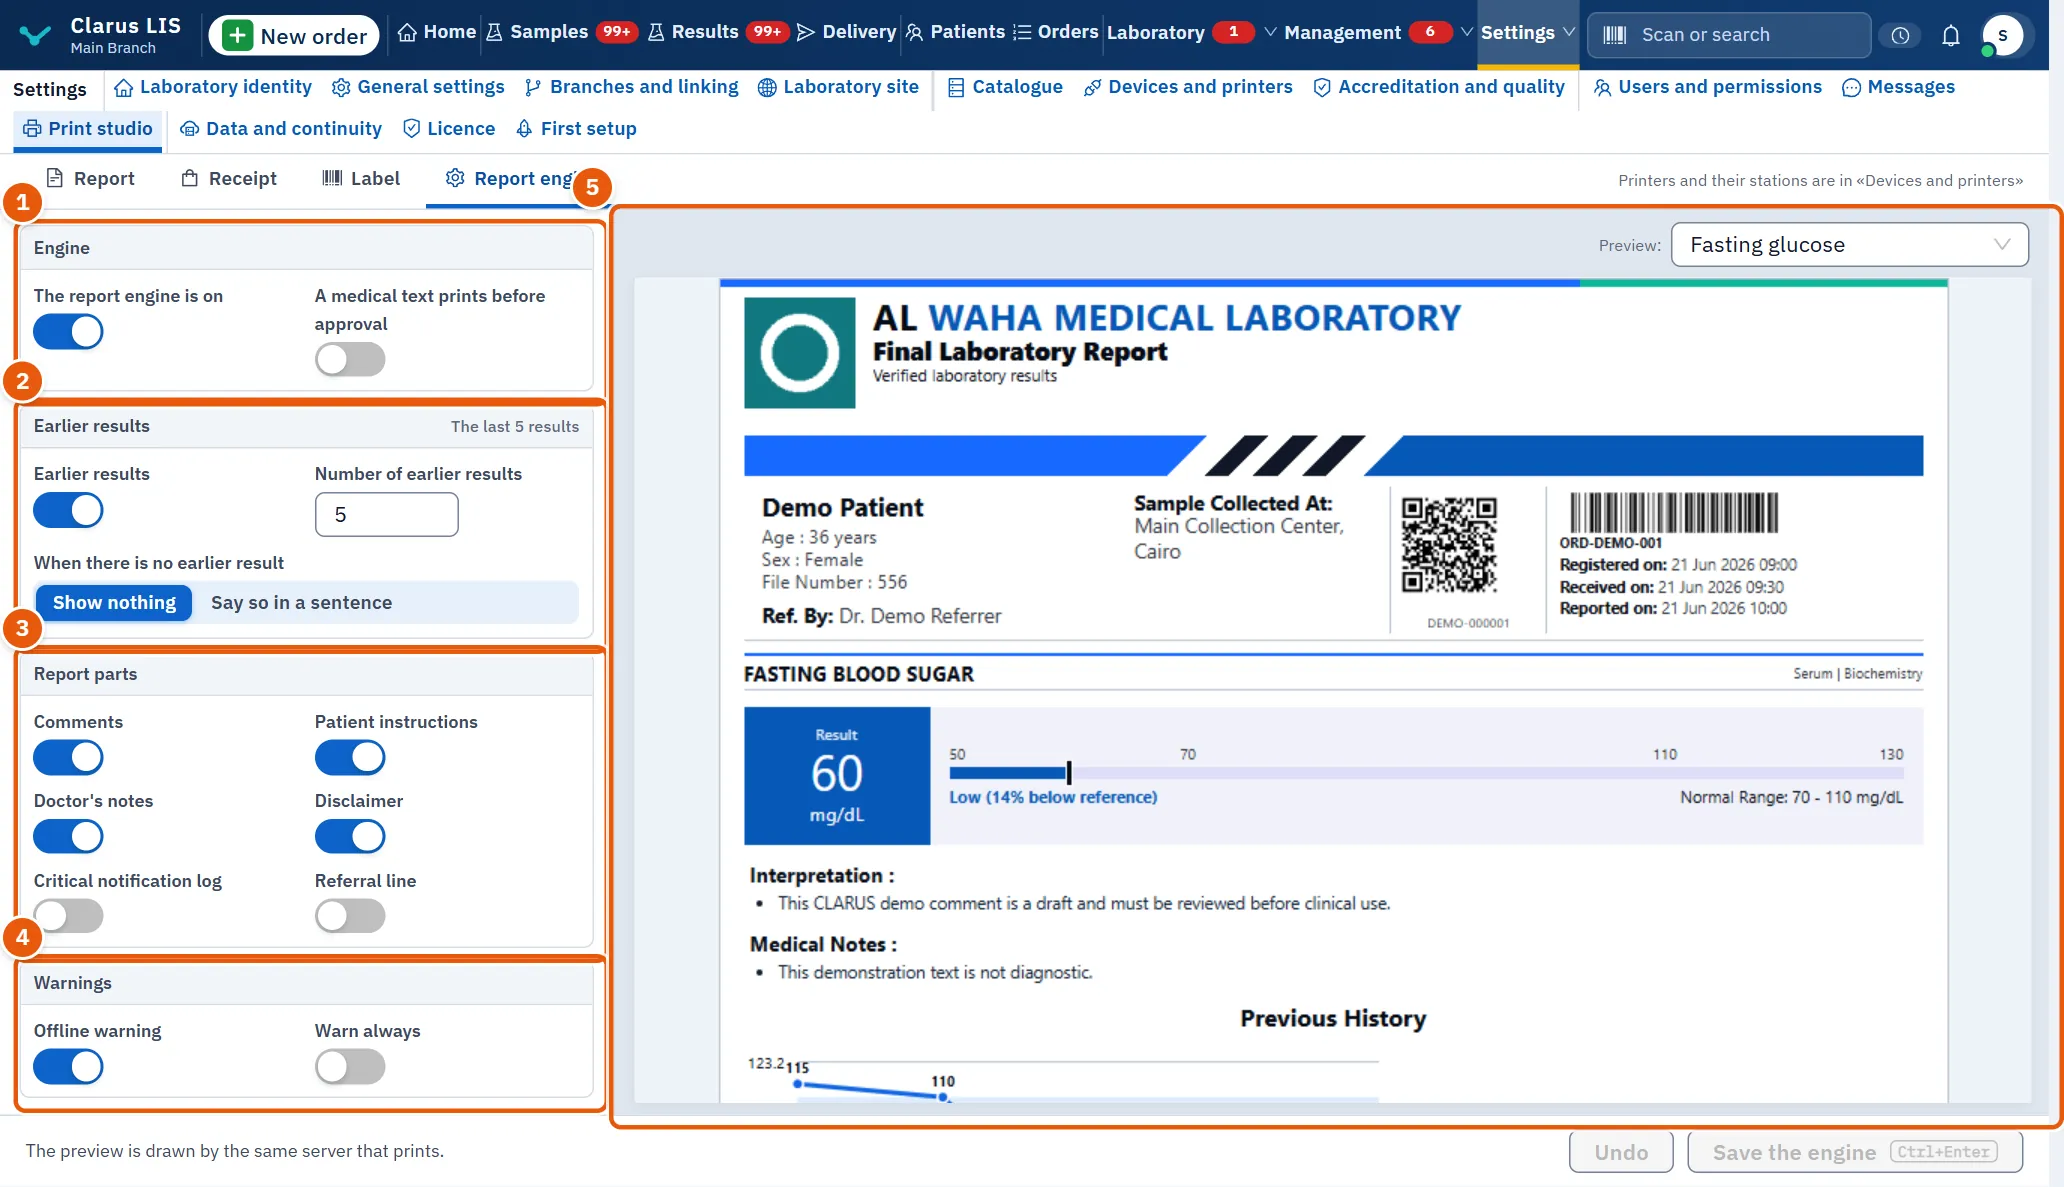
| Group | Controls |
|---|---|
| Engine | The report engine is on; A medical text prints before approval. |
| Earlier results | Earlier results (the summary says «The last N results» or «Not shown»); Number of earlier results (1 to 10, dim when earlier results are off); When there is no earlier result: Show nothing or Say so in a sentence. |
| Report parts | Switches: Comments, Patient instructions, Doctor's notes, Disclaimer, Critical notification log, Referral line. |
| Warnings | Offline warning; Warn always. |
36.8 Tasks
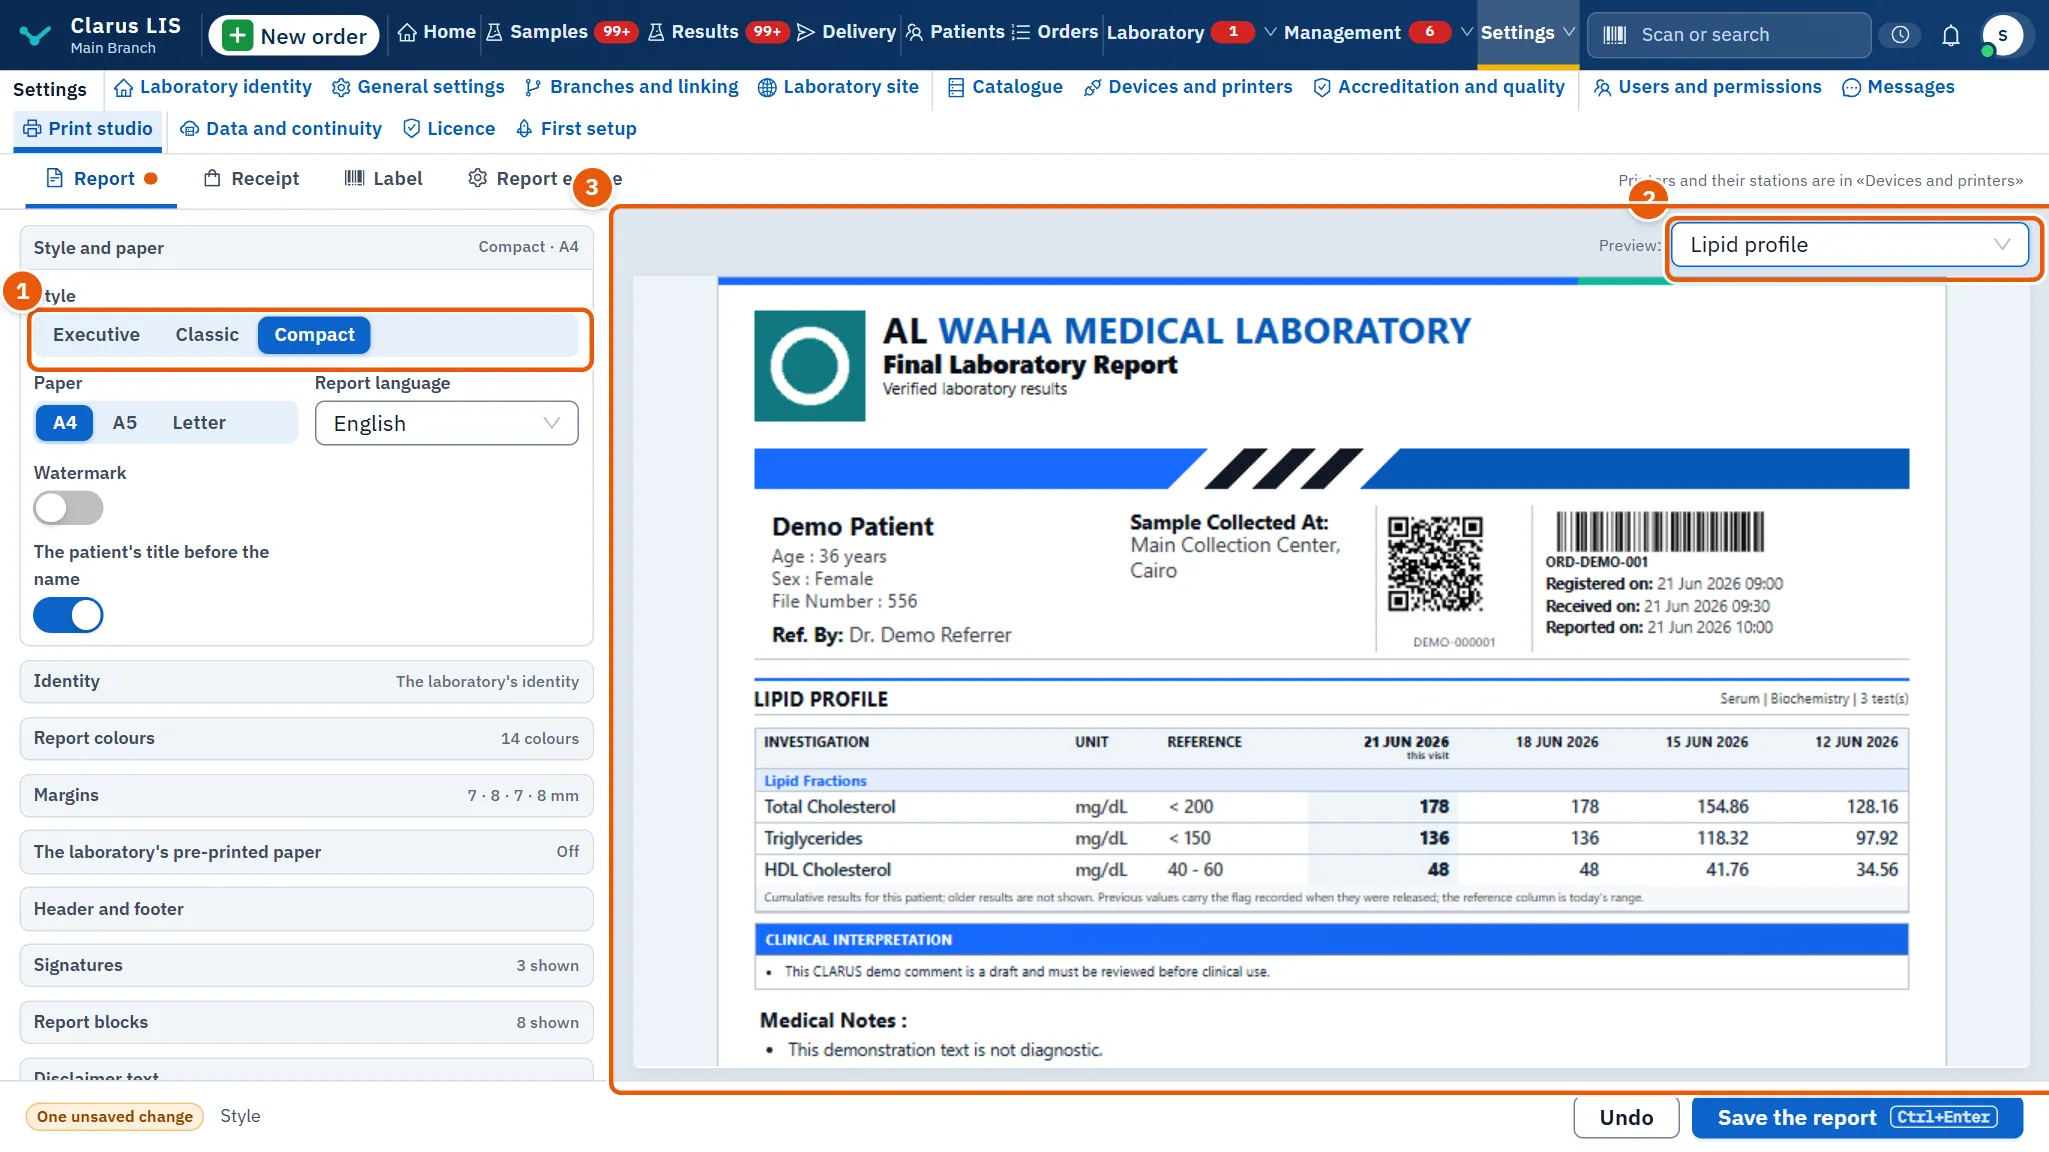
36.8.1 Task 1 — Change the report's style and save it
- Open Print studio; the Report tab is the first.
- In Style and paper choose a Style.
- Pick a sample report from Preview: and look at the preview.
- Press Save the report (or Ctrl+Enter).
36.8.2 Task 2 — Print on the laboratory's pre-printed paper
- In the report tab open The laboratory's pre-printed paper and switch on Print on the laboratory's pre-printed paper.
- Measure the head and foot already printed on the paper and type them in Space taken by the paper's head and Space taken by the paper's foot, in cm.
- Read the note about room: if it is red, reduce the two spaces.
- Press Save the report.
36.8.3 Task 3 — Add a signatory's picture
- In Signatures switch on the signatory.
- Press Upload the signature's picture and choose a PNG or JPEG file under 700 KB.
- Adjust Signature picture height if needed, then press Save the report.
36.8.4 Task 4 — Choose a label size and arrange it
- Open the Label tab and choose a Ready size, or type the width and height.
- Switch the Fields shown you want.
- Drag the elements on the stage until nothing covers anything.
- Press Save the label.
36.8.5 Task 5 — Show the patient's earlier results
- Open the Report engine tab.
- Switch on Earlier results and set Number of earlier results.
- Choose what to do when there is no earlier result.
- Press Save the engine.
36.9 Messages and what to do
| The screen says | Meaning | What to do |
|---|---|---|
| The design could not be loaded. | The design did not load. | Press the retry button; if it keeps failing, check the connection to the server. |
| The preview could not be drawn. | The server could not draw the preview. | Press the retry button, or undo your last change. |
| The picture is larger than 700 KB. Make it smaller, then upload it. | The picture is too big. | Make it smaller and upload it again. |
| Only a PNG or JPEG picture is taken. | The file is not a PNG or JPEG. | Convert it. |
| These elements cover each other on the label: …. Move one of them so that everything reads clearly. | Two elements cover each other on the label. | Drag one away. |
| The page has no room for the results if the two spaces together exceed … cm. | The two spaces leave no room for results. | Reduce the spaces. |
| The settings could not be saved. Try again. | The save failed. | Try again; the draft is kept. |
36.10 See also
- Printers and their stations: Devices and printers.
- The name, logo and contacts printed on every design: Laboratory identity.