Chapter 2Getting started
This part is about what a person meets first: signing in, the bar at the top of every screen, the keys, what each role sees, the first setup, and how to read this manual.
2.1 What this part is for
Every working day starts the same way: you sign in, and the program shows you its bar. This part explains the sign-in (by password or by scanning a code), what to do when a password is forgotten, the bar and everything on it, the keys that work on every screen, why two colleagues see different menus, and the first setup that prepares a new laboratory.
2.2 How to read this manual
- A name in bold is a button, field, tab or window exactly as the program writes it, in the language you chose. When a name changes with the language, the manual follows the language it is written in.
- A picture carries numbered discs. The caption says what each number points at, for example «1 the box, 2 the button». Read the caption beside the picture.
- A key is written between brackets, for example Ctrl+S. Keys are listed in the section «The keys of the program».
- A note marked Note adds a detail, Tip a shortcut, Warning something that can cost you work, and Danger something that cannot be undone.
- Every screen has its own chapter. This part is the only one that is not about one screen.
2.3 Signing in
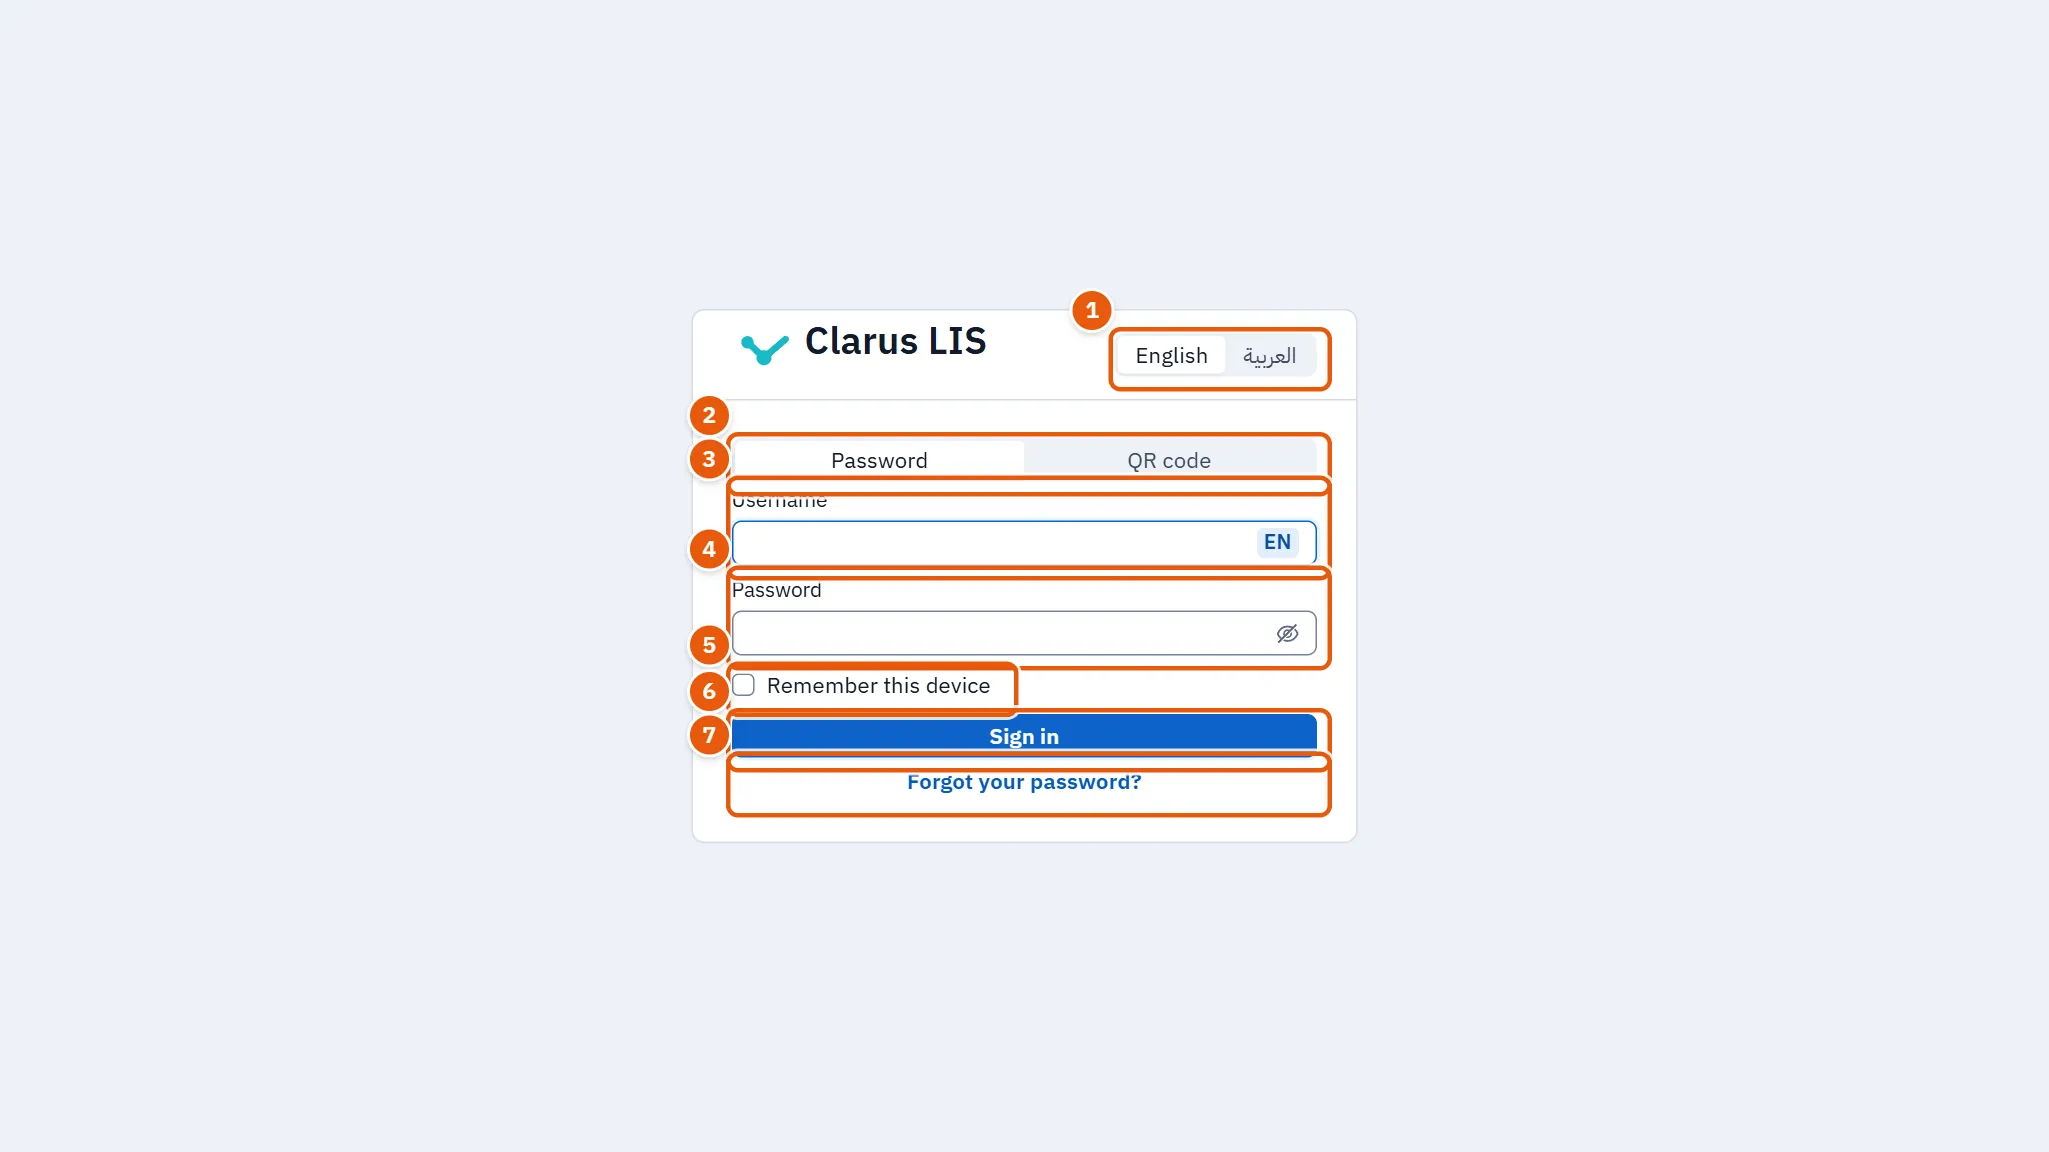
The sign-in screen is a single card titled Clarus LIS. It offers the language (Language) first, so that someone who cannot read the screen can change it before anything else.
| Element | What it does |
|---|---|
| Language | Chooses the language of the screen before you sign in. |
| How to sign in | Appears only when more than one way is offered: Password, or QR code where the laboratory offers it. |
| Username | Your user name. It is required: if you leave it empty the screen says «Enter your username». |
| Password | Your password. |
| Remember this device | Keeps this computer signed in to you. Tick it only on a computer you use alone. |
| Sign in | Signs you in and takes you to the screen you were trying to open, or to the home. |
| Forgot your password? | Opens the recovery window (below). |
| Sign in without a password (new installation) | Appears only on a new installation whose administrator has no password yet. |
2.3.1 Task 1: sign in with a user name and password
- Type your name in Username.
- Type your password in Password.
- Tick Remember this device only if this computer is yours alone.
- Press Sign in.
If the sign-in fails the card shows a red message with the reason, and you may try again.
2.3.2 Task 2: sign in by scanning a code
Where the laboratory offers it, the choice QR code appears above the form (not during the first-administrator setup).
- Choose QR code in How to sign in.
- Open «Clarus LIS Manager» on your phone and scan the code on the screen, as the line Scan this code with «Clarus LIS Manager» on your phone: says.
- The code changes after a short time, and the screen tells you how long (The code changes in ….). If it changes before you scan it, scan the new one.
When you scan it the screen signs you in by itself.
2.3.3 The second step
If the administrator turned on the second step for your account, signing in with the password is followed by one more check. It takes one of two forms:
- The phone: the screen shows a number, and you open «Clarus LIS Manager» on your phone and choose that number (Open «Clarus LIS Manager» on your phone and choose this number:). The request has a time limit, shown on the screen. If it ends, type the six-digit code instead or sign in again.
- The code: type the six-digit code that your authenticator app shows in Verification code. It is sent by itself as soon as the sixth digit is typed; Sign in does the same.
Press Back to return to the password.
2.3.4 Task 3: a forgotten password
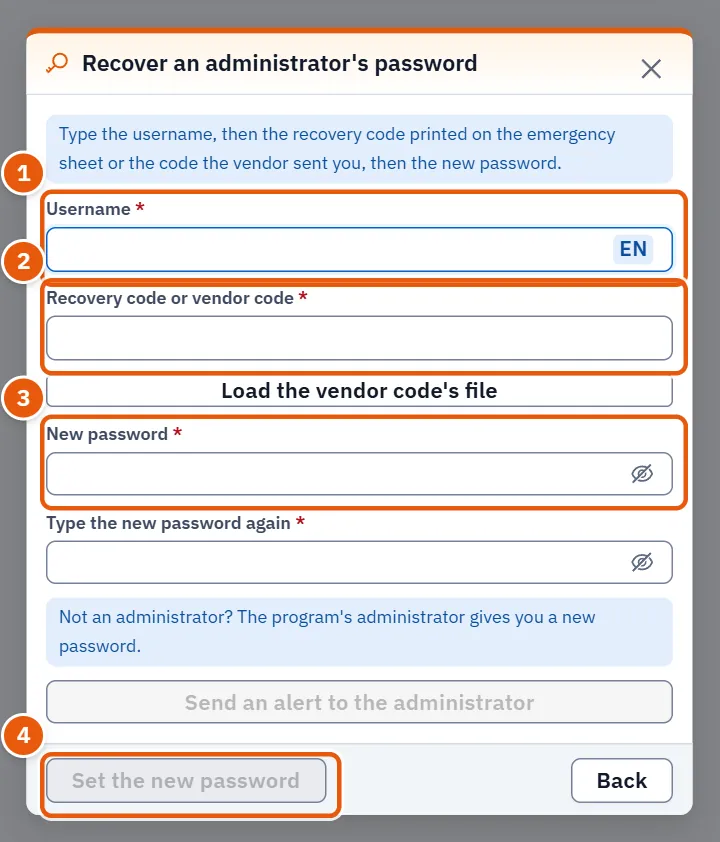
Press Forgot your password? under the sign-in button. The window Recover an administrator's password opens.
- Type your name in Username.
- Type the code in Recovery code or vendor code: the recovery code printed on the emergency sheet, or the code the vendor sent you. If the vendor sent you a file, use Load the vendor code's file.
- Type the new password in New password and again in Type the new password again.
- Press Set the new password.
The window tells you the new password is set and that every session opened with the old password has ended. Sign in with the new password; a new recovery code is shown to you at that sign-in.
2.3.5 The recovery code and the emergency sheet
When an administrator signs in, a window named Password recovery code shows the code. The text explains that the code appears this time only, so print the emergency sheet with Print the emergency sheet and keep it away from the computer. The sheet carries the laboratory's name, the user name, the recovery code, the cloud backup code (or says it is not turned on), the installation number and the steps for returning on a new computer. Tick I have saved the code when you have saved it; only then does Continue work.
If you lose the sheet, an administrator opens My account, finds Password recovery code and presses New code. The administrator types the password; the old code stops working at once and a new one is shown.
2.3.6 The first administrator on a new installation
A fresh installation may have an administrator with no password yet. The card is then titled First administrator setup and asks for the administrator's Full name, User name: and Password (the screen states the minimum length), then Type the password again. Press Create the administrator. If the two passwords differ the screen says so.
On a new installation you may instead press Sign in without a password (new installation). After you do, a strip at the top of every screen asks you to give the administrator a password: choose Set the password, or Later. If the server belongs to a laboratory chain, its administrator arrives from the chain's administrator site with the first exchange, and the card says so (This server is linked to its laboratory's chain: its administrator arrives from the chain's administrator site with the first exchange. Sign in with that account once it has arrived.). Sign in with that account once it has arrived.
2.4 The top bar
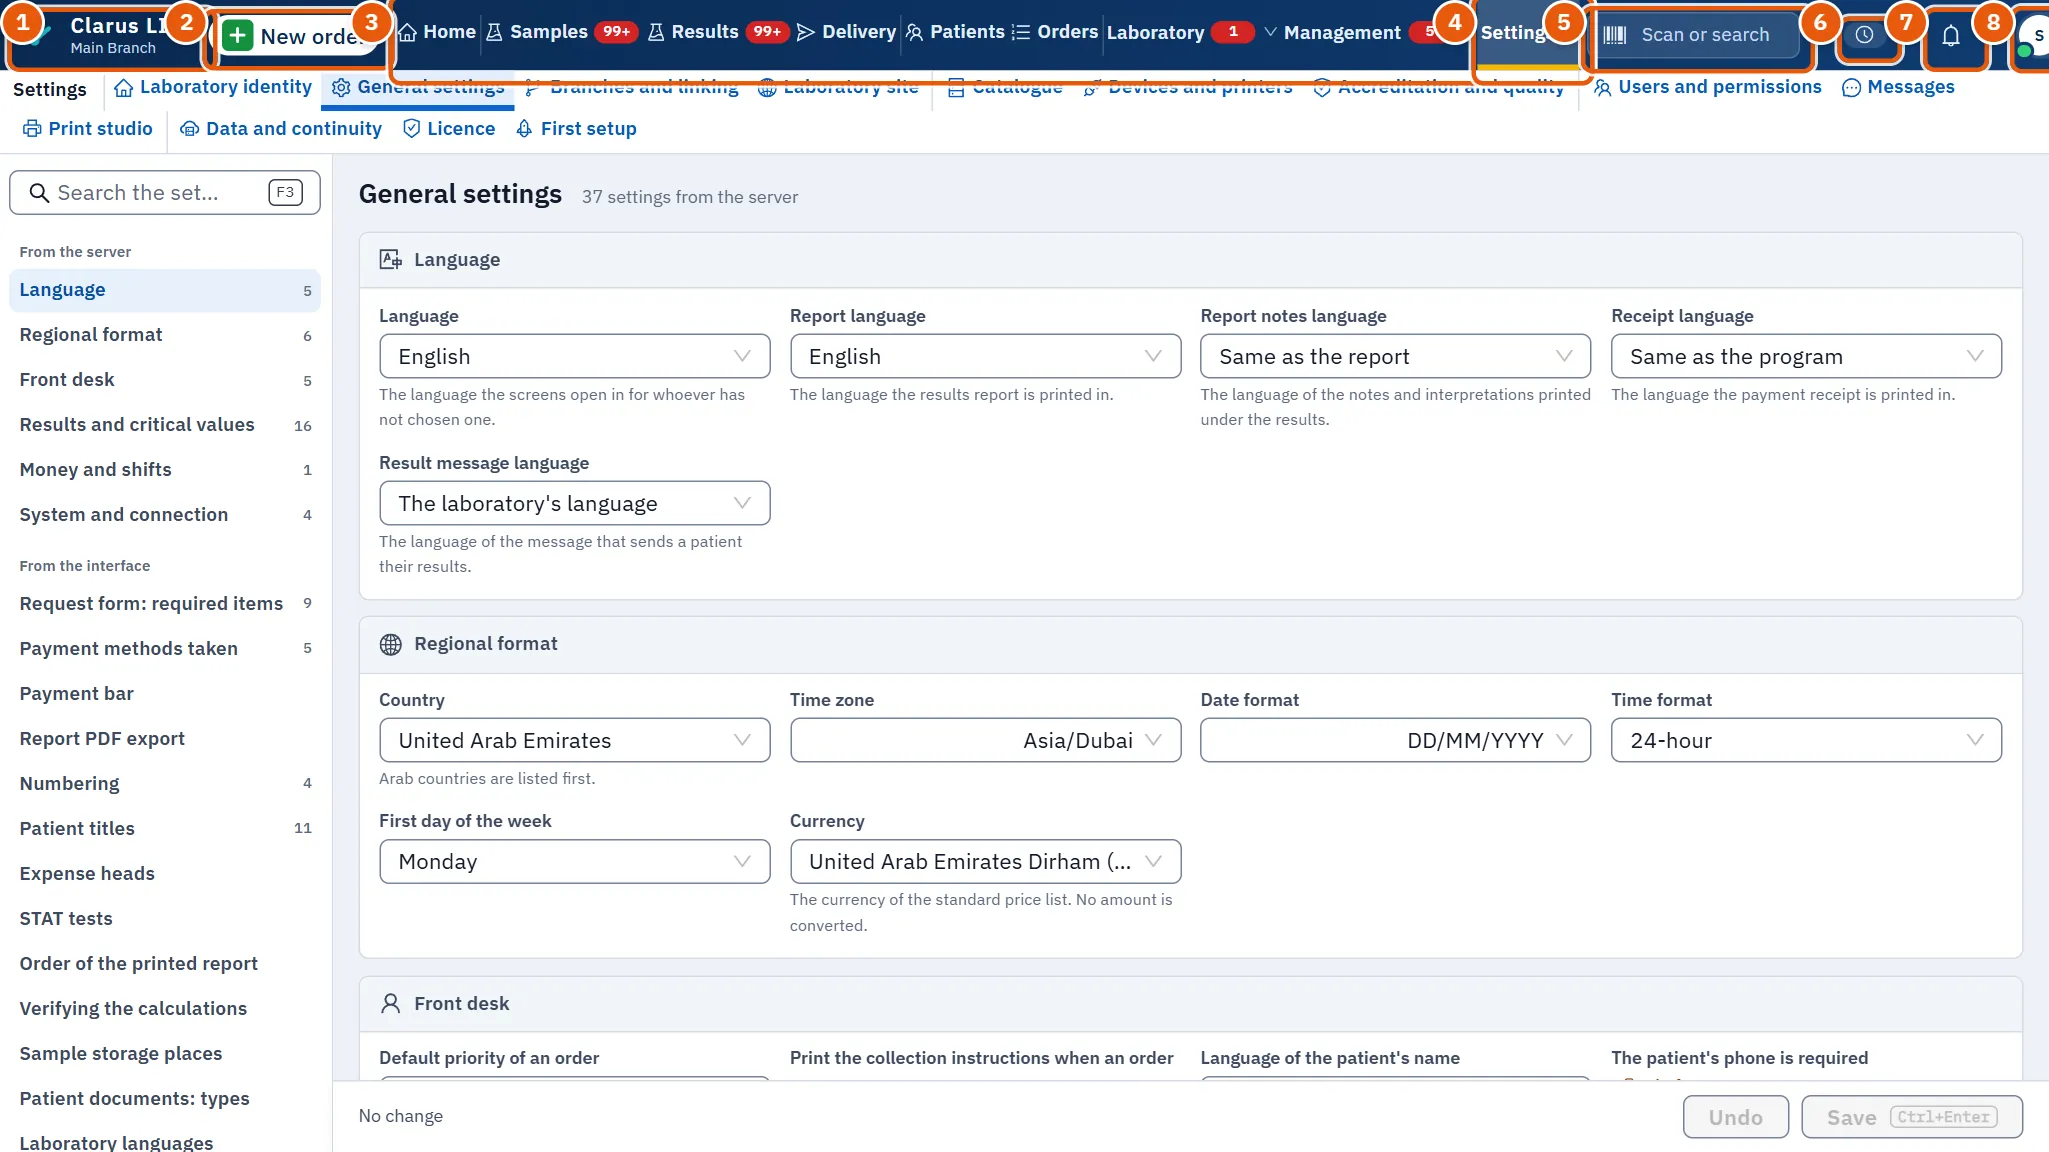
The bar stays on every screen. It holds, in this order: the name Clarus LIS with the branch's name under it; the New order button; the menu; the search box; and, on the far side, the marks and buttons described below.
2.4.1 The menu
The menu is built from your permissions: each screen is shown only to a person whose role may open it. Light lines divide it into four clusters:
| Cluster | Items |
|---|---|
| Home | Home |
| The day's flow | Samples, Results, Delivery |
| People and orders | Patients, Orders |
| Groups | Laboratory, Management, Settings, Support |
A group is a button that opens a second row under the bar, visible and whole, listing its screens. It is not a drop-down. A group appears only when you may open at least one of its screens. Arriving at a screen of a group opens that group's row by itself; press the group again to close the row.
| Group | Its screens |
|---|---|
| Laboratory | Send-outs, Daily QC, Microbiology, Clinical AI |
| Management | Treasury, Prices and contracts, Claims; Attendance, Follow-up, Inventory; Quality, Security and audit; Marketing, Clarus Market |
| Settings | Laboratory identity, General settings, Branches and linking, Laboratory site; Catalogue, Devices and printers, Accreditation and quality; Users and permissions, Messages, Print studio; Data and continuity, Licence, First setup |
| Support | Health and diagnostics, Cases and reports, Go-live, Server and updates |
In a group the screens are divided into sections by light lines; the sections are the semicolons above.
2.4.2 The numbers beside items
Some items carry a small number: Samples (samples still to draw or receive), Results (results waiting for entry), Daily QC, Quality, Inventory and Prices and contracts. A group carries the sum of the numbers of its screens. A number above 99 shows as 99+. The number turns urgent in colour when part of it is urgent; nothing is shown when there is nothing to do. The numbers are refreshed about every minute.
2.4.3 The New order button
It is the program's main button. It is shown to whoever may create an order, and it works from any screen; F1 works only for the same people. Press it, or press F1. If you are already on the new-order screen and something is typed there, that screen asks you to confirm before starting afresh.
2.4.4 The search box
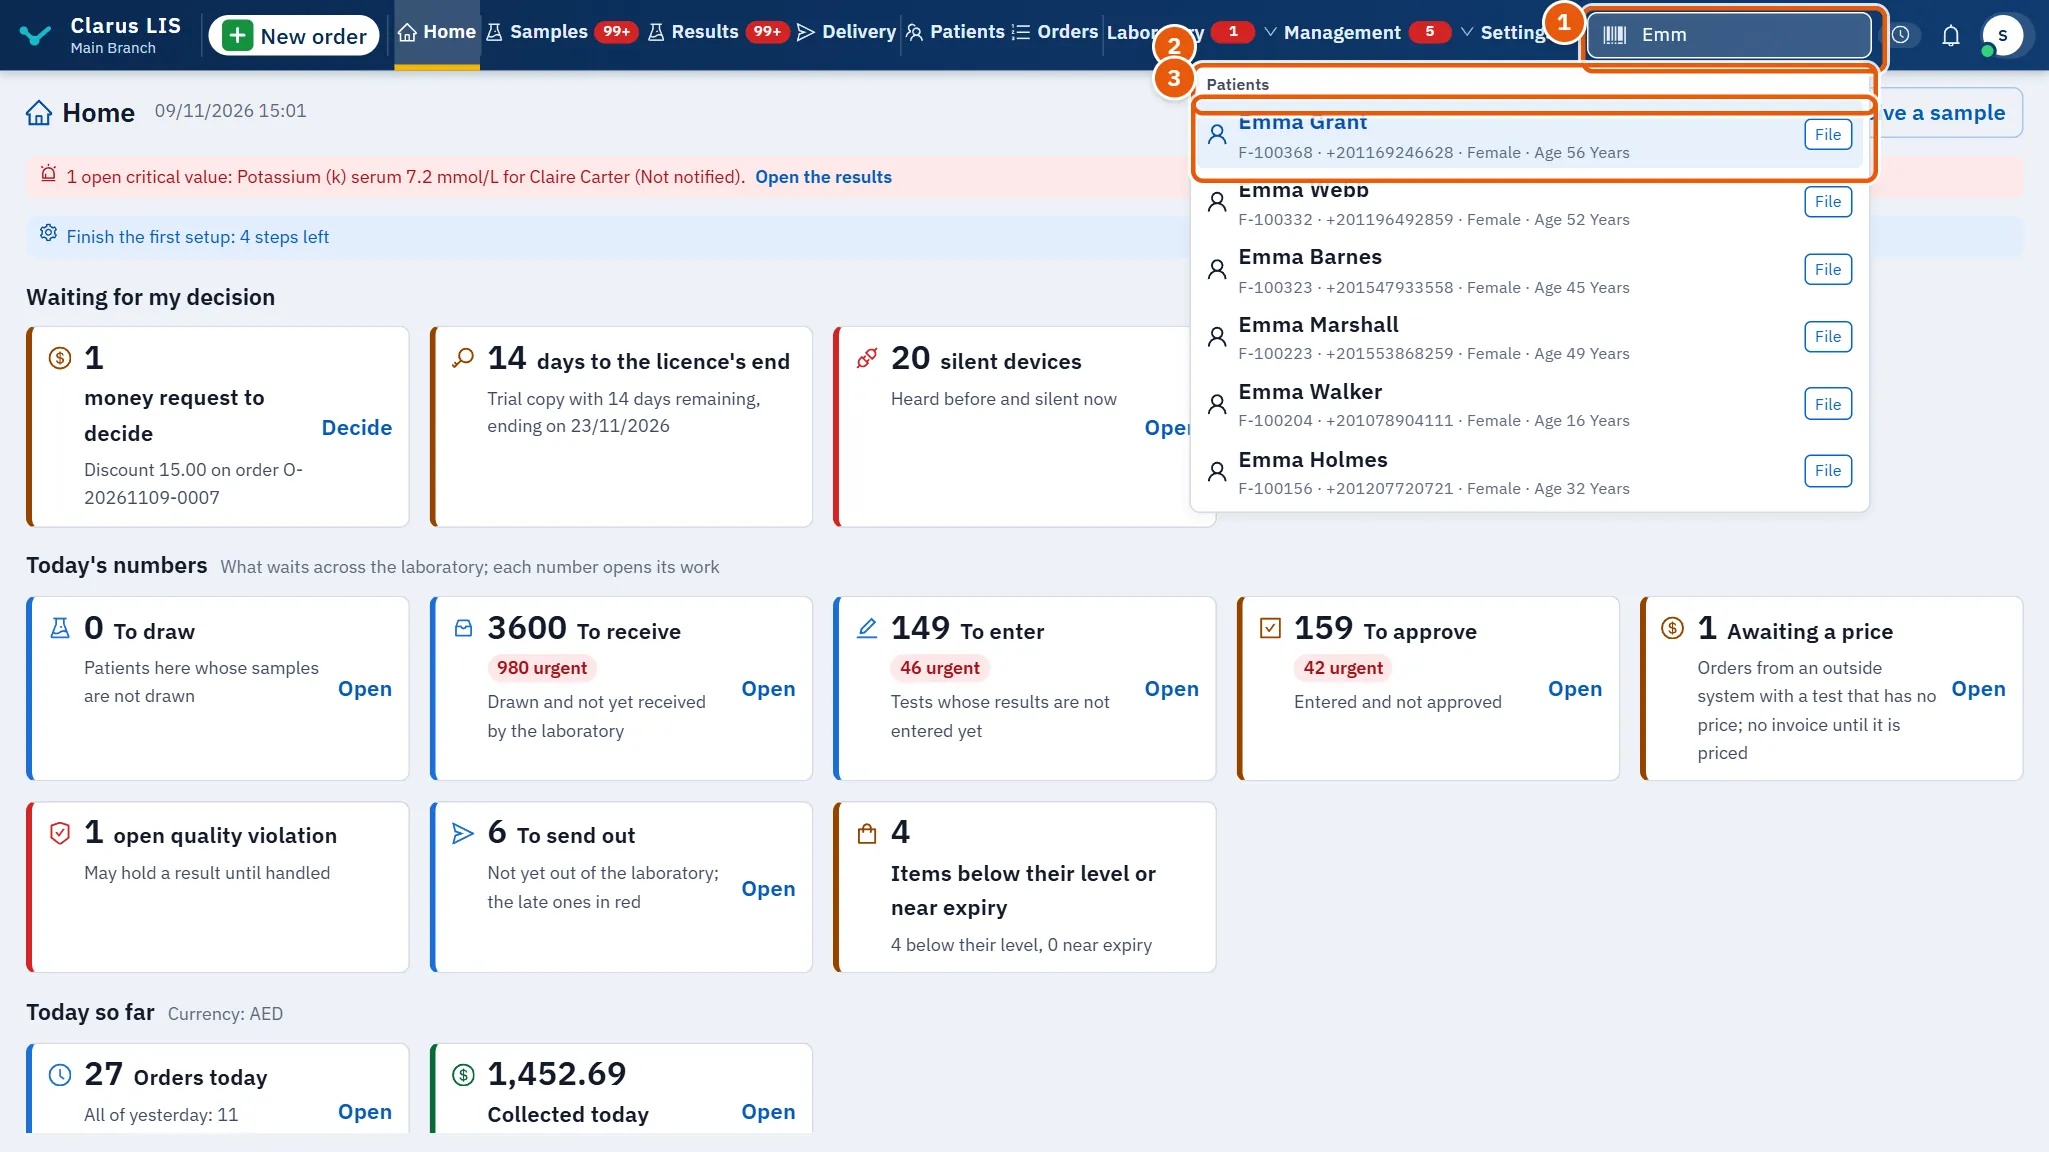
The box Scan or search is at the top of every screen. Press / from anywhere to jump into it (the key is also shown inside the box). Type at least two characters. It finds a sample by its barcode, an order by its number, a patient by name, phone, file number or national ID, a test, a doctor, or a screen. The results are grouped under Samples, Orders, Patients, Tests, Doctors and Screens; a patient's line shows the file number, phone, sex and age. A scanner works from any screen when no field has the focus: a barcode scanned then is searched at once.
- Press / and type, or scan a barcode.
- Move through the results with the up and down arrows.
- Press Enter on the result you want, or click it. Press Esc to close the results.
What a result opens: a patient, a new order with that patient (the button File beside it opens the patient's file instead; a person who may not create orders gets the file); an order or a sample, its screen with it searched; a test, the catalogue, only for whoever may open it; a doctor, a new order with that doctor; a screen, that screen (at most four screens are offered, and only yours). If you press Enter without choosing, one exact match opens by itself; if there are several results they are listed; if there are none, the text goes to the patient search on the order screen.
If nothing is found, the box says so. If the search fails it says The search failed..
2.4.5 Marks and buttons on the far side
| Element | What it does |
|---|---|
| Critical button (Critical and a number) | Appears only to a person who may approve results, and only while there are open critical values (checked about every minute). Pressing it opens Results. |
| The shift chip | Shown only to a person who holds a shift or may open one. It says No shift (pressing it opens the window that opens a shift), or My shift since … (pressing it opens the window that closes it). If a shift of an earlier day was left open it says so (Yesterday's shift is open) in orange. |
| The help button, a «?» | Shown on every screen that has its own chapter in this manual, between the shift chip and the bell; the sign-in page has none. Pressing it opens, in a new tab, this screen's chapter of the user manual on Clarus's website, in the program's language and for the program's version. If the computer cannot reach the website, the same tab opens the manual the program carries inside itself, in Arabic or English, so the press never ends on an error page. Its tooltip says «Help: this screen's chapter of the user manual». |
| The bell (Messages and alerts) | Opens the window of messages and alerts. The number on it counts the messages you have not seen plus your due reminders; it is asked about every half minute. |
| Your name, with a round mark | Opens My account. The mark shows the first letter of your name, and the button turns to a disconnected state when the program cannot reach the server. |
| Test environment | Appears only on a test copy: every name and number there is invented. |
| Developer mode | Tells the vendor's engineer that this session sees what the laboratory does not. |
On a narrow window the bar keeps the numbers and gives up the words; the name of each button is still its tooltip.
2.4.6 Strips under the bar
Strips appear above the screen's own content and say what needs your attention:
- Clarus technical support is inside your copy now. while a remote support session is open, with its end time. Anyone may stop it with Stop now.
- The administrator-password strip described in the section on signing in.
- A strip telling you that the browser is translating the page (The browser is translating this page, so test names, units and results may change. Turn the translation off from the translate button in the address bar and choose «Show original».). Turn the translation off, or test names, units and results may change.
- On the home only, the licence strip.
2.4.7 Messages, alerts and reminders
The bell opens Messages and alerts. A message from the management arrives as a Banner, a Notice or an Urgent message. An urgent one closes only with I have read it. You may answer with Reply, with a quick reply (Done, Seen, I will call you), or write to the management with Write to management.
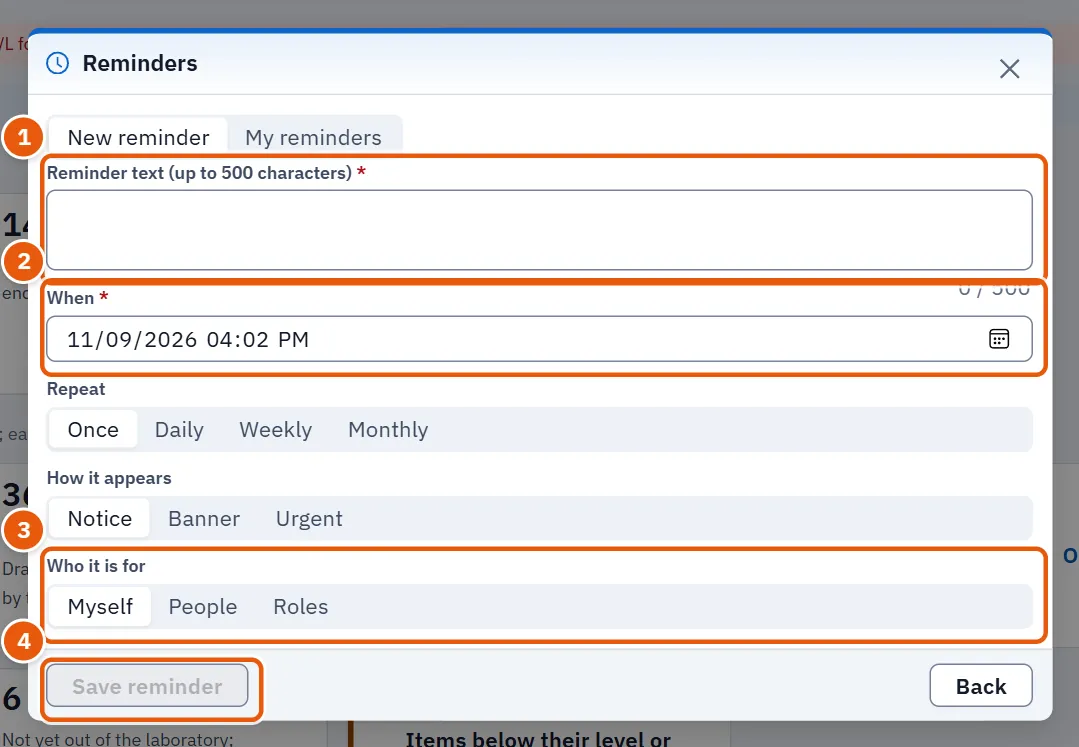
A reminder is a note you set for yourself or for others. From the window press New reminder, then fill in Reminder text (up to 500 characters), When, Repeat (Once, Daily, Weekly or Monthly), How it appears and Who it is for (Myself, Roles or People), and press Save reminder. The text is limited to 500 characters, and the time starts one hour from now. Reminding others (roles or people) is offered only to whoever is allowed to. When it falls due it appears; choose Done, or snooze it for ten minutes, an hour or until tomorrow. Hide hides it but it stays in the messages until you press Done or snooze it. Your own reminders are listed under My reminders, where Withdraw cancels one.
2.5 My account
Press your name in the bar. The window My account opens.
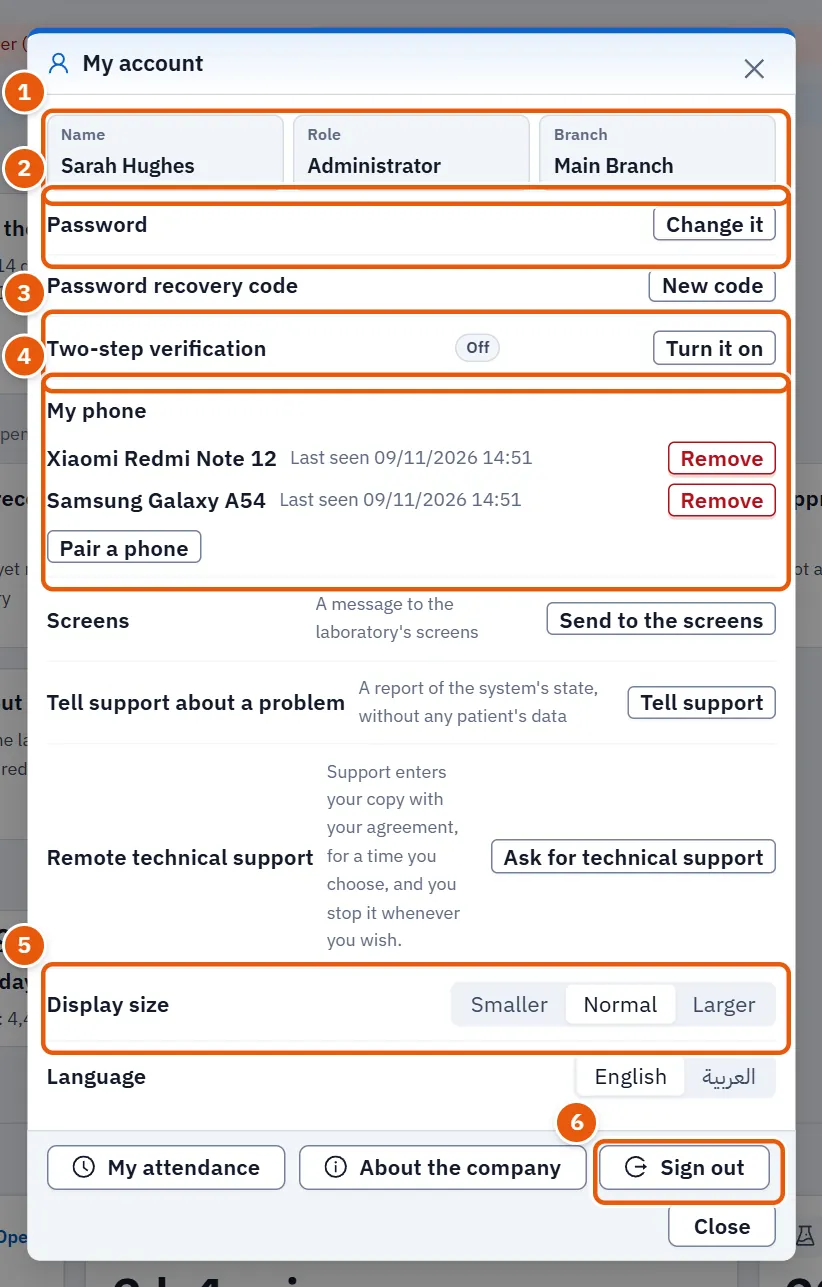
| Element | What it does |
|---|---|
| Name, Role, Branch | Who you are in the program. |
| Password with Change it | Asks for the current password, then the new one twice, and saves it with Save the new password. |
| Password recovery code with New code | A new recovery code, as described above. Shown to administrators only. |
| Two-step verification | Turn it on with Turn it on: scan the code with an authenticator app, or type the key by hand, then type the six-digit code. Turn it off with Turn it off. It is changed from inside the laboratory only: from outside, the window shows a note saying so instead of the buttons. |
| My phone | Pairs a phone with «Clarus LIS Manager»: Pair a phone shows two codes, one to download the app and one to pair the phone. A paired phone is listed with when it was last seen and can be taken off with Remove. If the app is switched off or your role does not carry it, the window says why, and offers a link to the page where it is changed only to whoever may change it. |
| Screens with Send to the screens | Opens the send window (below). Shown only to whoever may send to the screens. |
| Tell support about a problem with Tell support | Sends support a report of the system's state, without any patient's data. Shown only to whoever may manage settings. |
| My attendance | Opens your attendance for the month: days present, absent, minutes late, minutes left early, incomplete days, leave and your punches. |
| Display size | Smaller, Normal or Larger. It applies on this computer while you are signed in. |
| Language | Changes the language of the screen and its direction at once. A language marked experimental is not yet complete. If the language cannot be loaded the screen keeps its own language and says so. |
| About the company | Opens the about window: what the company makes, what it believes, and how to reach it. |
| Sign out | Ends your session. |
2.5.1 Send to the screens
Opened from Send to the screens, the window Send to the screens sends a message to the laboratory's screens. It has two tabs: New message and Sent.
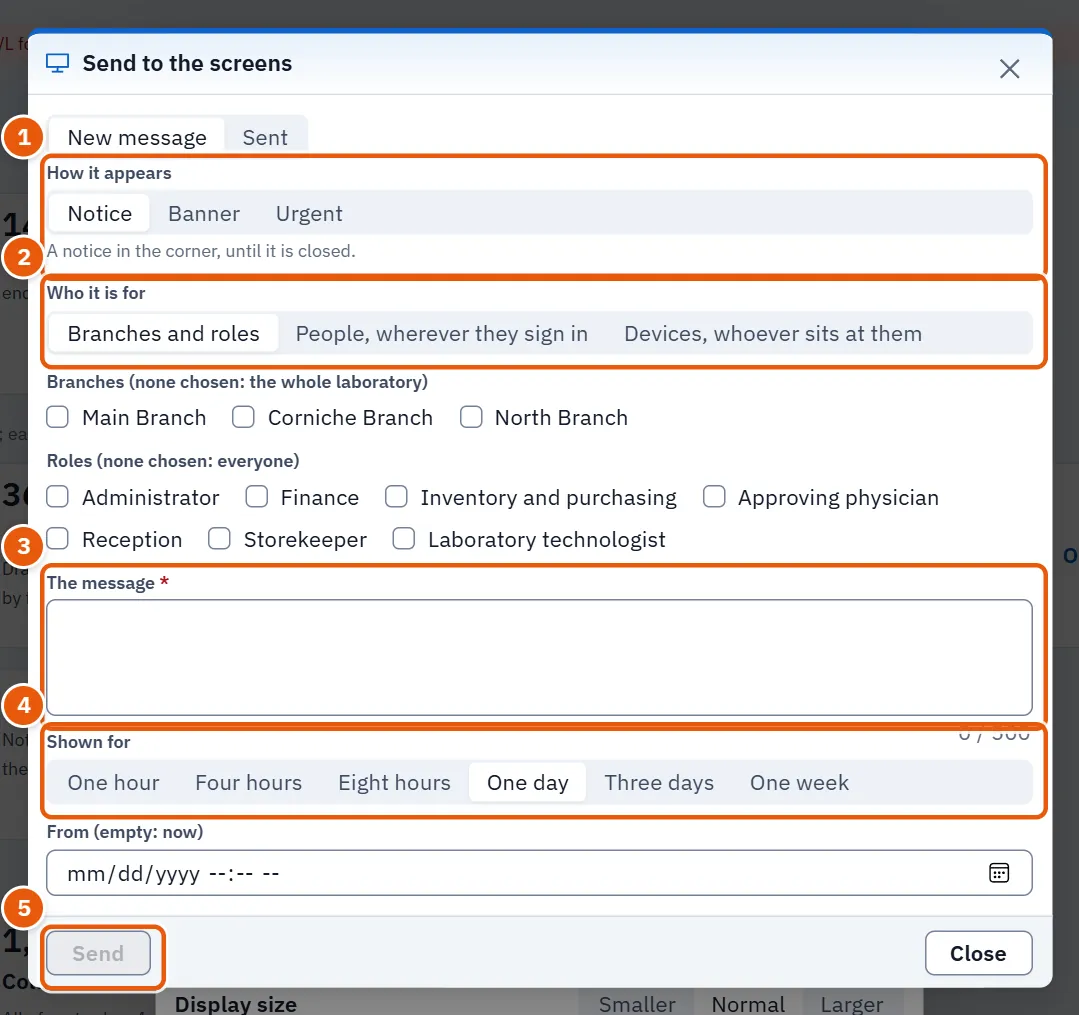
- In How it appears choose how it appears: Banner (a band along the bottom until its time ends), Notice (a notice in the corner until it is closed), or Urgent (a window that closes only with the reader's acknowledgement).
- In Who it is for choose Branches and roles, People, wherever they sign in or Devices, whoever sits at them. With the first, choose roles (none chosen means everyone); with the second, choose people; with the third, choose devices.
- Type The message.
- Choose Shown for: one hour, four hours, eight hours, one day, three days or one week. From (empty: now) leaves the start empty to mean now.
- Press Send.
The window says each screen it is for shows the message within half a minute. The tab Sent lists what you sent, its state (Showing now, Waiting for its time, Ended, Withdrawn), who saw it and who acknowledged it (Who saw it), and Withdraw takes one back.
2.6 The keys of the program
One key means the same on every screen.
| Key | What it does |
|---|---|
| F1 | New order, from any screen. |
| / | Goes to the top bar's search box, from anywhere. |
| F3 | Goes to the current screen's own search or scan box. |
| F2 | Goes to a screen's second box (on the order screen, the catalogue search). |
| Ctrl+Enter | The screen's main action: for example save the order, or save and approve what is ready. |
| Ctrl+S | Saves, without the main action. |
| Enter | The next field. |
| Shift+Enter | The previous field. |
| Esc | Closes a window. |
| N | On a board, a new place for what is picked (the new tube on the barcode board). |
| 1 to 5 | On the results screen, the five states in the order of its bar. Not while you are typing in a box. |
2.7 What each role sees
The menu hides what the permissions do not allow, so two people at the same laboratory may see different bars. Everyone who is signed in sees Home; the home is composed from what waits for that person. The roles that the program names are Administrator, Reception, Laboratory technologist, Approving physician, Finance, Inventory and purchasing, Storekeeper and Developer support. What each role may do is set in Users and permissions.
- A screen you may not open is absent from the menu. A group is absent when none of its screens is yours.
- Inside a screen, what happens to a button you may not use differs from screen to screen (dim or absent); the chapter of each screen says which.
- Some features need a permission beyond the screen's: for example the critical button in the bar appears only to whoever may approve results.
2.8 The first setup
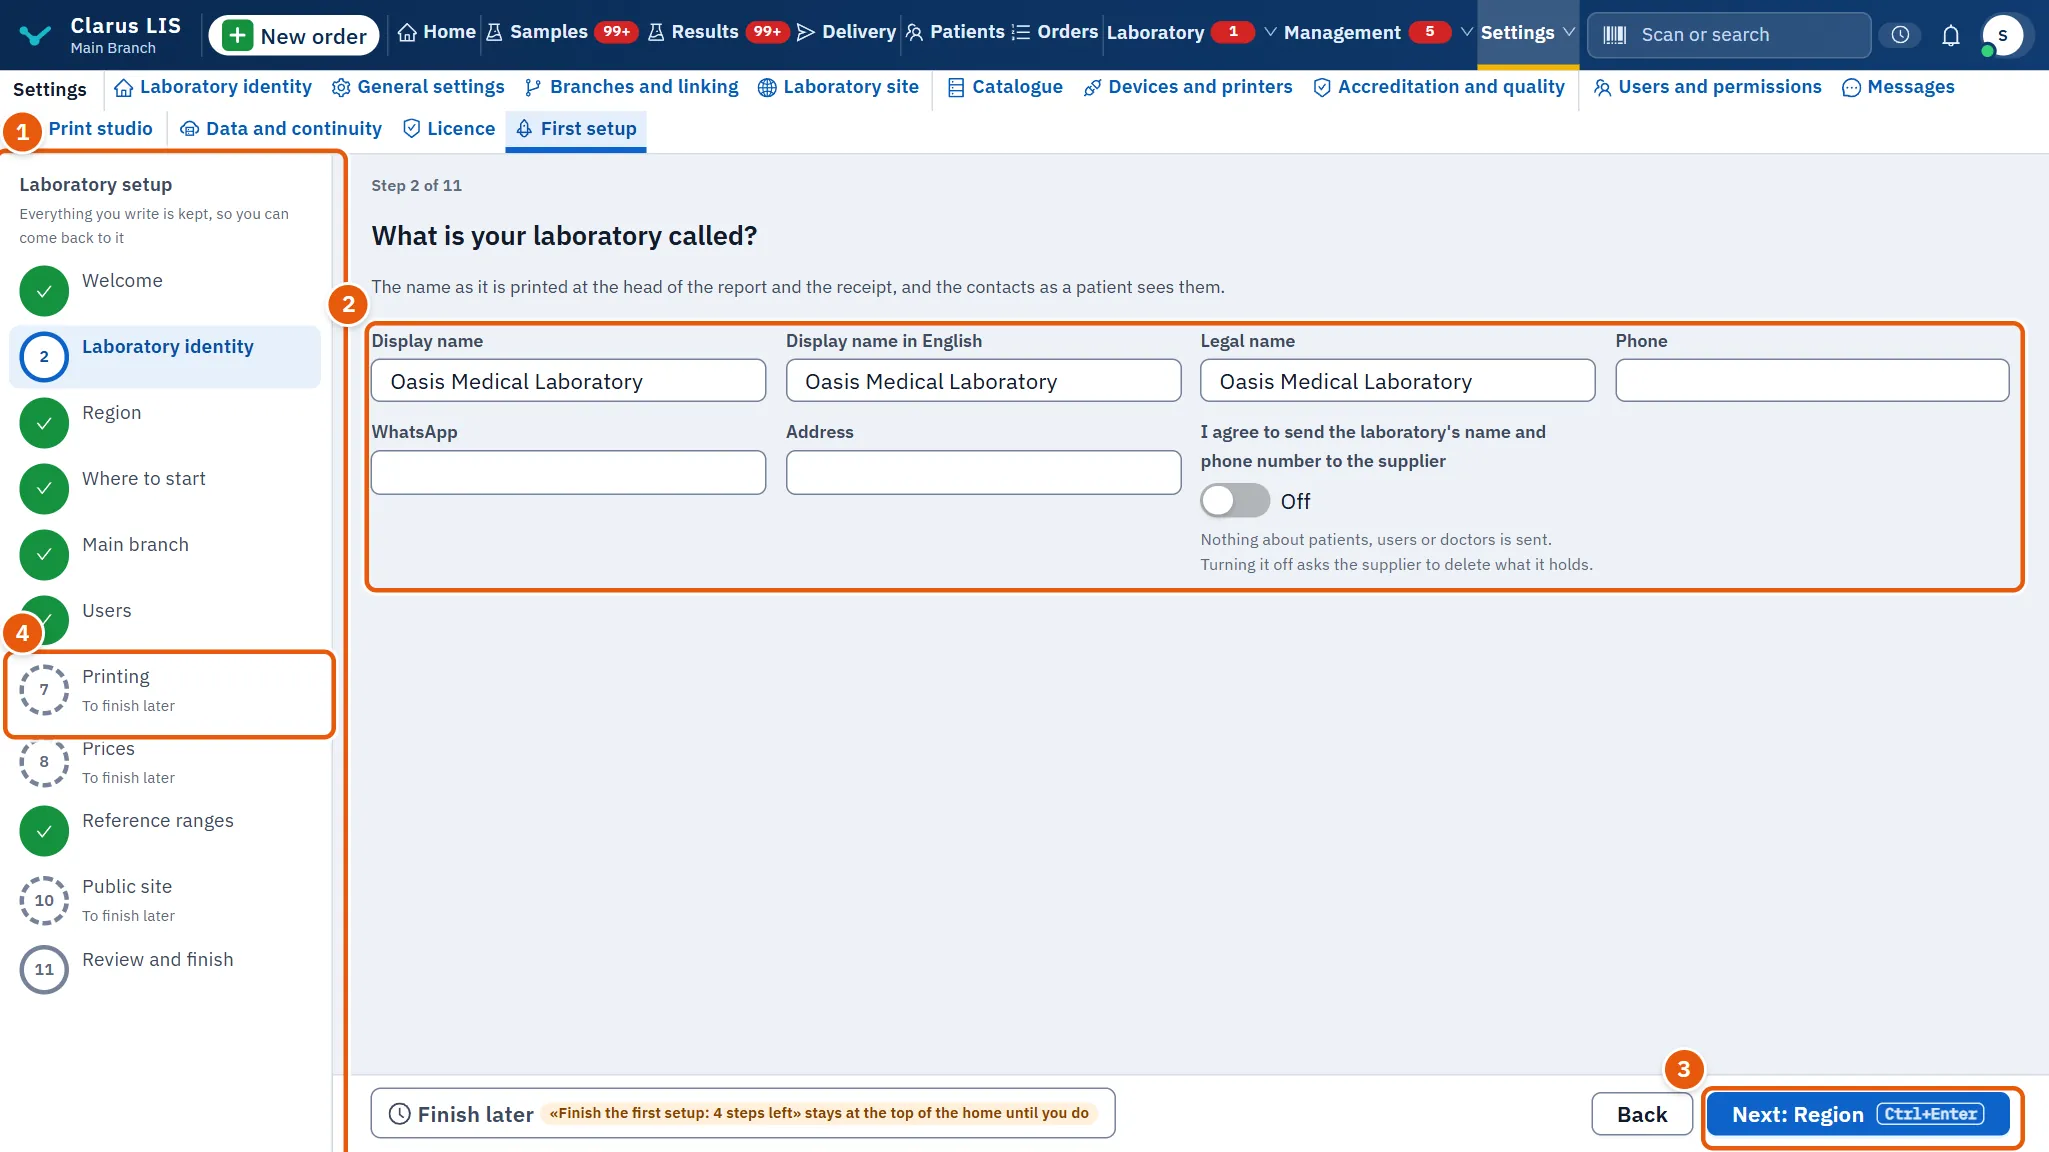
The first setup prepares a new laboratory in eleven short steps. It is First setup in the group Settings, and it stays in the menu so you can finish it later or review it at any time. Its title is Laboratory setup. Every step is kept when you move to the next one, so nothing is lost if you leave and come back, and you can return to any step.
| Step | What it settles |
|---|---|
| Welcome | What we will set up together. On a branch server of a chain it says what is set at the centre and what stays here. |
| Laboratory identity | The laboratory's name as printed at the head of the report and the receipt, and the contacts as a patient sees them. |
| Region | Country, time zone, currency and language: from them every page and paper writes its dates and amounts. |
| Where to start | Where to start: New laboratory (the whole Clarus catalogue), From RealLab (patients, visits, tests and prices come from the RealLab file) or Branch of a chain (it links by its licence number through Clarus Link, and the catalogue and the users come from the centre). |
| Main branch | The branch in which orders are registered first. Other branches are added later from Branches and linking. |
| Users | An account and a role for everyone who works, so nobody signs in as someone else. The step counts the working users and, if you are alone, says so. |
| Printing | Which printer prints the report, which the receipt and which the tube labels, chosen in Devices and printers. |
| Prices | The price of each test, written in Prices and contracts. The step counts the active tests that still have no price. |
| Reference ranges | The reference range of each test, in each test's card in Catalogue. The step counts the tests that still have none. |
| Public site | The page where a patient sees the laboratory and receives a result, written in Laboratory site. |
| Review and finish | What is set up and what is left. |
Steps whose work is done on another screen carry a button that opens it, for example Open devices and printers, Open prices, Open the catalogue, Open the laboratory site and Open users. In such a step press Reviewed when you have looked at it.
2.8.1 Task 4: complete the first setup
- Open First setup from the group Settings.
- In each step, read the text, write what is asked or open the page it names, then press the button that goes to the next step (it reads Next: …).
- If you cannot finish now, press Finish later. The home keeps a line at its top reminding you how many steps are left, until you finish.
- On the last step press Finish the setup. The screen says The first setup is finished..
2.9 Messages and what to do
| The screen says | Meaning | What to do |
|---|---|---|
| The sign-in did not succeed. | The server refused the sign-in. | Check the user name and password, and try again. |
| The sign-in was not completed. | The second step could not be completed. | Press Back and sign in again. |
| The request on the phone ended. Type the code, or sign in again. | The phone's request timed out. | Type the code, or sign in again. |
| The two passwords do not match. | The two passwords differ. | Type them again. |
| The password could not be set. | The recovery code or the user name was not accepted. | Check them, or ask the administrator. |
| This language could not be loaded from the server, so the screen keeps its language. Check that the server is running, then try again. | The language could not be loaded from the server. | Check the server is running and try again. |
| Nothing found. Press Enter to look for a patient by this on the order screen. | The search found nothing. | Press Enter to look for a patient by that text on the order screen. |
| The save failed, so the step stays as it was. | The step could not be saved. | It stays as it was; try again. |
2.10 See also
- Results: the chapter on results and approval.
- Users and permissions: roles and permissions, which decide what each person sees.
- First setup: the first setup, as a screen of its own.