Chapter 40Printing
Menu: none of its own; printing starts from the screens named below. Setting printing up: Print studio and Devices and printers.
40.1 What this chapter is for
Printing in Clarus is not one screen. Each paper is printed from the screen where it is needed: the report from delivery, the receipt and the labels from the order and the orders list, the worksheet from the orders list, the statement from claims. This chapter is the map: what can be printed, where the button is, which permission it asks for, which printer it goes to, and what to do when something does not print as expected.
40.2 Who may print
| You can… | …if your role holds |
|---|---|
| Preview a report on the results screen | Print reports, receipts and labels (without it the preview button is not shown) |
| Print or hand over a report on the delivery screen, and print the receipt there | Publish reports (it opens the screen itself) |
| Print the receipt, labels and worksheet of an order from the orders list | Read orders (it opens the screen; these three buttons have no further check on the screen) |
| Print the receipt, barcodes and collection instructions after saving an order | Create orders (it opens the order screen) |
| Print the tube labels in the samples screen | Read orders or Accept, reject and receive samples (it opens the screen; the print buttons have no further check) |
| Print a statement of claims | Manage billing (it opens the screen) |
| Design the report, receipt and label | Manage settings |
Whether a button you may not use is dim or hidden depends on the screen; the chapter of each screen says which.
40.3 What can be printed
| Paper | Where | Button |
|---|---|---|
| The result report | Delivery | Print the report, or Print beside one test; The visit's reports for all the visit's reports |
| A preview of the report | Results | Preview report |
| The payment receipt | The order screen after saving; the orders list; delivery | Receipt; Receipt; Receipt |
| The order's barcodes | The order screen after saving | Barcodes |
| The collection instructions | The order screen after saving | Collection notes |
| The tube labels of an order | Orders | Labels, which opens the window The order's labels |
| Tube labels in the samples screen | Samples | Print today's unprinted labels, Last 200 labels, Label (reads Print the label again once printed) and Print their labels |
| The worksheet | Orders | Worksheet |
| A statement of claims | Claims, page Statements of claims | Print, with Save as PDF beside it |
On the order screen the receipt, barcodes and instructions buttons are dim until the order is saved. Receipt in the orders list is hidden while the order awaits a price: no receipt is printed until the missing price is written.
40.4 The report
- Open Delivery, choose the order.
- Press Print the report. In the print window choose The whole order or One test, the Report language, and if wished Each family on a page of its own.
- Check The report as it will print and press Print.
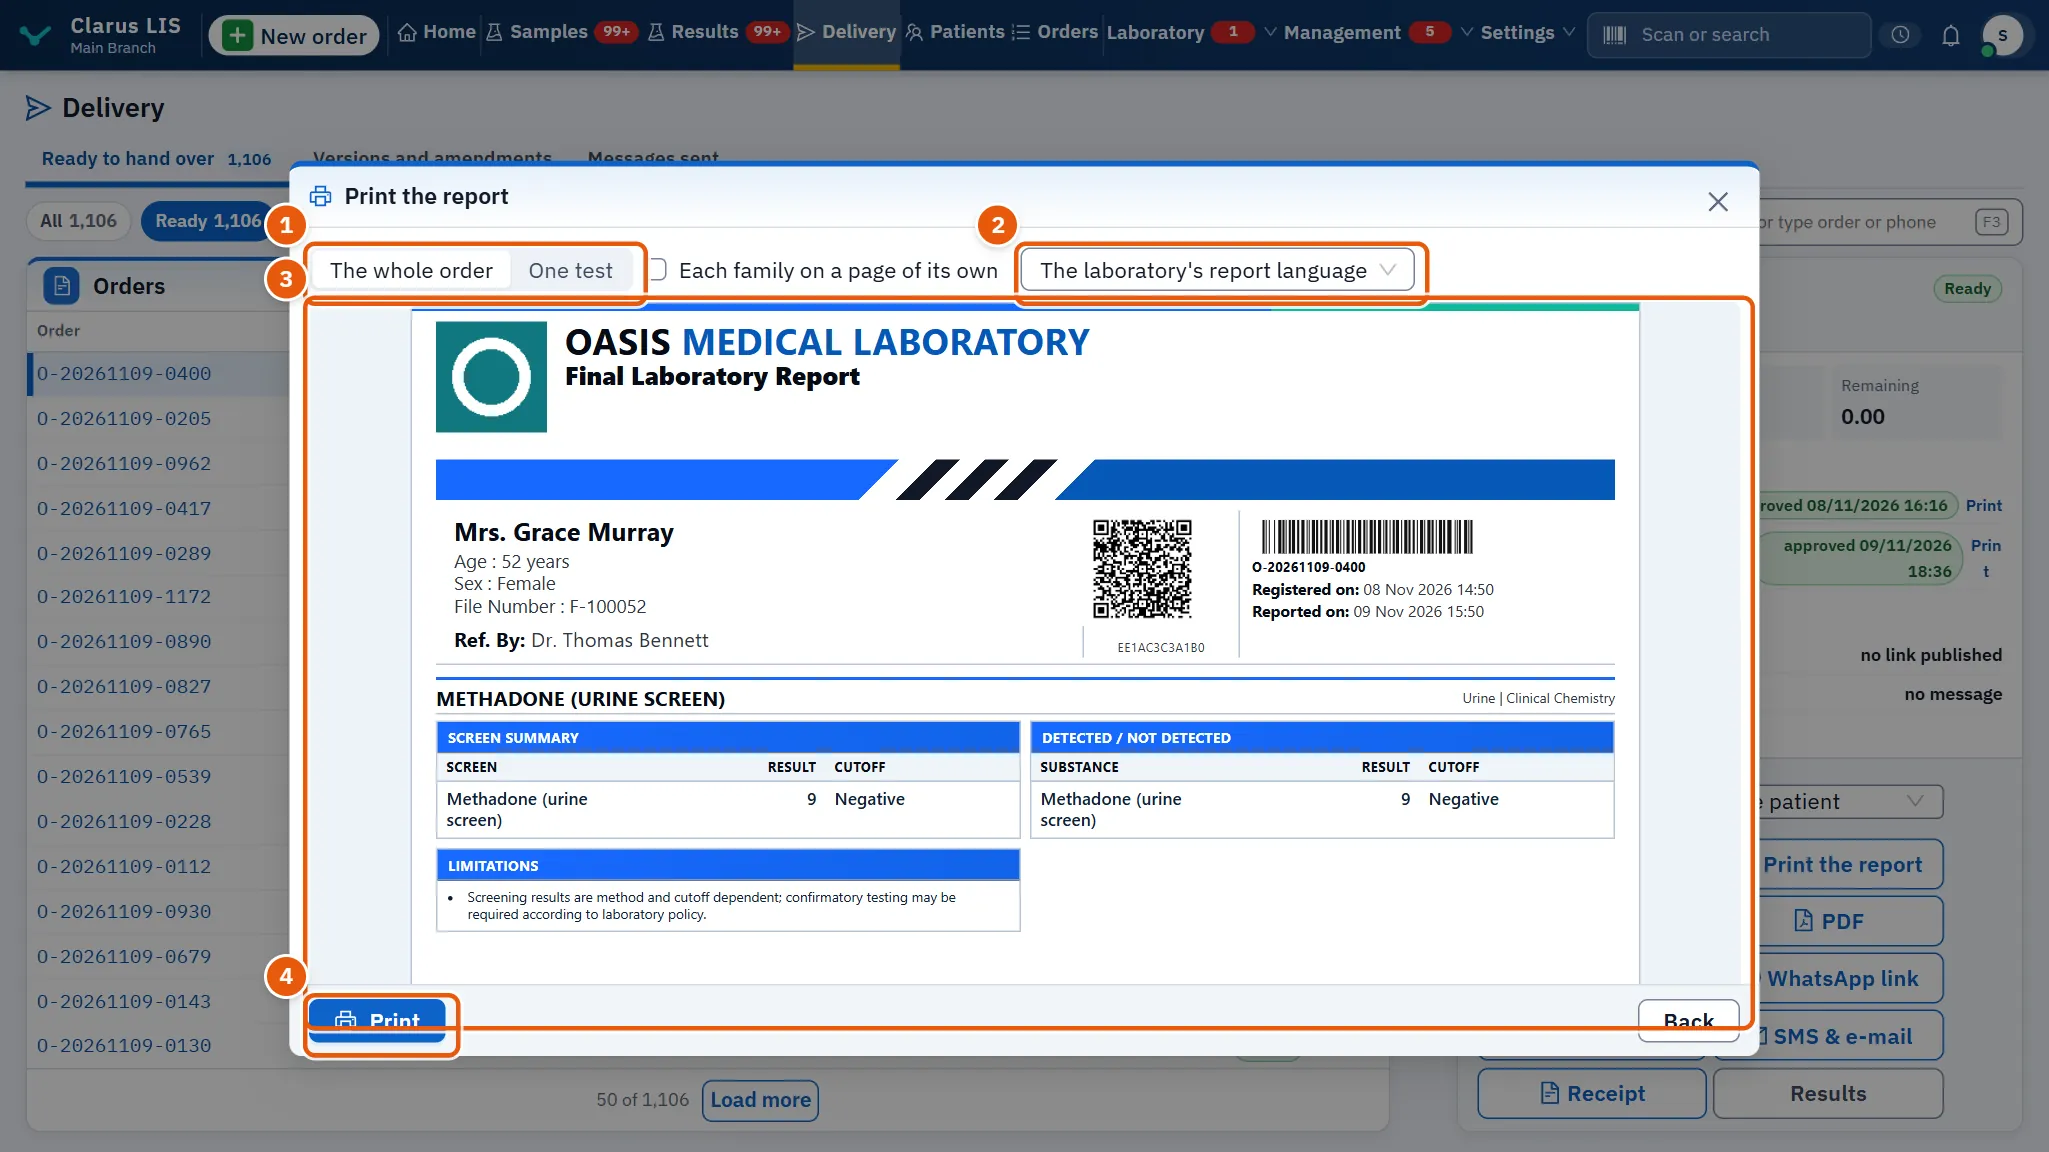
If the preview cannot be prepared the window says so and the report can still be printed. While the order is held, Print the report and The visit's reports are dim with a note that explains, and Print is not shown; the receipt button stays available.
40.4.1 Draft and amended reports
- A report in which any result is not yet approved carries «DRAFT — NOT APPROVED». Values typed and not yet saved appear in the preview as a draft that is never stored.
- When an approved result is withdrawn and approved again, its report prints headed Amended Report.
- The setting Report PDF export in the general settings writes each released report to a folder as a PDF; an amended report is a new file and the earlier one is never deleted.
40.5 Labels
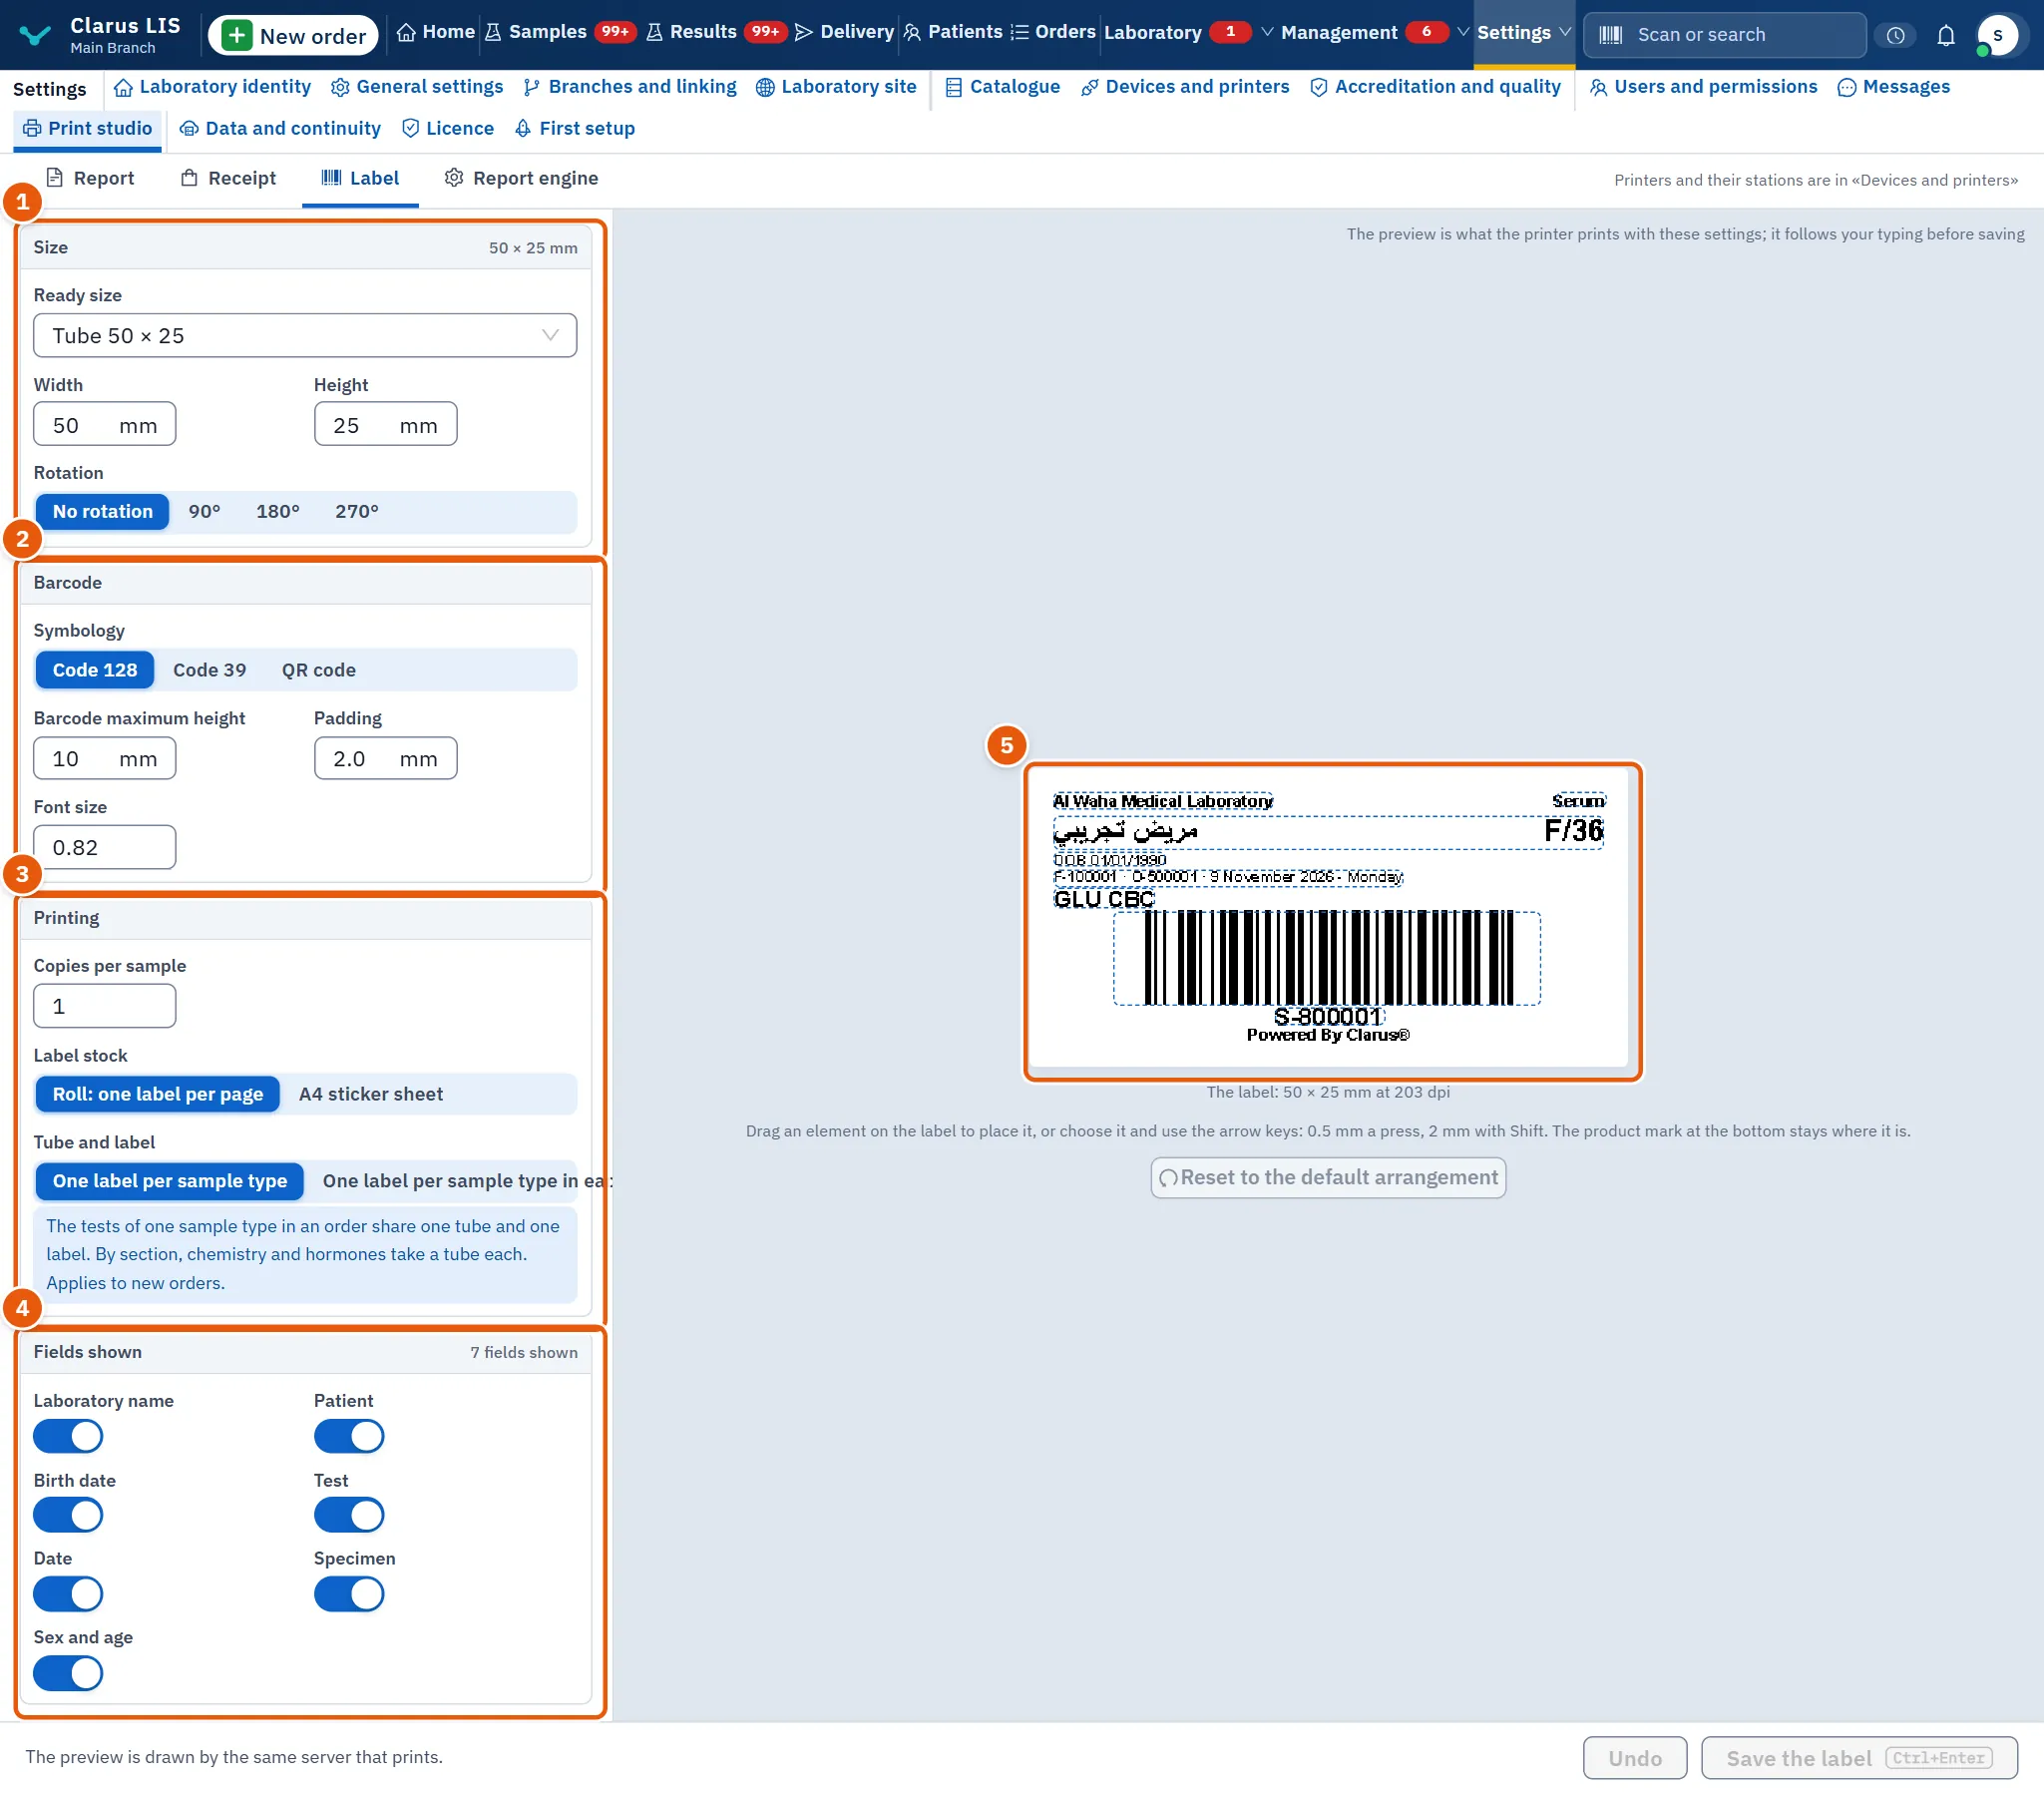
The order's tubes each have one label with all their tests. In the window The order's labels the tubes are listed with a tick and whether each label is printed: print the ticked ones or all, press The order's envelope label for the envelope, and set Copies for this print, or As in the label designer to keep the number set in the label design.
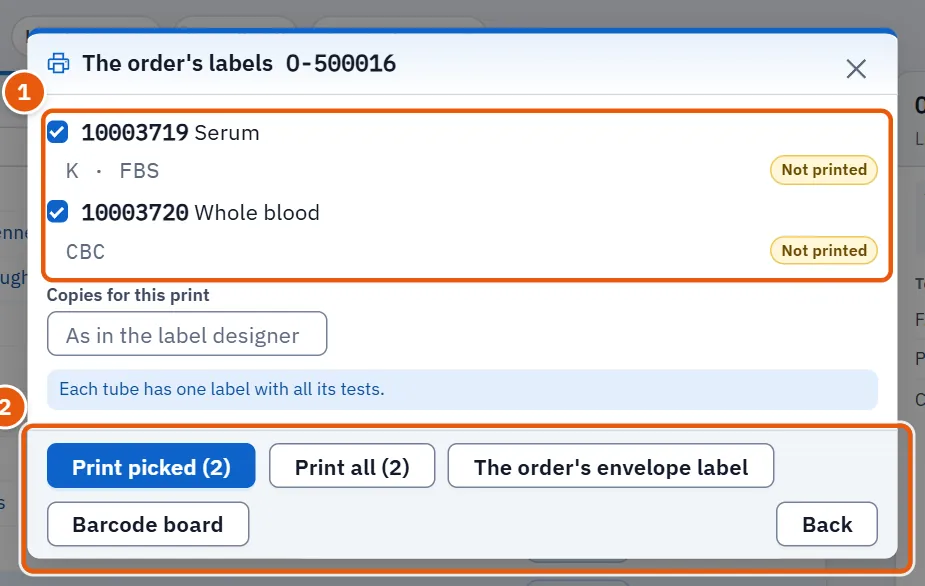
If tubes were changed on the barcode board, the screen tells you which; press Print them again.
40.6 The receipt and the barcodes after saving
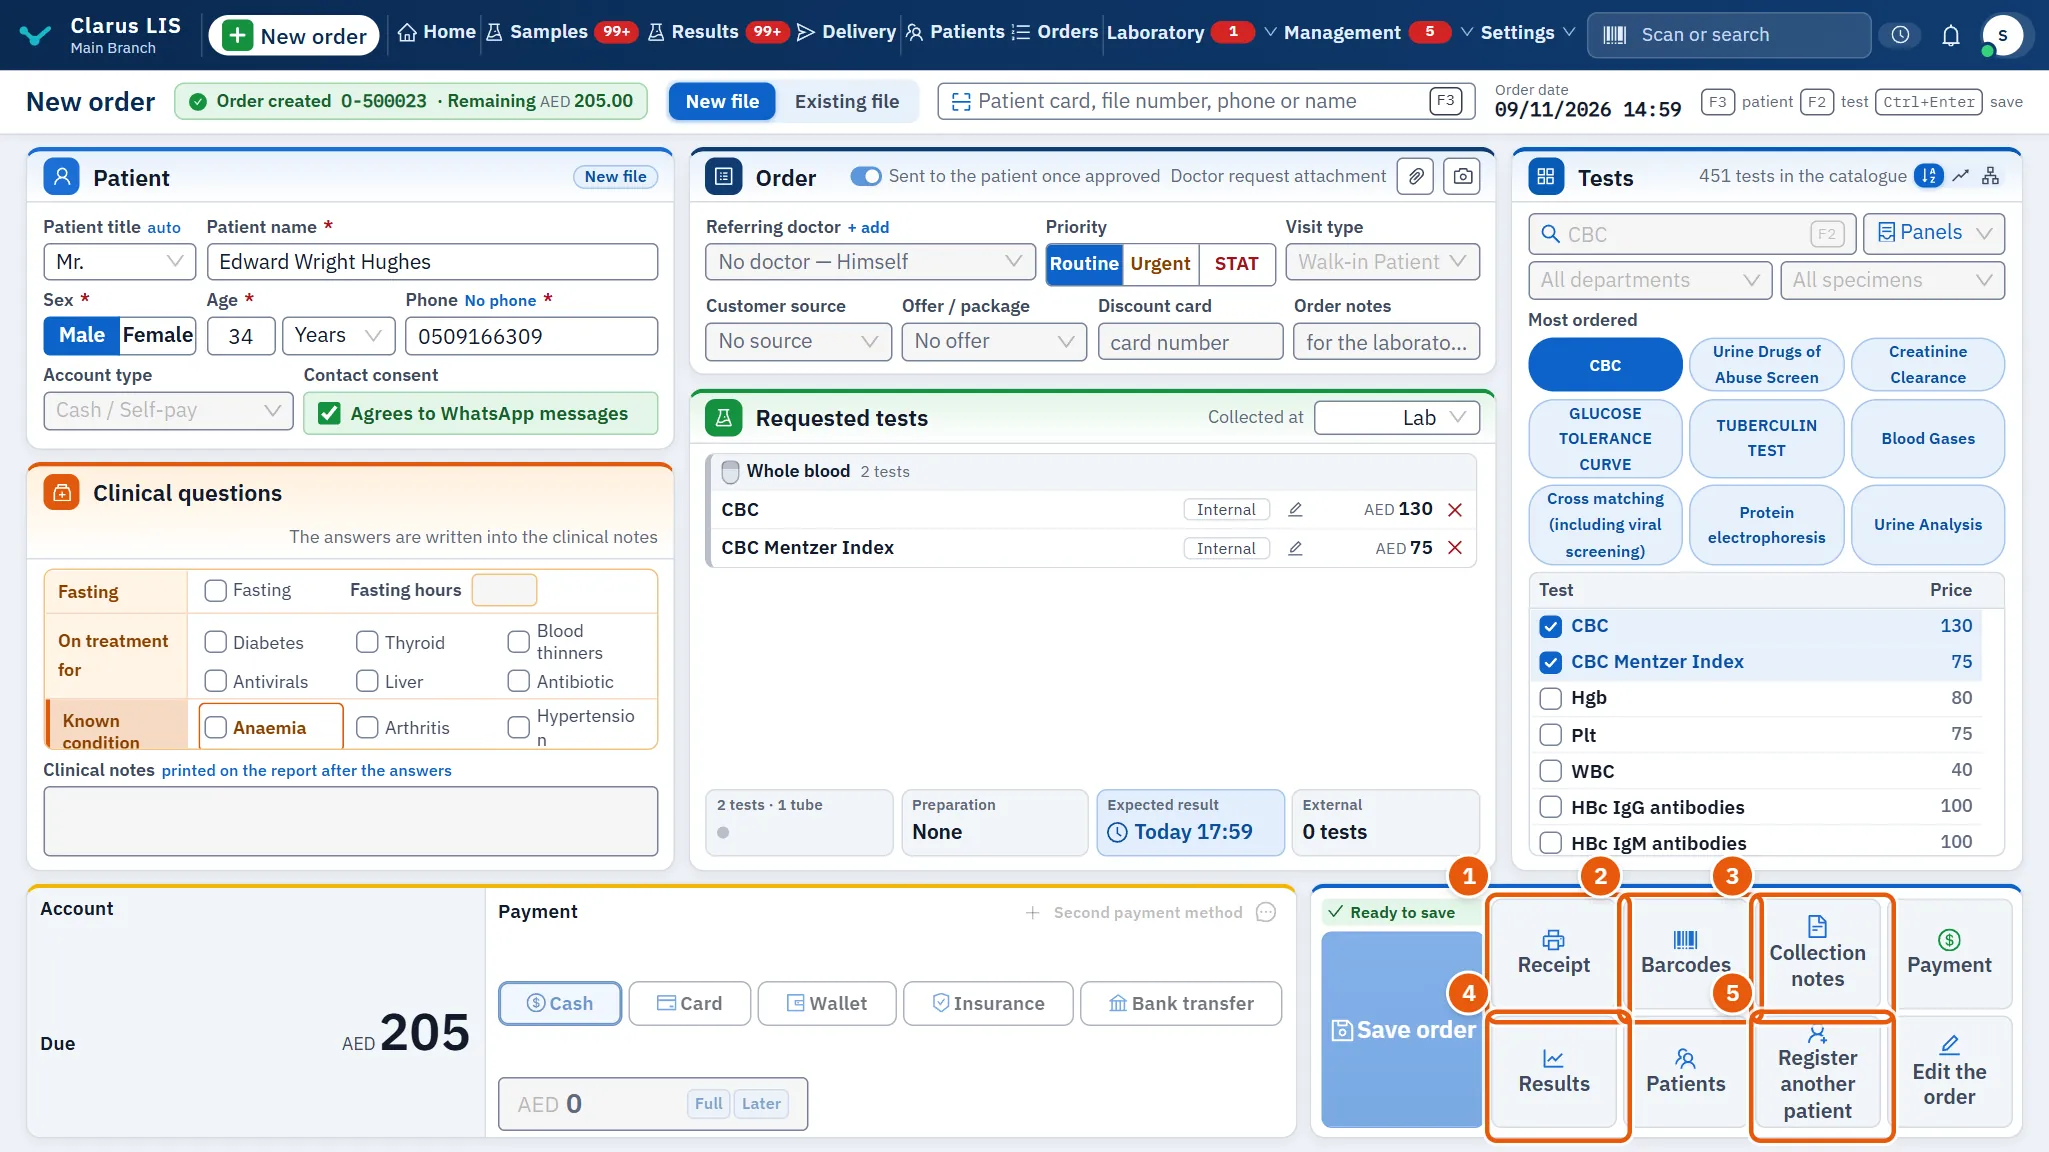
After an order is saved, Receipt, Barcodes and Collection notes are offered; before saving they are dim. Barcodes opens the window The order's labels described above. When the order is paid from the payment window, the receipt is sent to print if the window's print option was chosen.
40.7 Which printer it goes to
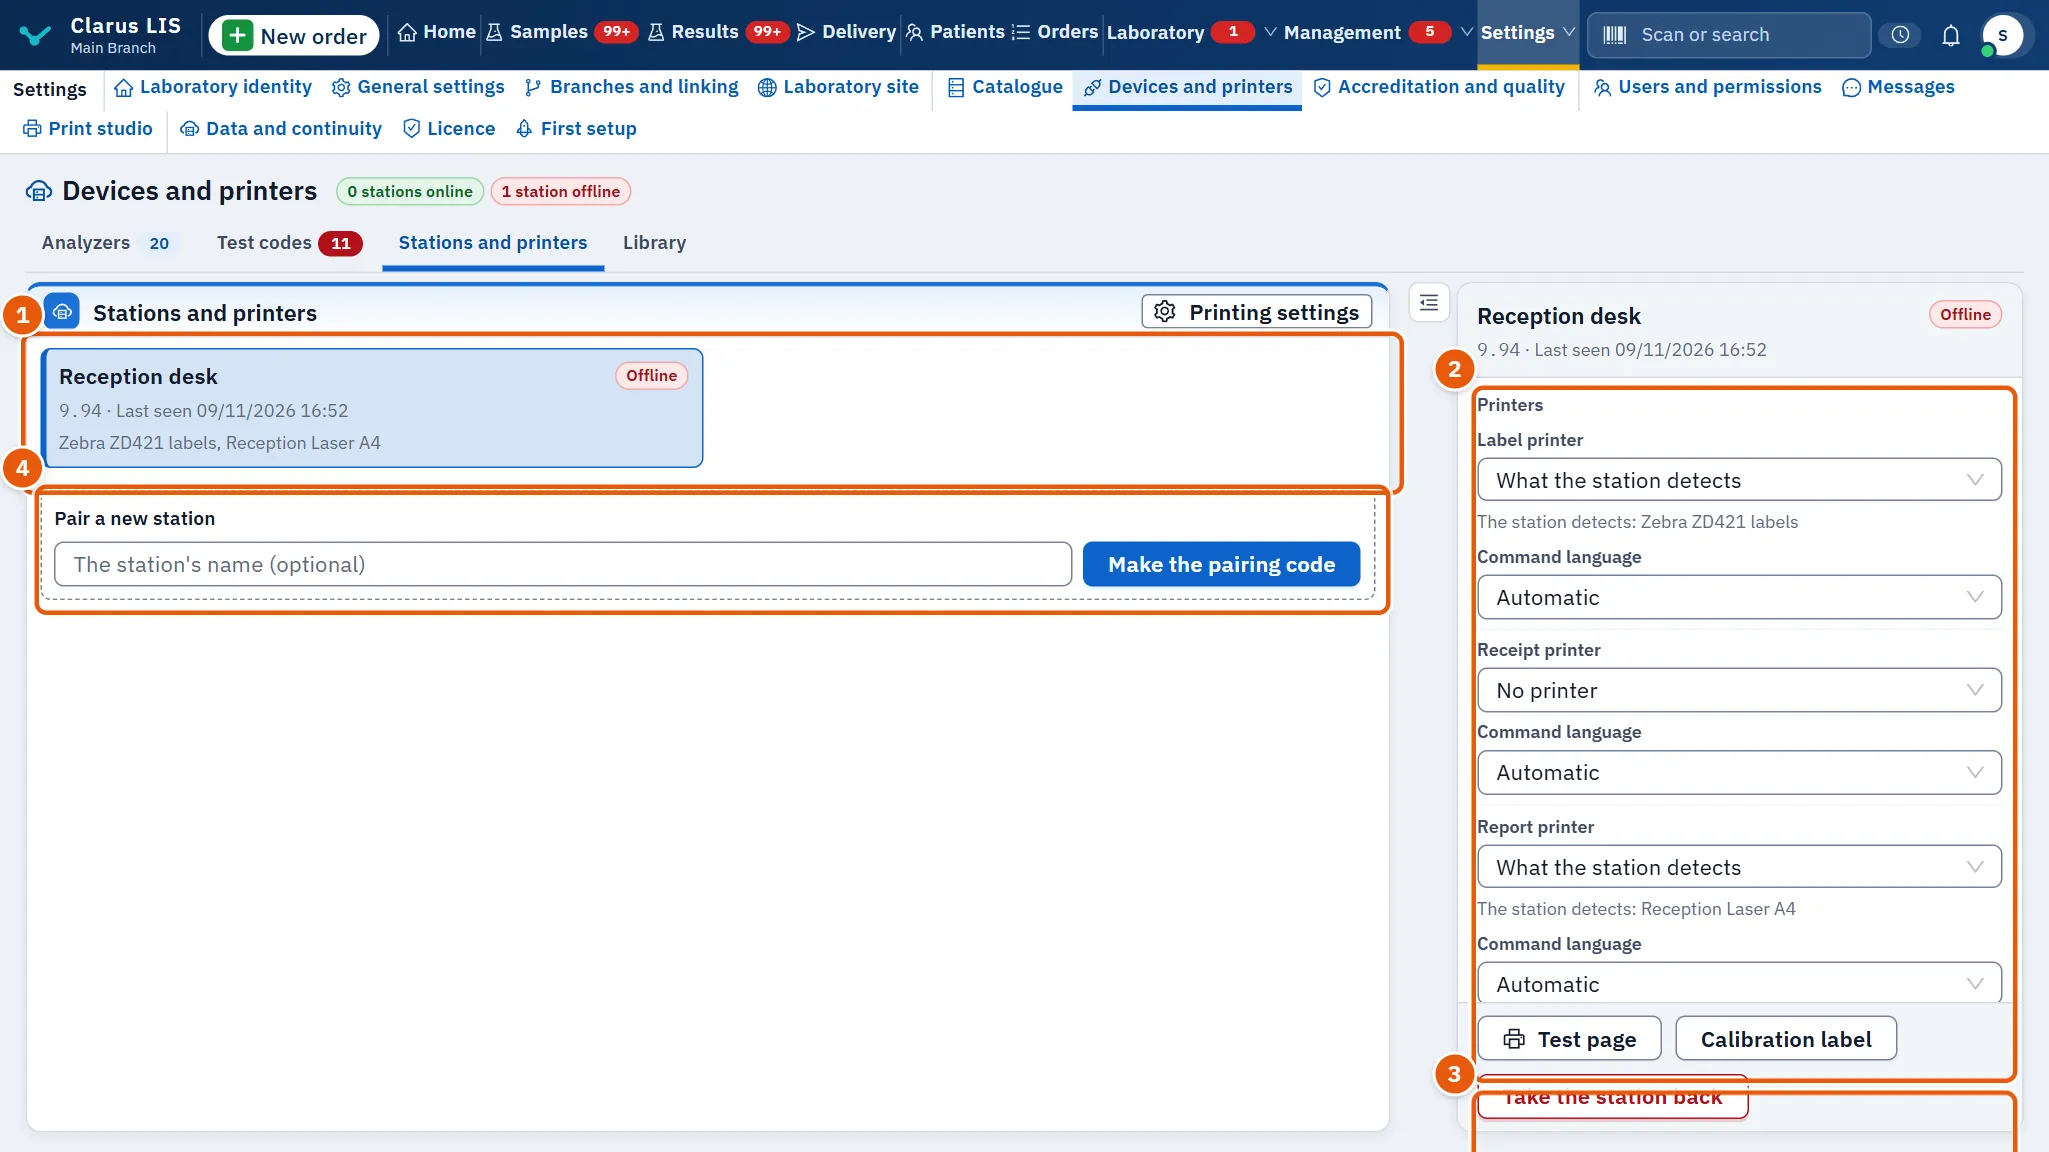
Each station (a computer with a printer or an analyzer) has one printer for each role: labels, receipts and reports. They are chosen in Devices and printers, page Stations and printers. In Silent printing through the stations mode each station prints on its chosen printer without a dialog; a role with no printer chosen opens the browser's print dialog. The other mode is The browser's print dialog.
40.8 Who sets printing up
| What | Where |
|---|---|
| The look of the report, the receipt and the label, and what the report engine draws | Print studio |
| The name, logo and contacts printed on every design | Laboratory identity |
| The report, notes, receipt and result-message languages | the general settings |
| The station's printers, the test page, label calibration, offsets | Devices and printers |
40.9 Printing trouble
| What you see | Meaning | What to do |
|---|---|---|
| No printer is bound on this station yet — choose one for each role first. | No printer is chosen on the station. | Choose one for each role in Devices and printers. |
| Print sits off the label or paper | The paper is not aligned. | In Test page check the printers; press Calibration label to see the label's real edges; adjust the offsets in Printing settings. These corrections never change the PDF a patient receives. |
| Report print buttons are dim | The order is held. | Read the note under the order; the print buttons come back when the hold is lifted. |
| The report's PDF could not be downloaded. | The PDF could not be downloaded. | Try again. |
| The numbering barcode does not fit the label | The numbering format is too long. | Shorten it in the general settings. |
| Two elements cover each other on the label | The design is crowded. | Drag one away in Print studio. |
40.10 See also
- Print studio: designing the report, receipt and label.
- Devices and printers: stations and their printers.
- Delivery, Samples, Results: where the papers are printed.