Chapter 39First setup
Menu: First setup (in the group Settings). Address: /setup/first-run.
39.1 What this screen is for
This is the step-by-step reference of the wizard that prepares a new laboratory. The chapter «Getting started» introduces it in a few lines; here every one of the eleven steps is described with its fields, what it saves and where the work continues. The wizard's title is Laboratory setup.
Three of the steps write on the wizard itself: the identity, the region and the main branch. The others (users, printing, prices, reference ranges, the public site) show where things stand and open the page that does the work. The wizard keeps its place on the server, so leaving for another page and coming back finds the same step.
39.2 Who sees it
Whoever holds Manage the laboratory's structure: branches, numbering, first run, external laboratories. The menu hides the screen from everyone else. One more control depends on a second permission:
| You can… | …if your role holds |
|---|---|
| Open the wizard and write its steps | Manage the laboratory's structure |
| Have the wizard notice that the history already came from RealLab (the origin step then says so and takes From RealLab as the choice) | Run the migration |
The button Open the migration from RealLab is tied to that same permission: it is shown only to a role that may Import data from a previous system, when Bring my history from RealLab is chosen and the wizard has not found a finished import. A role without it leaves the migration to one that has it, in Data and continuity.
39.3 The screen at a glance
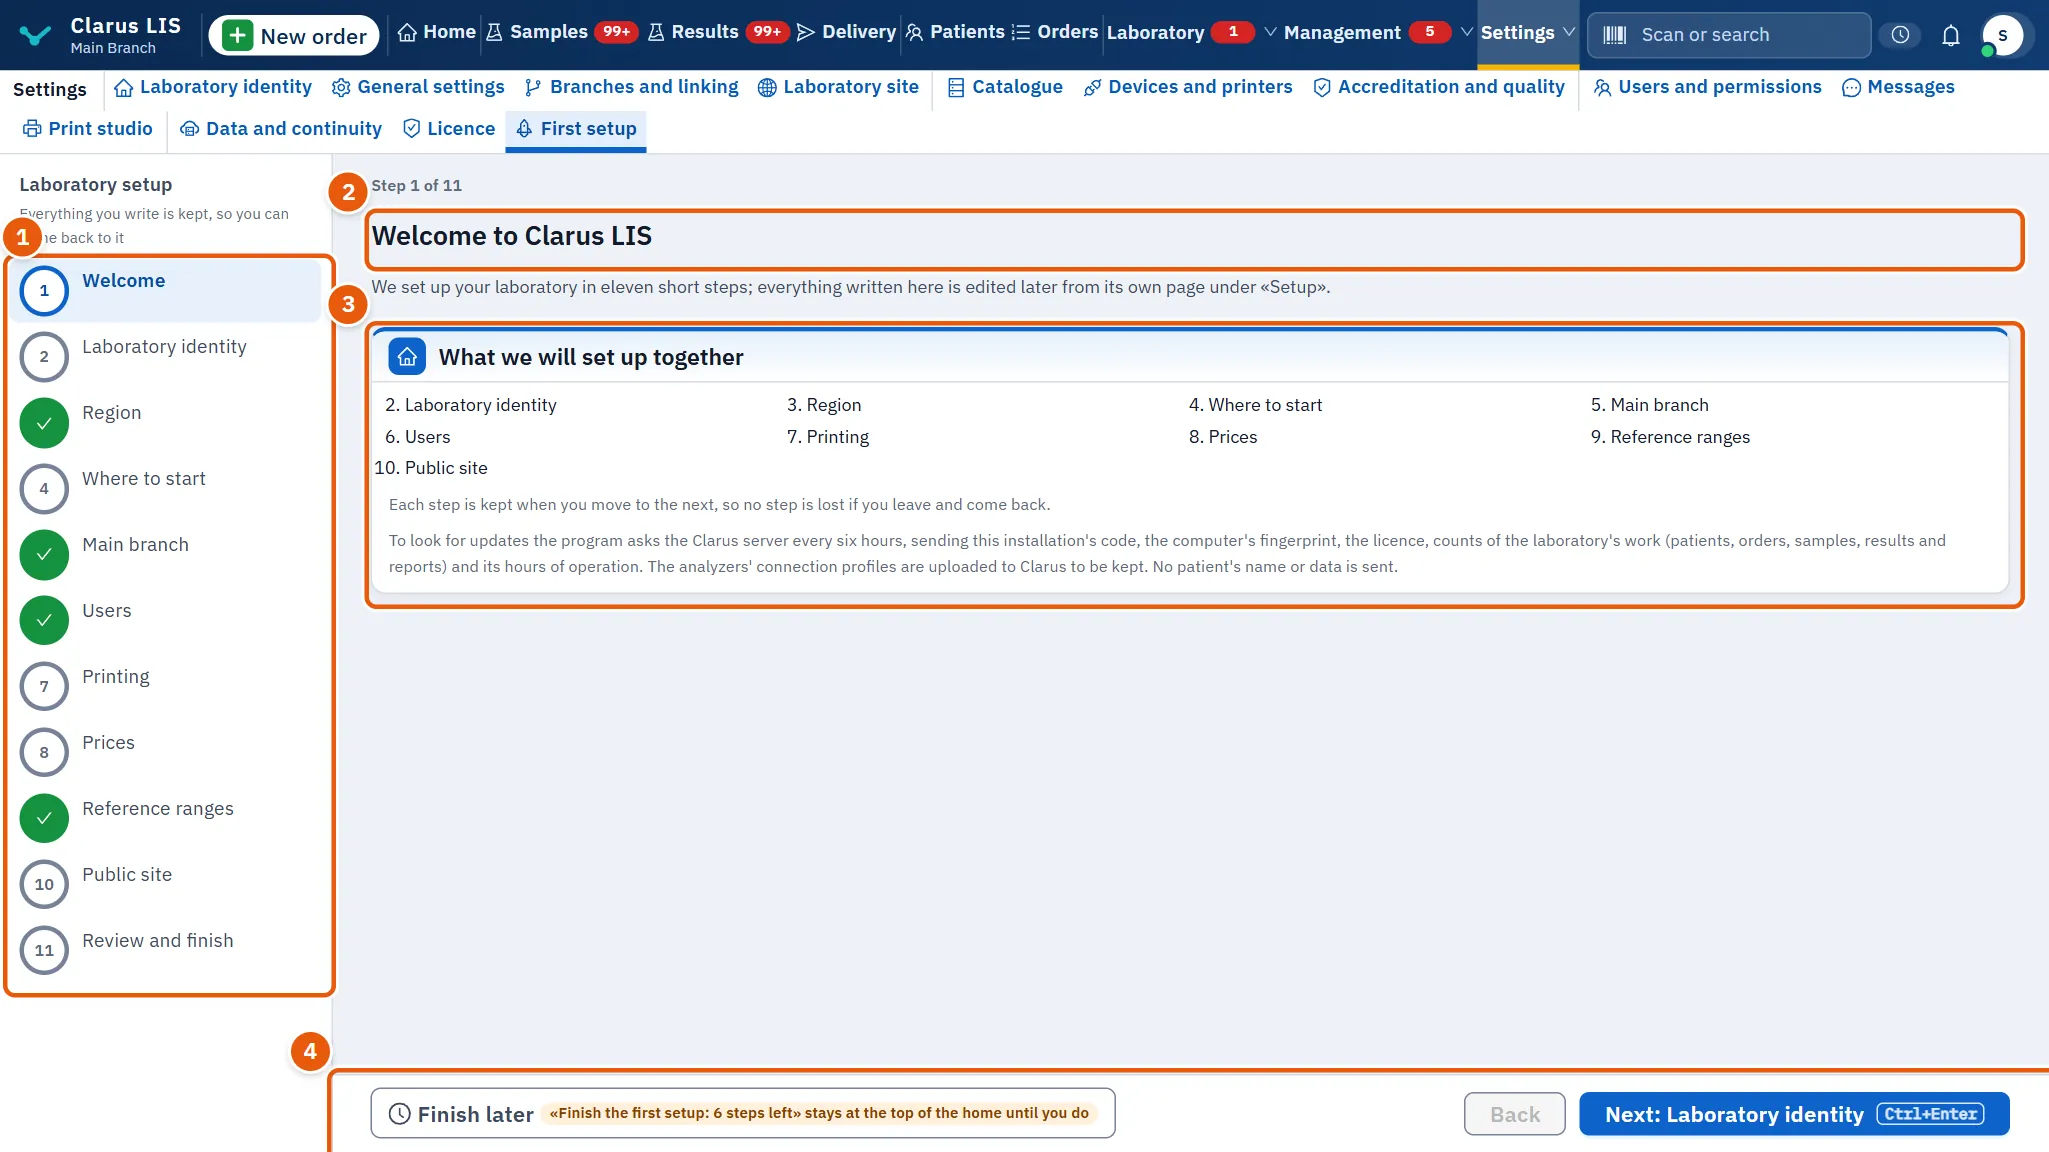
- The steps: the eleven steps in order, each marked as the current one, done, passed without being finished, or still to do. A step may carry a small note under its name.
- The step's heading and text: what the step is for.
- The step's body: fields to write, choices to make, or a card that opens another page.
- The foot: Finish later (absent once the setup is finished), a button to go back, and the button to go on, which reads Next: … with the next step's name and on the last step Finish the setup.
You may press any step in the list to go straight to it. Going on from a step first saves what you wrote in it. If the save is refused the step stays as it was and the reason is shown (The save failed, so the step stays as it was. when the server gives none).
39.4 The steps
39.4.1 Welcome
The step Welcome opens a card titled What we will set up together that lists the steps to come, and states that each step is kept when you move on. It also repeats what leaves this computer when the program looks for updates, in the same words as General settings. Depending on how you arrive it adds a line: You finished the first setup before, and can review any step. if the setup was finished before, or You are back where you left the setup. if you put it off.
39.4.2 Identity
The step Laboratory identity writes the name and contacts as the report and the receipt print them.
| Field | What it holds |
|---|---|
| Display name | The laboratory's name at the head of the report and receipt. If it is empty the step warns that the printed report carries no name. |
| Display name in English | The same name in English. |
| Legal name | The legal name. |
| Phone | The phone a patient sees. Written left to right. |
| The WhatsApp number. Written left to right. | |
| Address | The laboratory's address. |
| I agree to send the laboratory's name and phone number to the supplier | The agreement to send the laboratory's name and phone number to the supplier. It is off until you tick it and is kept in the settings as well. |
39.4.3 Region
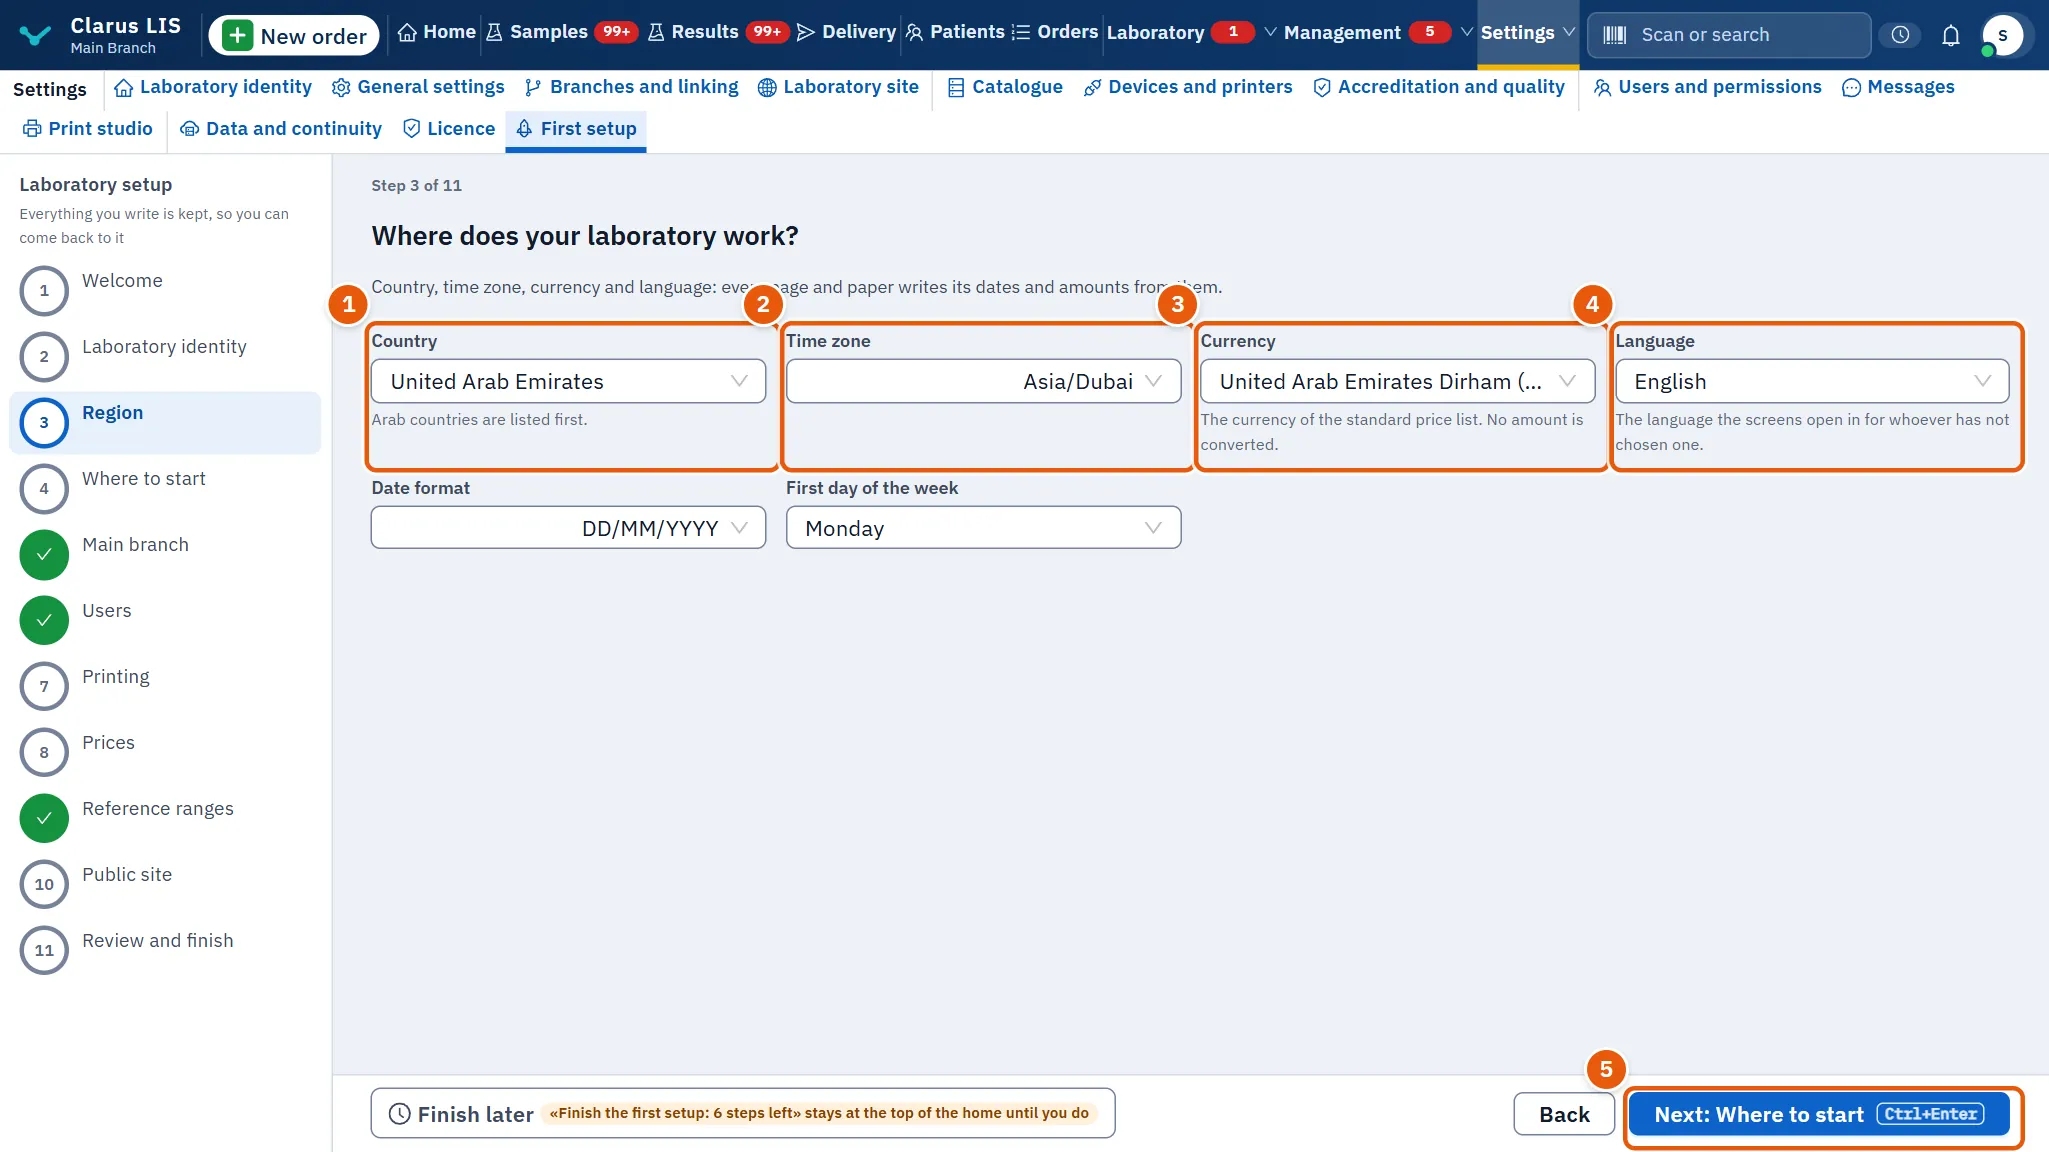
The step Region sets how every page and paper writes its dates and amounts.
| Field | What it holds |
|---|---|
| Country | The laboratory's country. |
| Time zone | The time zone. |
| Currency | The currency of the standard price list. No amount is converted. |
| Language | The laboratory's language. |
| Date format | How dates are written. |
| First day of the week | The first day of the week. |
For a new laboratory still on the language the installation wrote, the step proposes the language you are working in. It is only a proposal: choose another if the laboratory works in another language. The page redraws when the date format changes; the wizard stays on the same step.
39.4.4 Where to start
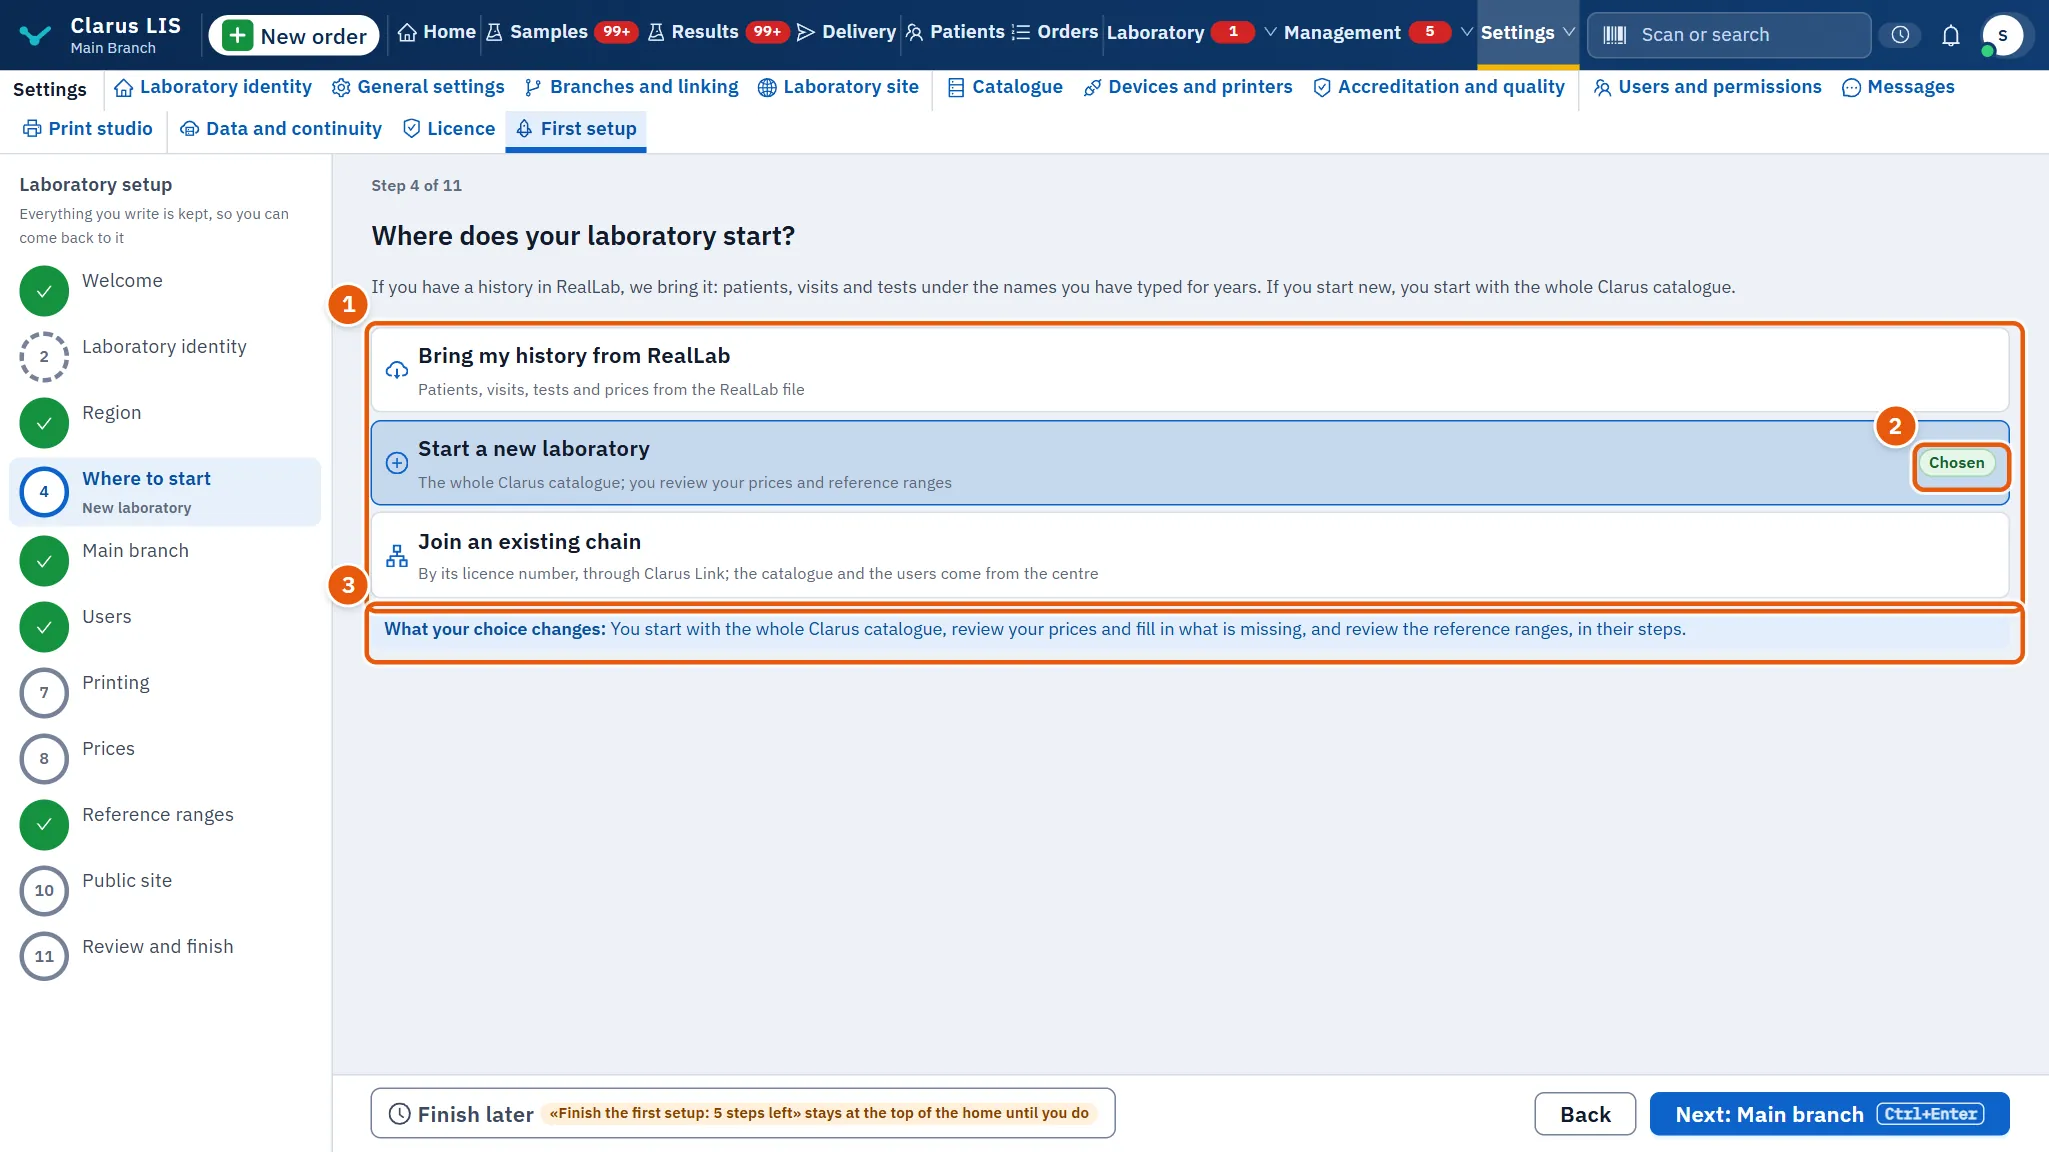
The step Where to start offers three choices. Each is a card; the one you pressed carries the mark Chosen and a line under What your choice changes: says what the choice changes.
| Choice | What it means | What it changes |
|---|---|---|
| Bring my history from RealLab | Patients, visits, tests and prices come from the RealLab file. | Prices and reference ranges become a review of what arrived. The button Open the migration from RealLab opens the migration, in Data and continuity; it is shown only to a role that may Import data from a previous system, while this choice is made and no finished import is found. |
| Start a new laboratory | The whole Clarus catalogue. | You review your prices, fill in what is missing, and review the reference ranges in their steps. |
| Join an existing chain | It links by its licence number through Clarus Link, and the catalogue and the users come from the centre. | Their steps are reviewed, not written. The button Open branches and linking opens Branches and linking. |
If the history has already come from RealLab the step says so (Your laboratory's history came from RealLab, so prices and reference ranges are a review of what arrived.) and the choice is taken as From RealLab unless you chose otherwise. The choice is saved with the wizard's draft; the other steps show it as a small note on the step.
39.4.5 Main branch
The step Main branch writes the branch in which orders are registered first.
| Field | What it holds |
|---|---|
| Branch name | The branch's name, shown as well as stored. |
| City | The city. |
| Branch phone | The branch's phone, written left to right. |
| Address | The address. |
If the laboratory already has other working branches, a line says how many. Other branches are added later from Branches and linking.
39.4.6 Users
The step Users shows a card with the number of working users and the first eight of them, each with the role. If you are the only one it warns (You are alone in the laboratory now. Add an account for everyone who works with you.). Open users opens Users and permissions, where the accounts are added.
39.4.7 Printing
The step Printing is a card that says printers are chosen and given their papers in Devices and printers. Open devices and printers opens that page. This is also the step a branch server of a chain keeps.
39.4.8 Prices and reference ranges
The steps Prices and Reference ranges have the same shape: a card, a count of what is missing, and a button that opens the page of the work.
| Element | What it does |
|---|---|
| The text | Says where the work is done: prices in Prices and contracts, ranges in each test's card in Catalogue. If the history came from RealLab it changes to a review of what arrived and the step carries the note From the RealLab file. |
| The count | Says how many active tests have no price or no reference range, out of the active tests; or that every one has. On an older server it counts the whole catalogue instead and says so. |
| Open prices / Open the catalogue | Opens the page of the work. |
| Reviewed | Shown on the prices step (and the public-site step) only while it is not done: records that you looked at it (The review is recorded.). |
39.4.9 Public site
The step Public site is a card for the page where a patient sees the laboratory and receives a result. Open the laboratory site opens Laboratory site, where the sections, head and results portal are written and published when you choose. While the step is not done, Reviewed records the review.
39.4.10 Review and finish
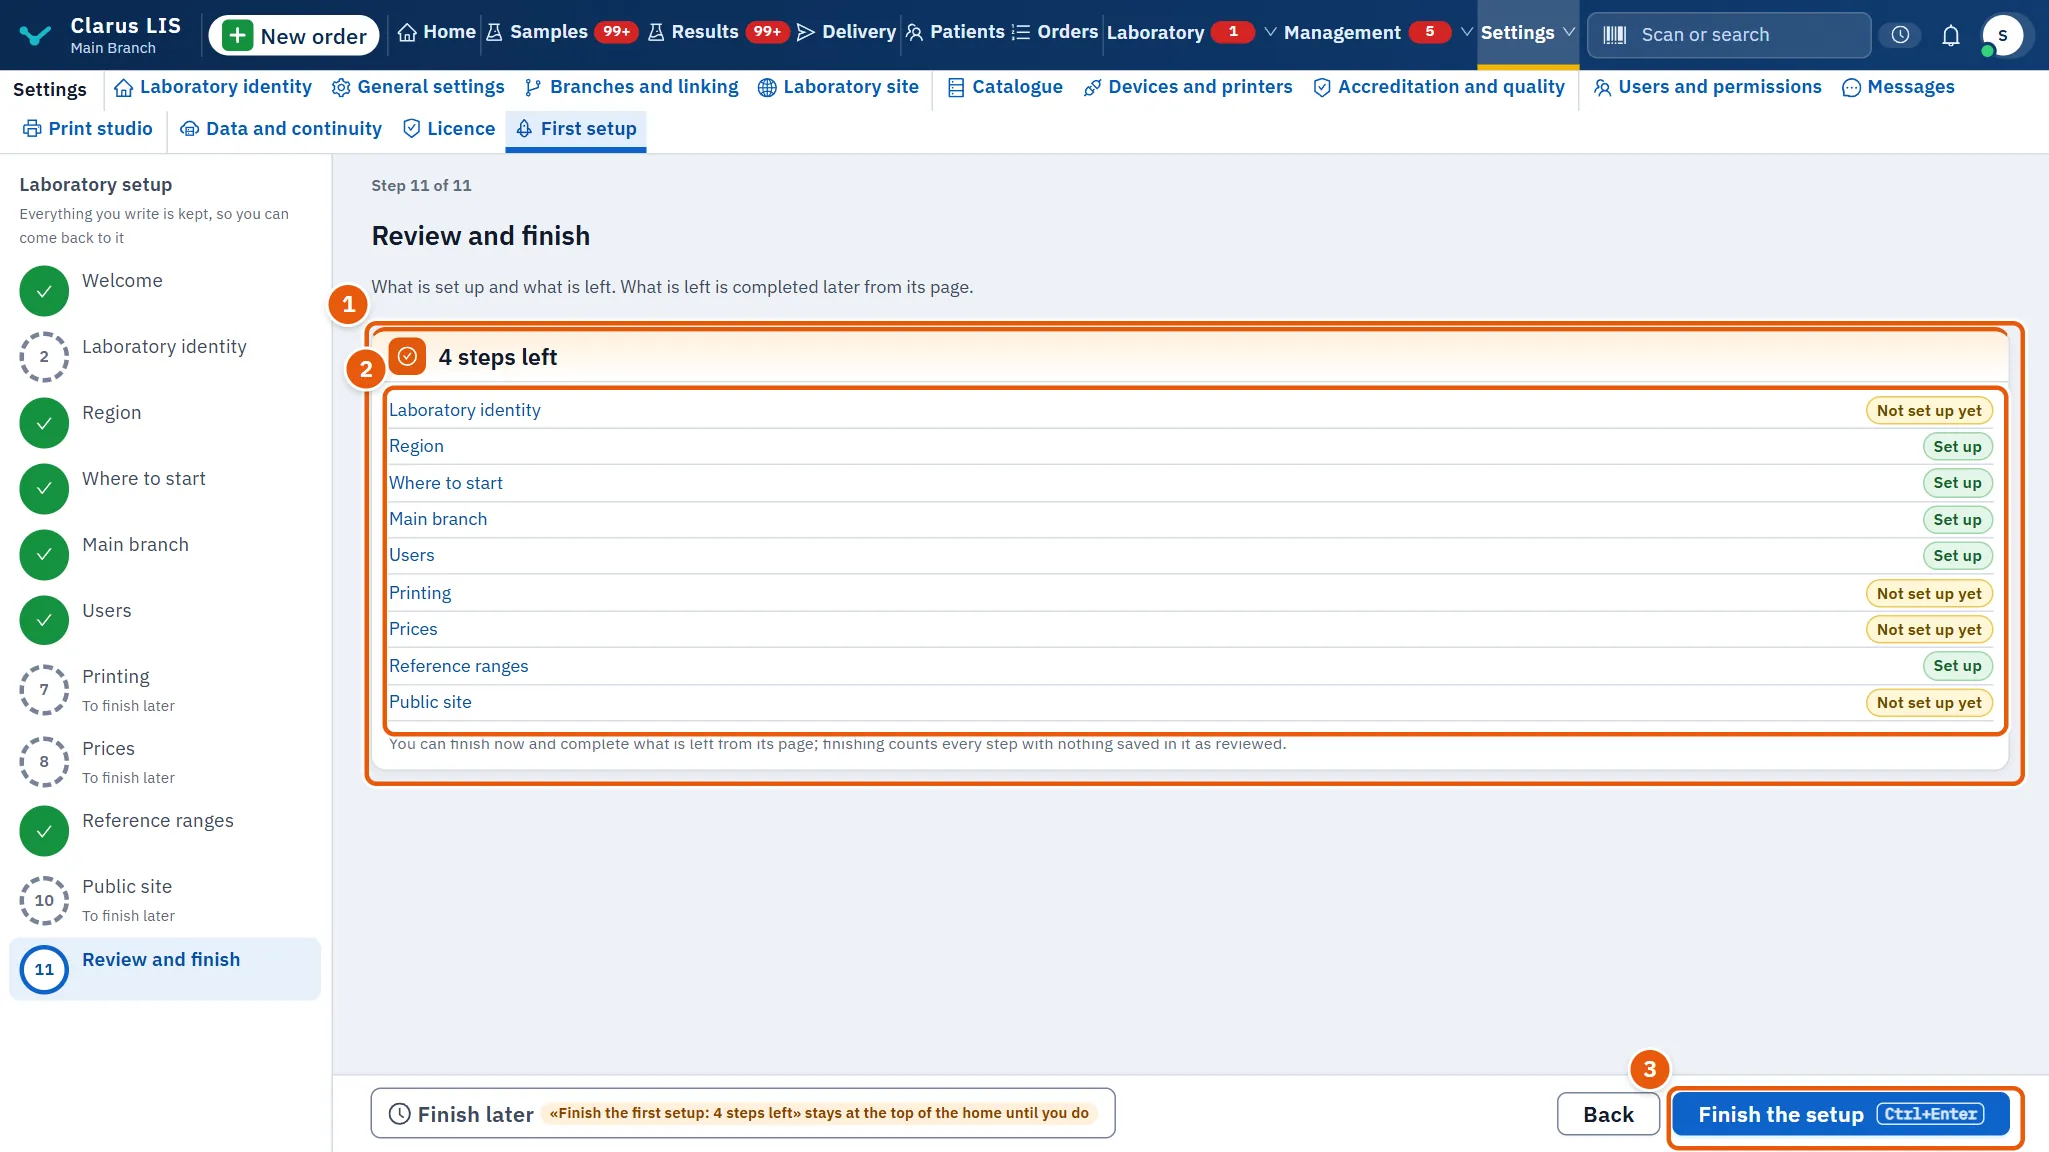
The step Review and finish lists every step between the welcome and itself with a mark: done or still open (a page step is done when the server finds its work in place; the origin step, once you have passed it). Press a step's name to go back to it. The card's title says how many steps are left (… steps left) or Everything is set up. If the laboratory still has no written name, the step warns and offers Write the name. If steps are open, a note says you can finish now and complete the rest from its page.
39.5 Tasks
39.5.1 Task 1 — Set up a new laboratory
- Open First setup.
- On Laboratory identity write the name in Display name and the contacts, then press the next button.
- On Region check the country, time zone, currency and language, then go on.
- On Where to start press Start a new laboratory.
- On Main branch write the branch's name, city, phone and address.
- On each of the page steps press its open button, do the work, return, and go on.
- On the last step press Finish the setup. The screen says The first setup is finished..
39.5.2 Task 2 — Bring the history from RealLab
- On Where to start press Bring my history from RealLab.
- Press Open the migration from RealLab and run the migration in Data and continuity.
- Return to the wizard. The origin step now says the history came from RealLab.
- On Prices and Reference ranges review what arrived, and complete only what is missing.
39.5.3 Task 3 — Finish later
- In any step press Finish later.
- The wizard saves your place and takes you to the home, which keeps a line at its top reminding you how many steps are left («Finish the first setup: … steps left» stays at the top of the home until you do).
- To come back, open First setup: it opens where you left it.
39.5.4 Task 4 — Mark a step reviewed and finish
- On the prices or the public-site step, open the page, look at what is there and return.
- Press Reviewed. The screen says The review is recorded. and the step turns done.
- On the last step check the list, then press Finish the setup.
39.6 Messages and what to do
| The screen says | Meaning | What to do |
|---|---|---|
| The first setup could not be loaded. | The setup could not be loaded. | Press the retry button; check the server is running. |
| The save failed, so the step stays as it was. | The step could not be saved. | The step stays as it was; try again. |
| The laboratory's name is not written yet, so the printed report carries no name until it is. | No name is written. | Write Display name in the identity step. |
| You are alone in the laboratory now. Add an account for everyone who works with you. | Only one working account. | Open the users page and add the others. |
| The review is recorded. | The review was recorded. | Nothing; go on. |
| The first setup is finished. | The setup is finished. | Nothing; you return to the home. |
39.7 See also
- Home: where the line about steps left is kept.
- Data and continuity: the migration from RealLab.
- Branches and linking: other branches and linking to a chain.
- Users and permissions, Devices and printers, Prices and contracts, Catalogue, Laboratory site: the pages the steps open.