Chapter 6Samples
Menu: Samples. Address: /samples.
6.1 What this screen is for
This is where a tube is followed from the moment it is drawn until it is disposed of. You scan the sample's label, see which order and patient it belongs to, and move it one step at a time: receive it at the bench, start its analysis, store it afterwards and, when the retention time is over, dispose of it. A sample that cannot be used is rejected here, and the program opens a new draw.
The screen also keeps the sample's record: when it was really drawn, what its condition was on arrival, any alert on it, the timed draws of a protocol such as glucose tolerance, and the printing of its barcode labels.
6.2 Who sees it
| You can… | …if your role holds |
|---|---|
| See the screen and the list of samples | Read orders or Accept, reject and receive samples |
| Open the barcode board (change which tube holds a test) | Create orders |
Without the permission for the board, its button is not shown at all. The barcode print buttons (Print today's unprinted labels, Last 200 labels and Print their labels) are shown only to a role that may Print reports, receipts and labels; the screen's other buttons are shown to anyone who sees it; if the server refuses a step for your role, the screen says so.
6.3 The screen at a glance
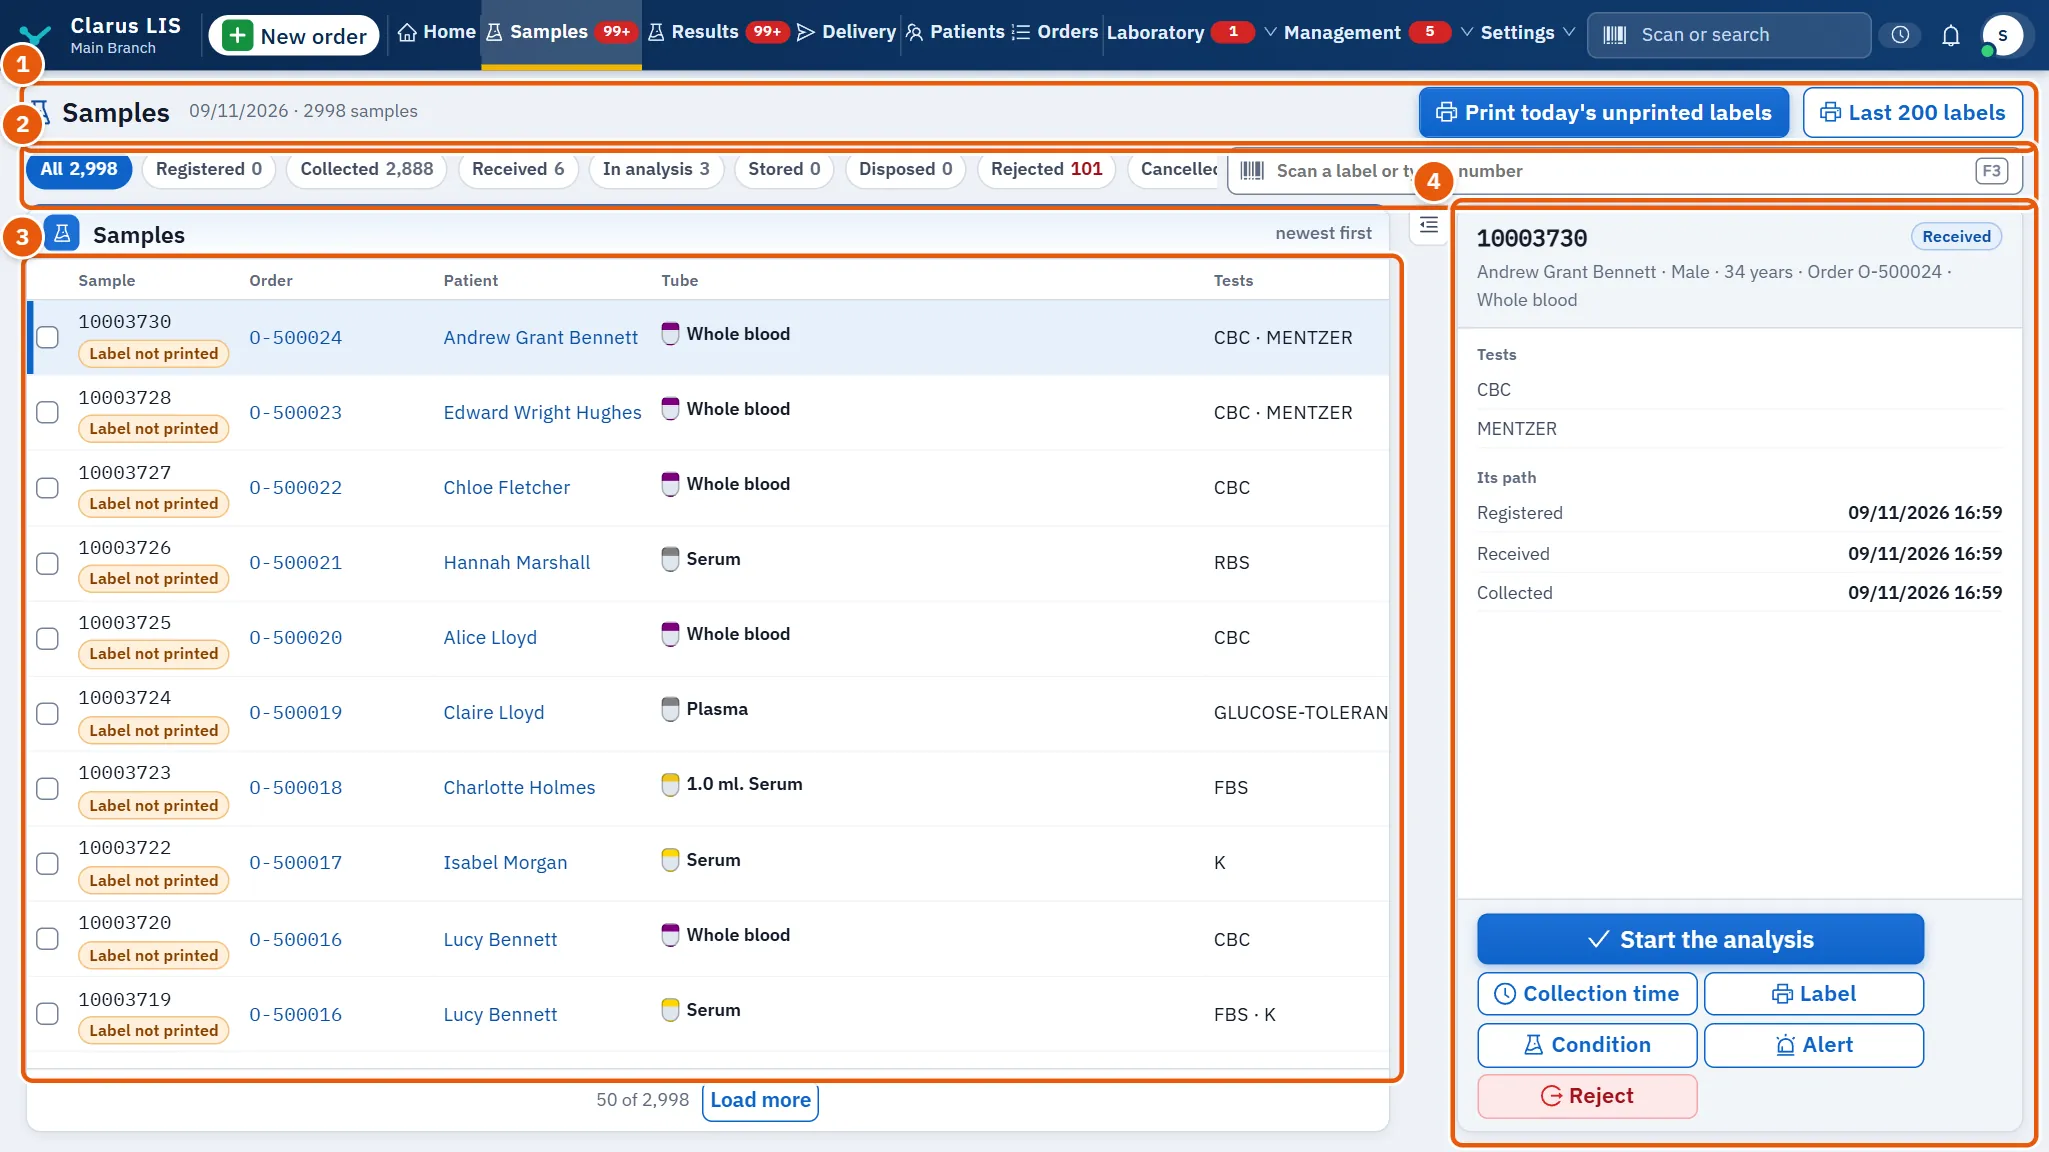
- The title, with the day and how many samples it holds, and the two buttons that print labels: Print today's unprinted labels and Last 200 labels.
- The scan box and the state chips.
- The list: Samples, one line per sample.
- The chosen sample: its details and the buttons that act on it.
6.4 The head
| Control | What it does |
|---|---|
| Print today's unprinted labels | Prints the labels of the day's samples that have none yet. Shown only when the list has a day. |
| Last 200 labels | Prints the last 200 labels again. |
| Scan a label or type a number | A scanner types the label's code and presses Enter; or type the sample's number or the order's. While you type, the list narrows to what matches. On Enter the sample opens in the details. If nothing has that code: «No sample with the code …». The code stays selected, so the next scan replaces it. |
| Sample state | Chips that limit the list, each with its count: All, Registered, Collected, Received, In analysis, Stored, Disposed, Rejected, Cancelled, Alert and Timed draw. The chips Registered, Collected and Cancelled appear only when the server counts samples in that state. Changing the chip clears the chosen sample and the ticks. |
6.5 The list
| Column | Meaning |
|---|---|
| (tick box) | Chooses the sample for a bulk action. A rejected or cancelled sample has none. |
| Sample | The sample's code. Label not printed marks a label not yet printed (not shown on a rejected or cancelled sample). Re-drawn as: gives the code of the new draw; Re-draw of: gives the code of the sample this one replaces. |
| Order | The order's code, which opens the order. |
| Patient | The patient's name. |
| Tube | The specimen type, in the tube's colour. |
| Tests | The codes of the tests drawn into this tube. |
| State | The state, and an Alert mark when the sample has an open alert or a custody problem. A rejected sample shows the reason. |
| Approved | How many of the tube's tests are approved out of how many, such as 2/4. |
The list shows one laboratory day, runs newest first, loads 50 lines at a time (more are loaded when there are more) and renews itself every 30 seconds. With the chip Stored on, a warning counts the stored samples that are past their retention time.
When the list is empty the screen says why: for example «No sample today.», «No received sample waits.» or, after a search, «No sample matches …».
6.6 The chosen sample
The details show the code, the state, the patient with sex and age, the order and the specimen. Under them Tests lists the tests, and Its path gives the times: Registered, Received, Collected (or «not recorded») and, once stored, Stored at.
A note appears when the sample has an open alert or its custody needs review. The custody notes say what is wrong: collected and not received in time, no active barcode label, a received sample with no receipt time, a stored sample with no storage place, a rejected sample with no active re-draw, or an open result still linked to a rejected sample. A timed sample also shows its protocol and the time of the next draw.
| Button | What it does |
|---|---|
| One main button, by the state | Receive the sample for a registered or collected sample; Start the analysis for a received one; Store the sample for one in analysis; Dispose for a stored one. A rejected, cancelled or disposed sample has none. |
| Collection time | Records when the sample was really drawn. Not shown on a rejected or cancelled sample. |
| Label | Prints the sample's label. Once printed, the button reads Print the label again. |
| Condition | Records what the tube looks like. Not shown on a rejected or cancelled sample. |
| Alert | Puts an alert on the sample. |
| Timed draws | Shown only for a sample of a timed order. |
| Reject | Rejects the sample. Not shown on a rejected or cancelled sample. |
6.7 Tasks, step by step
6.7.1 Task 1 — Follow a sample from receipt to storage
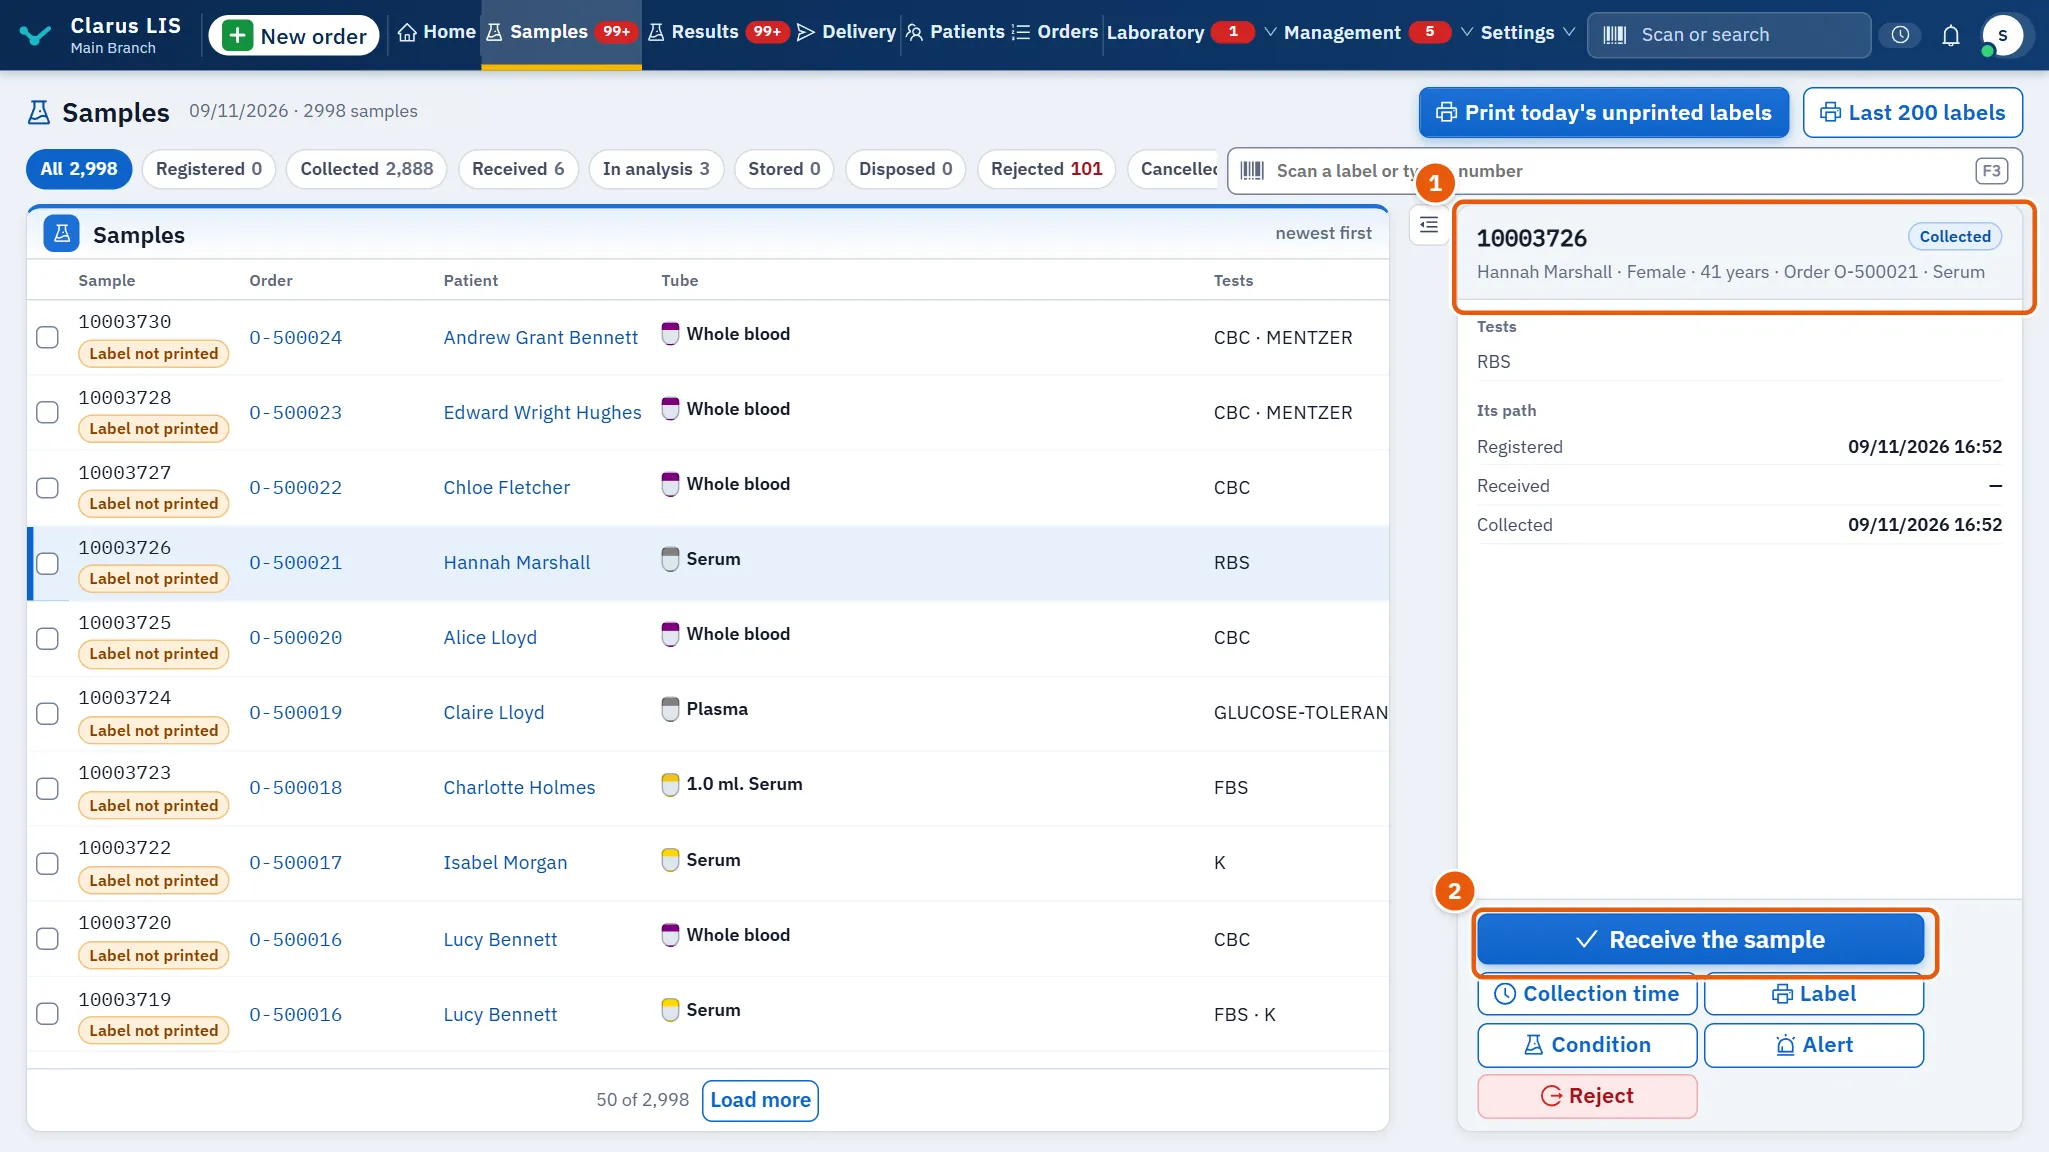
A sample passes through these steps in order: registered or collected, received, in analysis, stored, disposed. Each press of the main button moves it to the next.
- Scan the sample's label in Scan a label or type a number, or choose it in the list.
- Press Receive the sample. The screen says the sample was received.
- When the analysis begins, press Start the analysis.
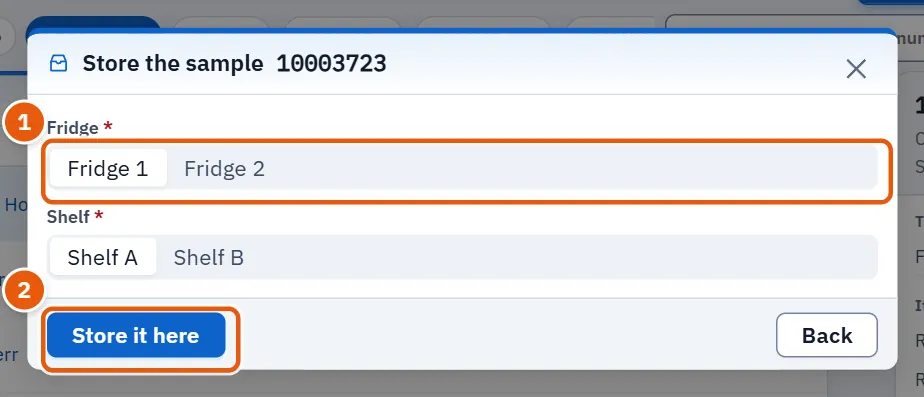
- When it is done, press Store the sample. In the window Store the sample choose the place: Fridge, and Shelf when that fridge has shelves; the save button stays dimmed until they are chosen. If the laboratory has not set its storage places yet, the window says so and its button reads Store without a place: the sample is stored without a place and its custody notes that. The places are set in Setup.
- After the retention time, press Dispose. In Dispose of the sample write How it was disposed of (required; the button stays dimmed without it) and press Dispose.
6.7.2 Task 2 — Receive or start many samples at once
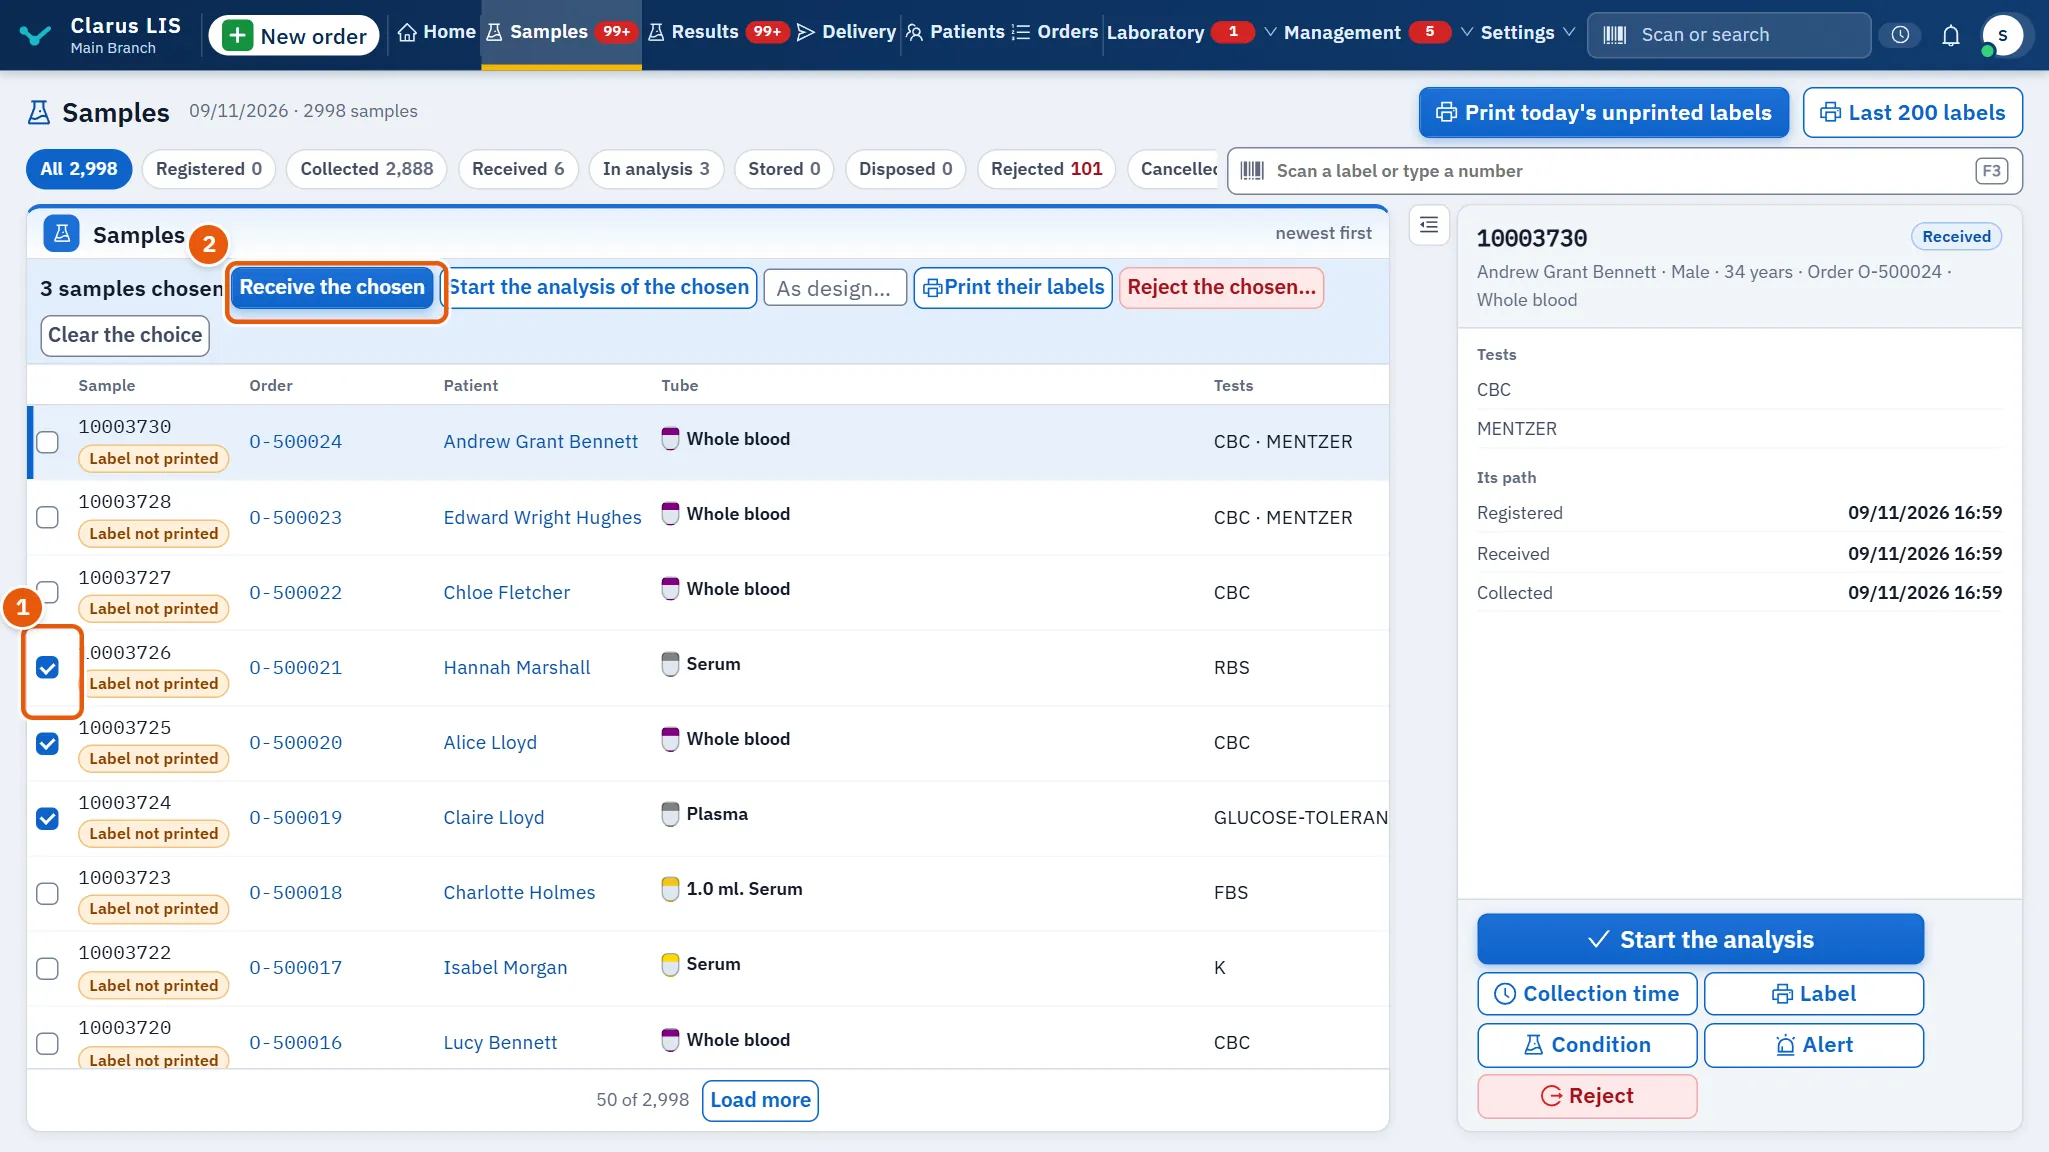
- Tick the boxes of the samples in the list.
- A bar appears above the list (Chosen samples), saying how many are chosen. Press Receive the chosen or Start the analysis of the chosen. The screen sends the step for every chosen sample whatever its state, and the server decides.
- To print their labels, set Copies for this print if you wish (1 to 10; left empty, the labels print as designed) and press Print their labels.
- Clear the choice unticks them all.
6.7.3 Task 3 — Reject a sample
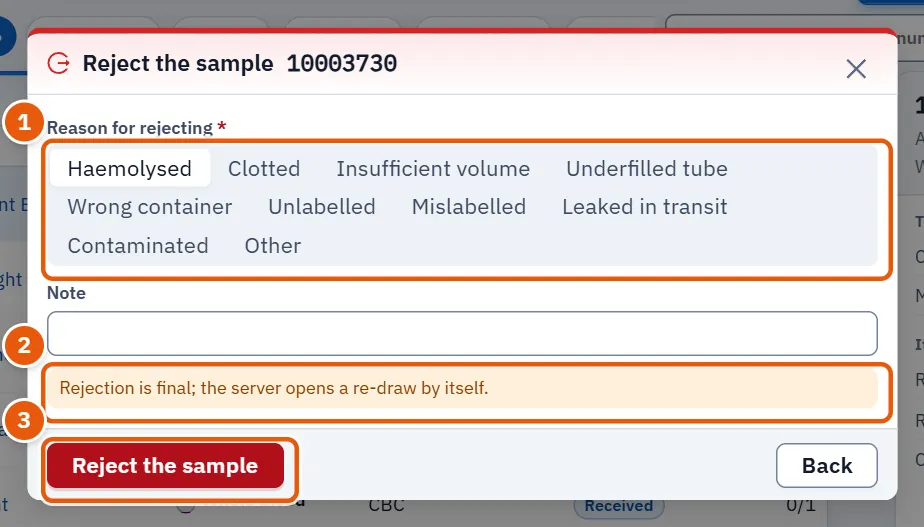
- Choose the sample and press Reject; or tick several and press Reject the chosen.
- In the window, choose Reason for rejecting from the list (it holds the conditions that justify rejection, and the choice is required). The last choice is Other; then The reason must be written. For the other reasons you may add a Note.
- Press the reject button of the window; it stays dimmed until a reason is given.
6.7.4 Task 4 — Record the sample's condition
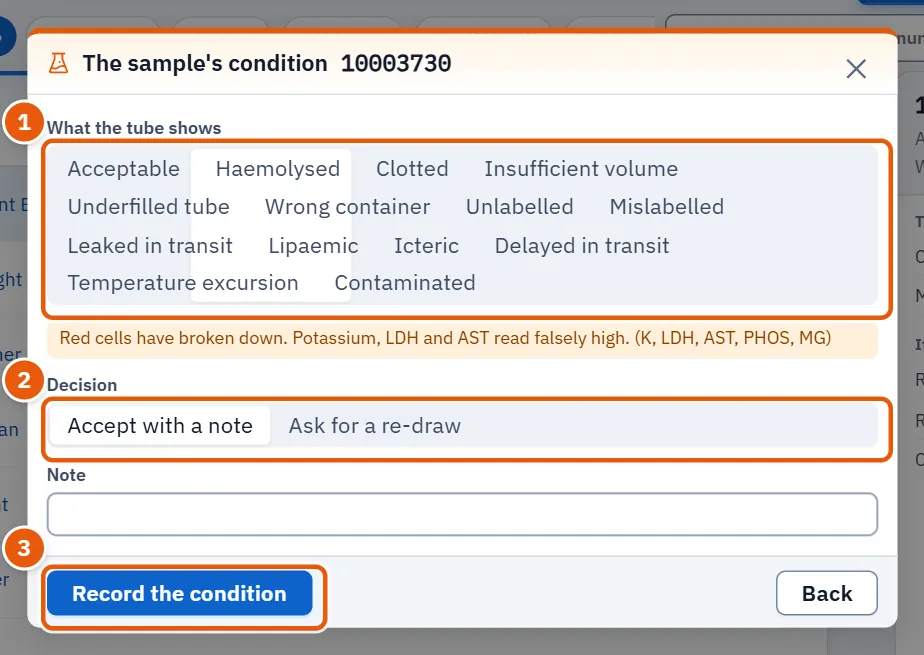
- Choose the sample and press Condition.
- In What the tube shows choose what the tube shows. The list of conditions comes from the server, and the button in step 4 stays dimmed until one is chosen.
- If the condition chosen is one that justifies rejection, Decision appears: choose Accept with a note or Ask for a re-draw. The first is unavailable for a condition that cannot be accepted with a reservation. Writing a Note is optional.
- Press Record the condition.
6.7.5 Task 5 — Record the real collection time
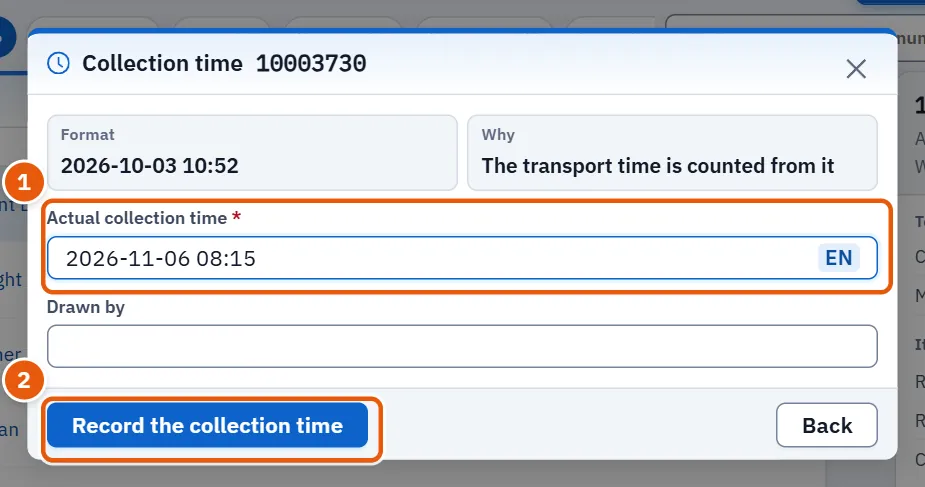
The transport time to the laboratory is counted from it.
- Choose the sample and press Collection time.
- Write Actual collection time in the form
2026-10-03 10:52. Another form is not accepted: the field says «Write the time as …» and the save button stays dimmed. - Write who drew it in Drawn by (optional).
- Press Record the collection time.
6.7.6 Task 6 — Put an alert on a sample
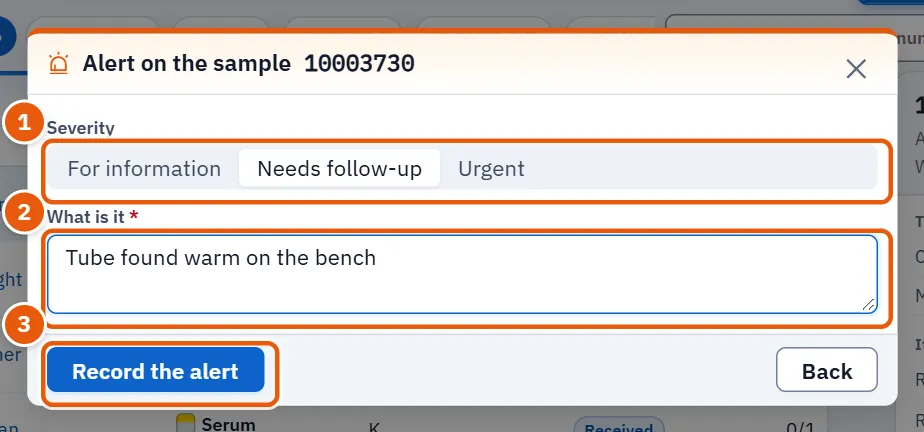
- Choose the sample and press Alert.
- Choose Severity: Urgent, Needs follow-up or For information.
- Write What is it (required) and press Record the alert. The severity starts at Needs follow-up.
The sample then carries the Alert mark in the list, and the chip Alert counts it.
6.7.7 Task 7 — Timed draws
A sample of an order with a timed protocol, such as Glucose tolerance (GTT) or Two-hour post-prandial glucose, shows Timed draws.
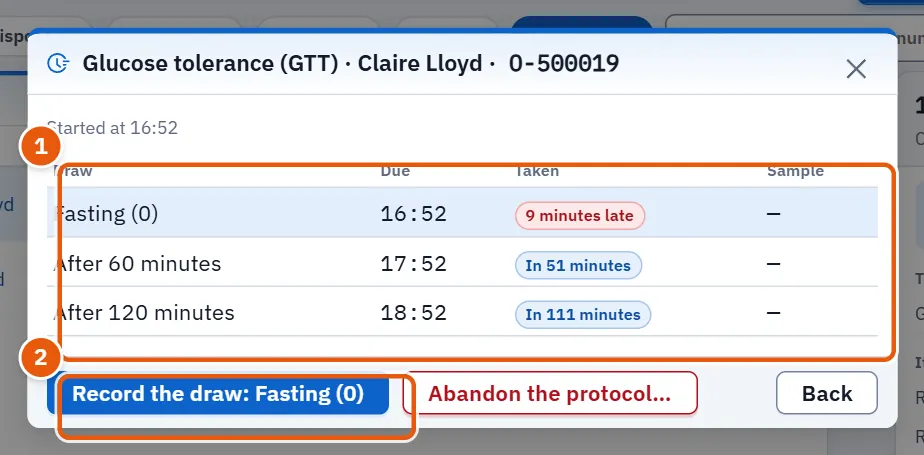
- Press it. The window shows when the protocol started and a table: Draw, Due, Taken and Sample. Each draw says where it stands: waiting, due, late, missed or outside its window.
- When the patient is drawn, press the button that records the next draw (Record the draw: …; when none is left it reads No draw is left in this protocol. and is dimmed). If it was outside its window the screen says so, and the report says so too; a late draw is recorded, not refused. The label of that draw's tube is sent to print at once.
- To stop the protocol (offered only while it is not complete) press Abandon the protocol, say why in Why did the protocol stop? (required) and confirm with Abandon the protocol. The reason is written on the report, no draw is recorded after it, and measuring again needs a new protocol.
6.7.8 Task 8 — Print labels and use the barcode board
Each tube has one label with all its tests. From this screen, labels are printed with Print today's unprinted labels, Last 200 labels, the chosen sample's label button, or Print their labels.
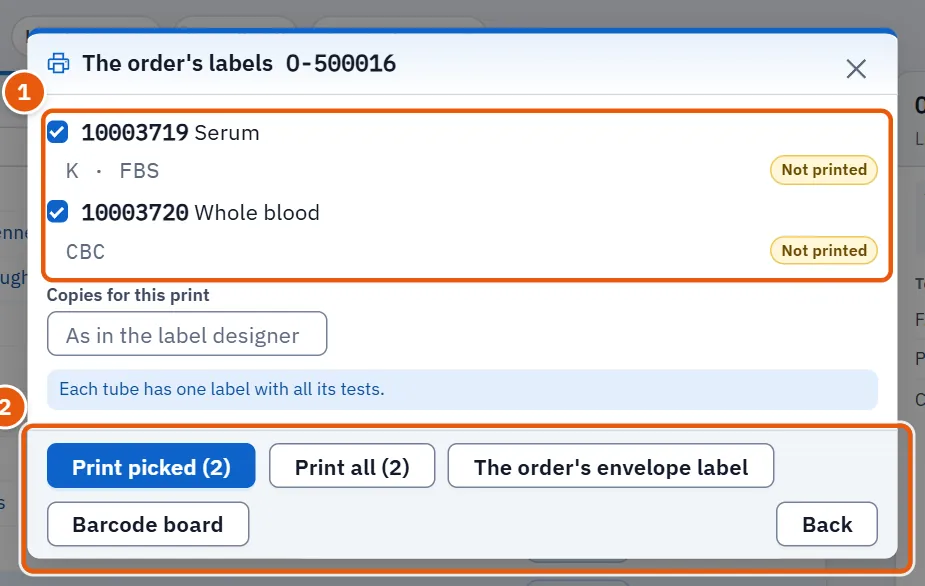
The window The order's labels is opened from the Orders screen and from the order screen, not from here. It lists the order's tubes, a tick for each, and whether each label is printed.
- All tubes start ticked. Leave ticked the ones you want and press the print-picked button (dimmed when none is ticked), or print them all.
- The order's envelope label prints the label of the order's envelope.
- Copies for this print (1 to 10) sets the number of copies for this print, envelope included; left empty (As in the label designer) it keeps what the label designer says.
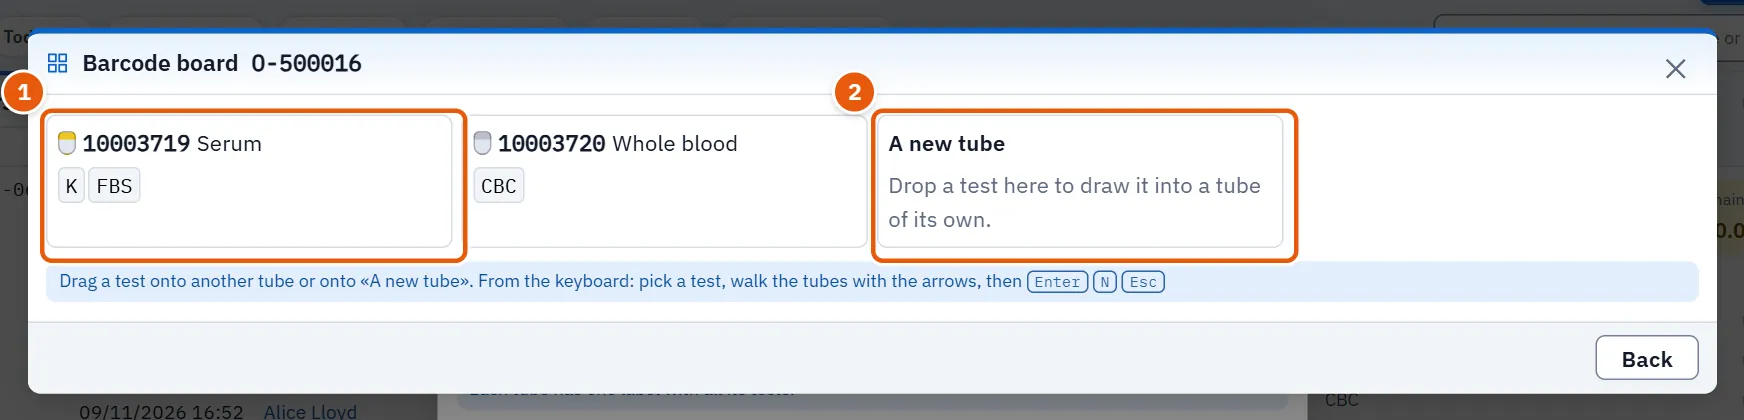
To change which tube holds a test, press Barcode board in that window (it needs the permission to create orders; without it the button is not shown).
- Drag a test onto another tube, or onto A new tube to draw it into a tube of its own. From the keyboard: pick the test, walk the tubes with the arrows, press Enter to drop it, N for a new tube, and Esc to let go.
- If the two tubes are of different kinds, or the test is done elsewhere, the screen warns first. Choose Move it anyway or Leave it where it is.
- A tube whose label was printed is marked Label printed. Moving a test out of it, or into it, asks Why does this printed tube change? (optional; the move is kept in the audit log either way); the reason is optional, and the move is kept in the audit log either way.
- When tubes have changed, the screen tells you which. Press Print them again.
6.8 Messages and what to do
| The screen says | Meaning | What to do |
|---|---|---|
| No sample with the code … | The code was mistyped, or no such sample exists | Scan again, or search by the order's number |
| The code could not be read. | The scan failed | Scan again |
| That could not be saved. | The server refused the step | Read the reason shown, correct and repeat |
| The samples could not be read. | A connection fault | Check the connection and retry |
| … stored samples are past their retention | Samples kept longer than the retention time | Dispose of them (6.7.1 Task 1 — Follow a sample from receipt to storage) |
| The move could not be made. | The board refused the move | Look at the tubes and try again |
| Write the time as 2026-10-03 10:52 | The collection time is not in the expected form (shown under the field) | Write it as in the example |
| Rejection is final; the server opens a re-draw by itself. | A notice before rejecting | Be sure, then reject |
6.9 See also
Orders (where the labels window opens), Order (the draw at reception), Results and approval (what follows the analysis), Patients (the patient's file).