Chapter 9Patients
Menu: Patients. Address: /patients.
9.1 What this screen is for
This is the laboratory's directory of patient files. Every patient who has ever been registered has one file here, with an identity, contact details, clinical notes, and everything that has happened to the patient: orders, results, reports, payments, samples and documents.
From the directory you find a file, read it, correct it, open a new order for the patient, issue a card, send a message, archive a file that is no longer in use, and merge two files that belong to one person.
9.2 Who sees it
Whoever holds Read patient files. Within the screen:
| You can… | …if your role holds |
|---|---|
| See the directory and read the file's overview | Read patient files |
| Create a file; edit a file; archive it; restore it; issue a card (the card window itself, with the points, opens for every role that sees the screen) | Write patient files |
| Open a new order for the patient; stop or resume uploading the patient's results to the website; send a test to another branch; record the patient's consent to marketing messages in the file window | Create orders |
| Tick the box that marks a file sensitive | The administrator role |
| Merge a duplicate into a file | Manage settings |
| See the Visits and Attachments tabs | Read orders |
| See the Results tab | Enter results, Verify results, Publish reports, or Print reports, receipts and labels |
| See the Reports tab | Publish reports, or Print reports, receipts and labels |
| See the Money tab, the Open balance figure and the Balance column of the directory | Take payments at the desk, or Manage billing |
| See the Samples tab | Read orders, or Accept, reject and receive samples |
| See the Activity tab | Manage settings |
| See and add documents in the Documents tab | See and add the patient's documents |
| Send a message (and tick files in the directory for one) | Send messages to patients |
| Print a report from the file (Print, Print all the patient's reports) | Print reports, receipts and labels |
| Use Send in the Reports tab, which opens Delivery | Publish reports |
A button you may not use is not shown.
9.3 The screen at a glance
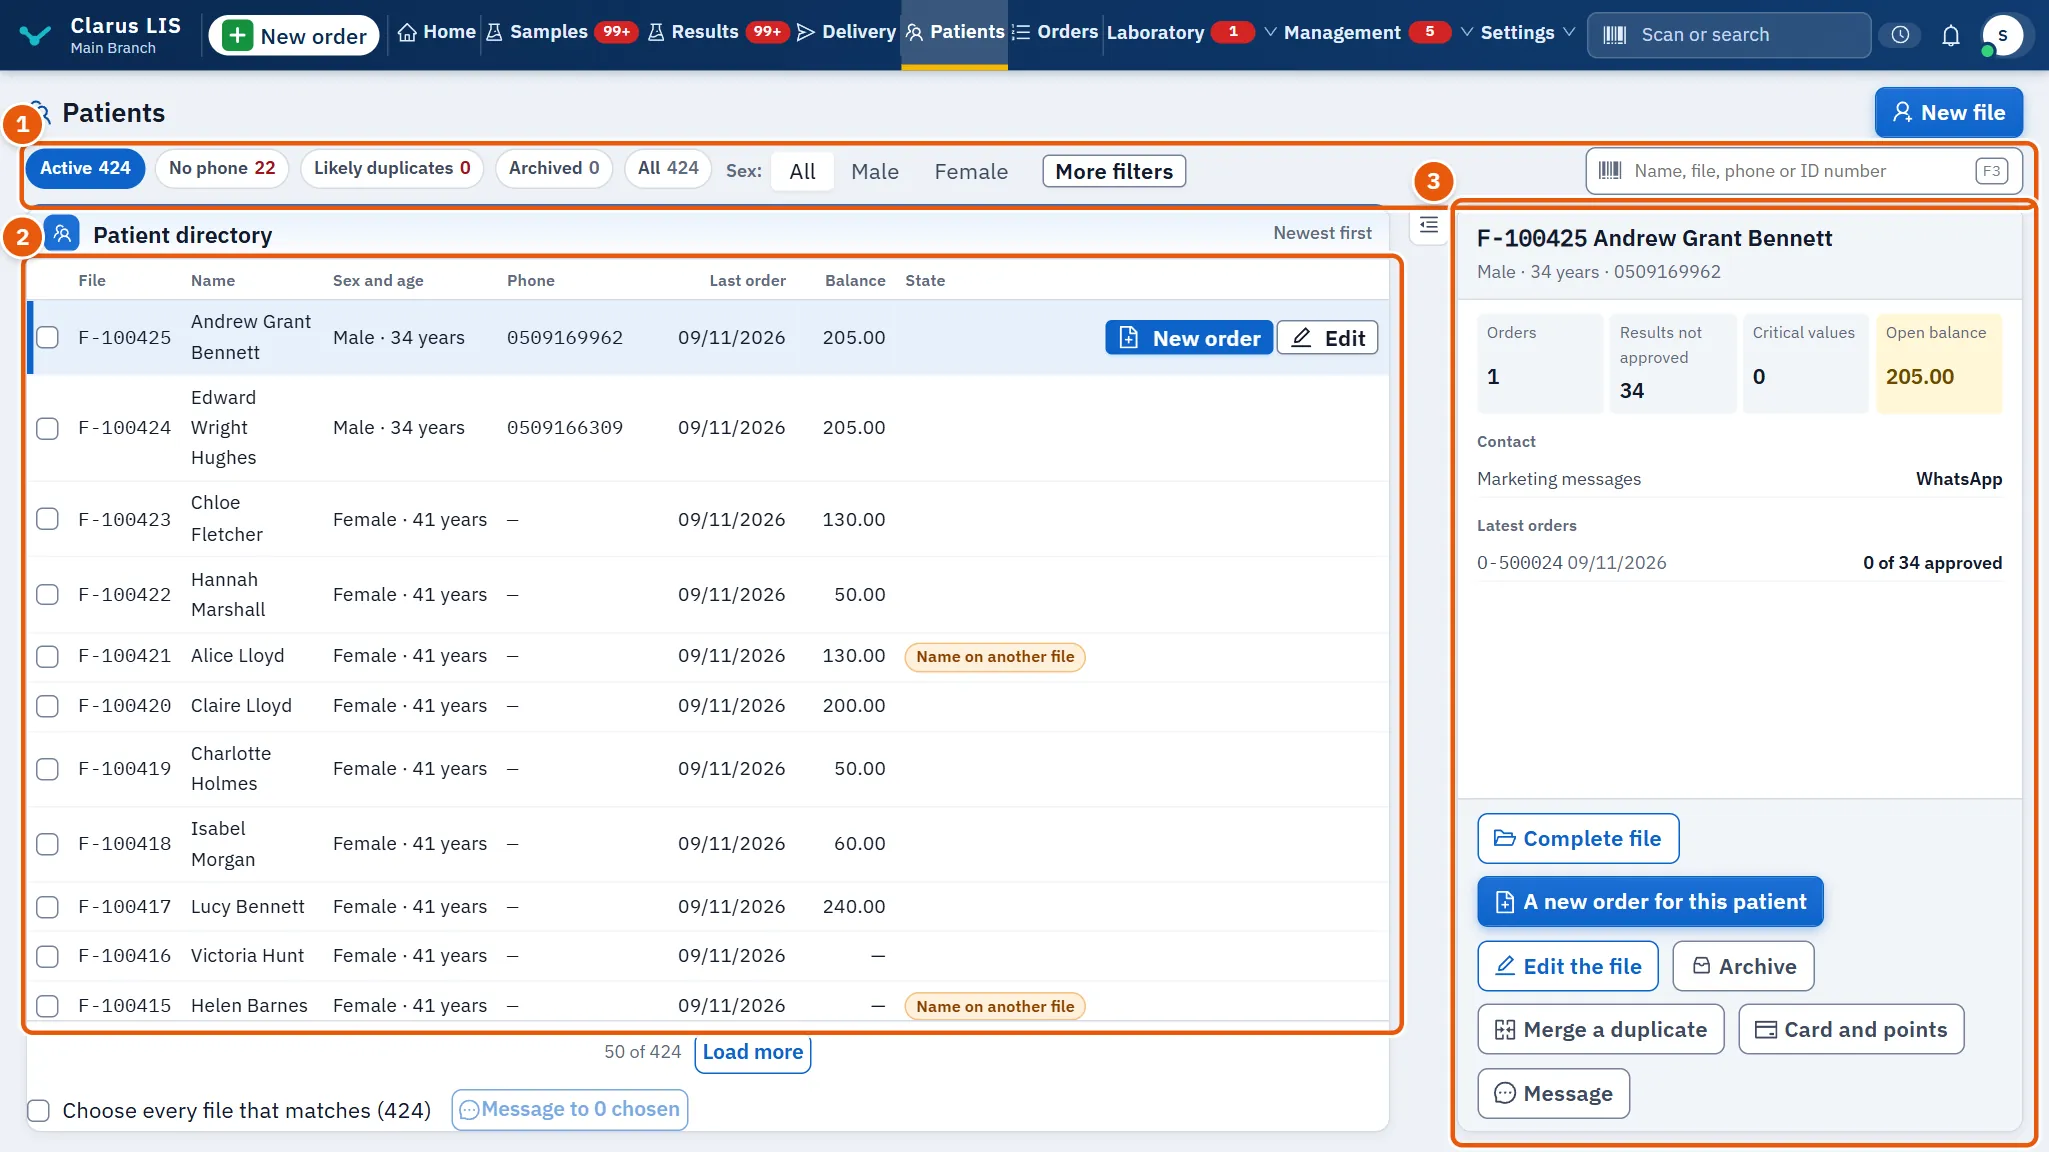
- Search and filters: the search box, the state of files, sex and More filters.
- The directory: Patient directory, one line per file, with a box to tick the file for a message.
- The patient's file (The patient's file): the figures, the contact, the clinical notes, the latest orders, and the buttons that act on the file.
The button New file is at the head of the screen if you may write patient files.
9.4 The directory
| Control | What it does |
|---|---|
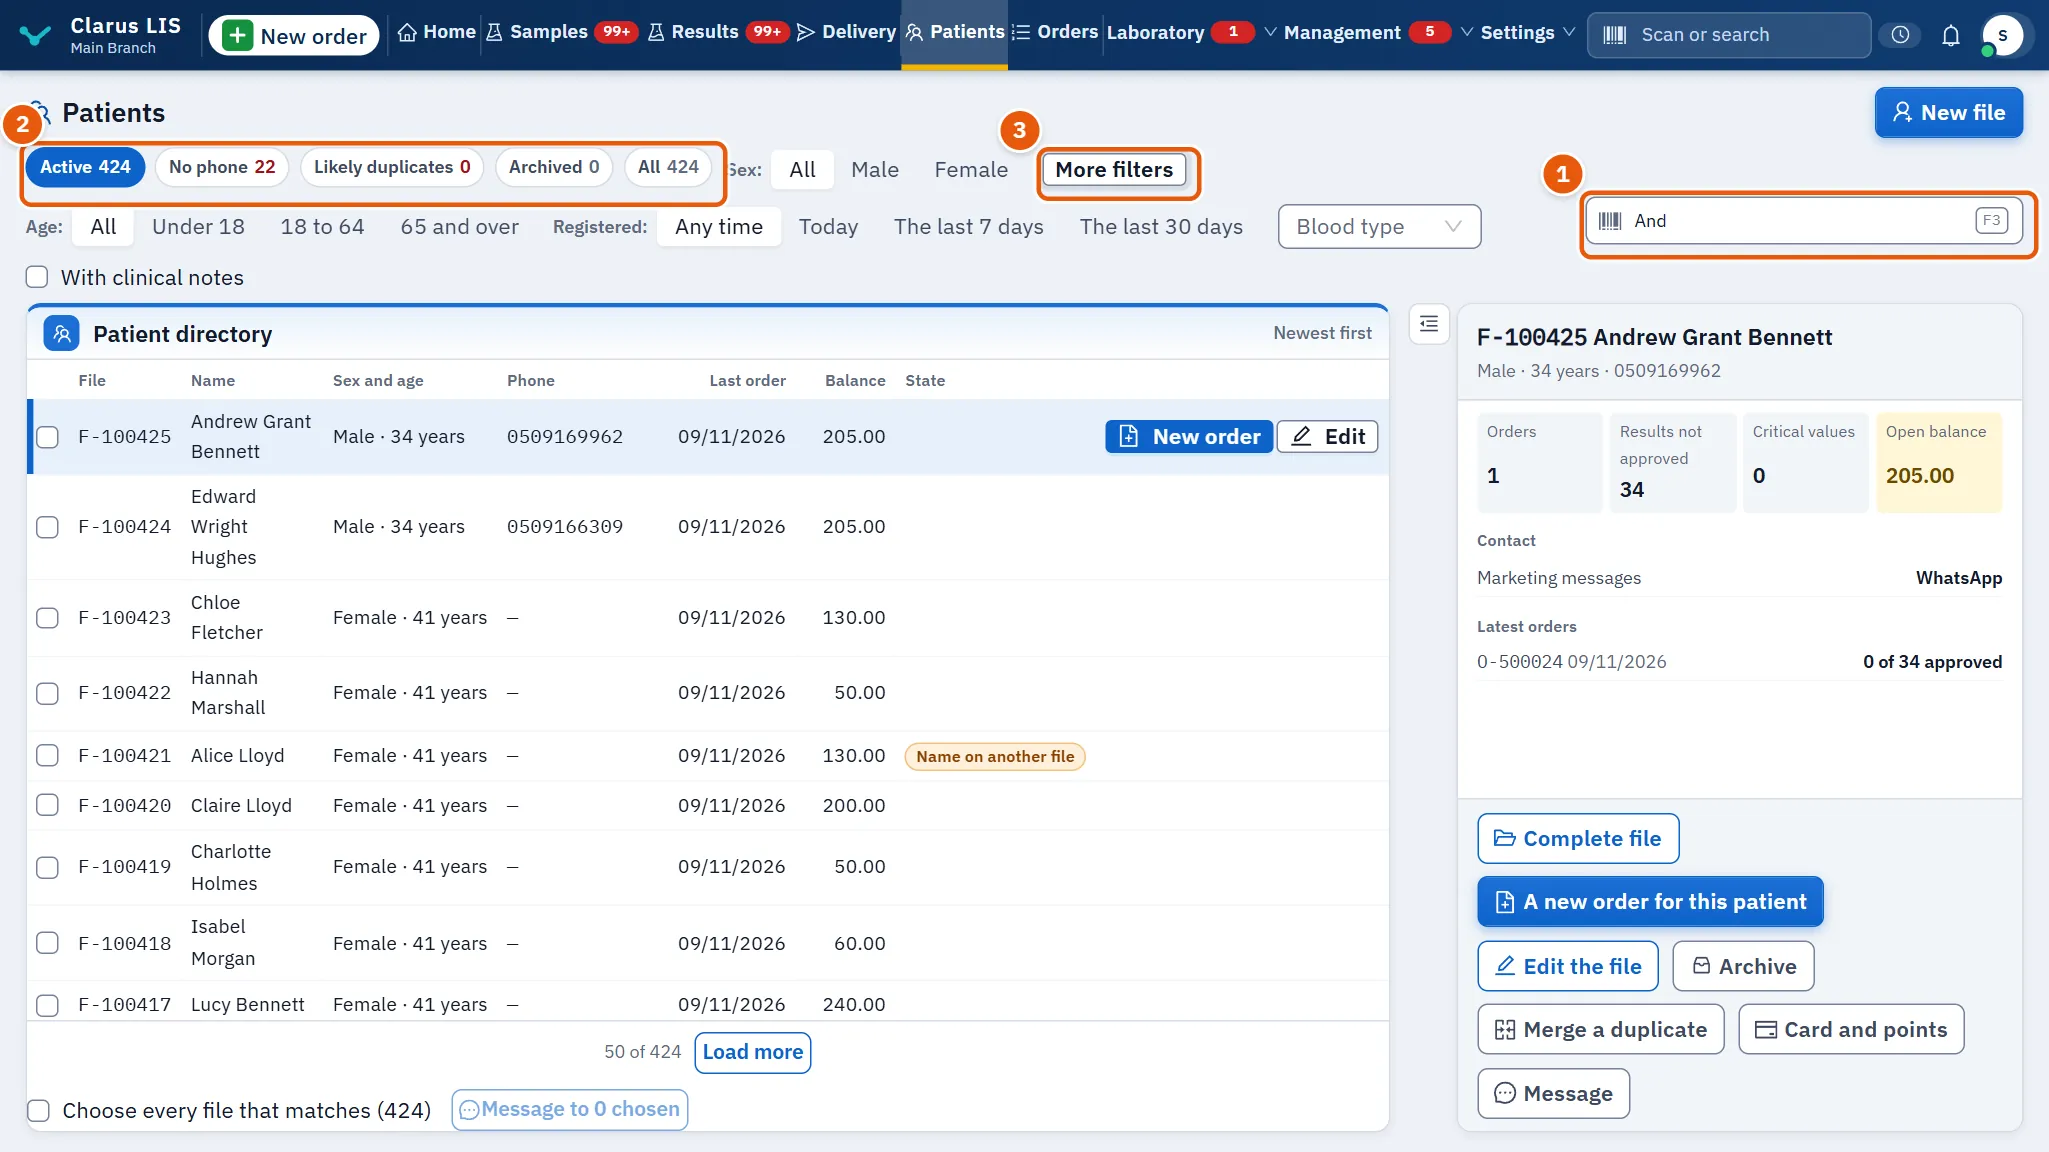
| Name, file, phone or ID number | Searches by name, file number, phone, e-mail or national ID. While you search, the note Searching every branch says the search is not limited to this branch. |
| Files' state | Active, No phone, Likely duplicates, Archived or All. In Likely duplicates each pair of likely twins is shown side by side. |
| Sex: | Limits the list to one sex, or All. |
| More filters | Opens The directory's other filters: Age: (under 18, 18 to 64, 65 and over), Registered: (today, the last 7 days, the last 30 days, any time), Blood type, and With clinical notes. The button shows how many of them are in effect. |
| Clear the filters | Removes all these filters. |
The columns are File, Name, Sex and age, Phone, Last order, Balance and State. A file may be marked Archived or Sensitive file, and a name that also appears on another file is marked Name on another file.
Each line has two buttons, New order and Edit (double-clicking the line also opens the edit). The list shows 50 files at a time; more are loaded on request. Click a line to read its file in the file pane; until you click, the first file of the list is the one shown, and the screen says Choose a patient in the directory to read the file. only when the list is empty. A merged file has no edit button and cannot receive a new order, and an archived one cannot receive a new order either.
9.4.1 Choosing patients for a message
- Tick the box of each file (Choose patients for a message), or tick Choose every file that matches (…) to choose every file that matches the search and filters.
- Press Message to … chosen. It stays dimmed until something is chosen.
- Clear the choice removes the choice.
Changing the search or any filter also drops the choice. These boxes appear only for a role that may send messages.
9.5 The patient's file
The chosen file shows these buttons, each only if your role allows it: Complete file, A new order for this patient, Edit the file, Archive (or Restore to active for an archived file), Merge a duplicate, Card and points and Message. A file that is archived or merged cannot receive a new order, and a merged file has no edit or message button; the server refuses to edit it or issue it a card. Card and points is shown to every role that sees the screen.
| Element | What it shows |
|---|---|
| Figures | Orders, Results not approved, Critical values, and Open balance for those who may see money. |
| Alerts | The count of amendments to approved reports waiting to be approved again, and of abnormal results in the recent orders. |
| Contact | Marketing messages: the channels the patient agreed to, or Does not agree, or Not asked yet. |
| The laboratory's website | Whether the patient's results are uploaded to the website (see 9.6.8 Task 8 — Stop or resume uploading a patient's results to the website). This row appears only once the laboratory's website is published. |
| Clinical notes | Allergies, Chronic conditions and Current medications, when they are recorded. |
| Latest orders | The latest orders, or No orders in this file yet.. |
9.5.1 The complete file
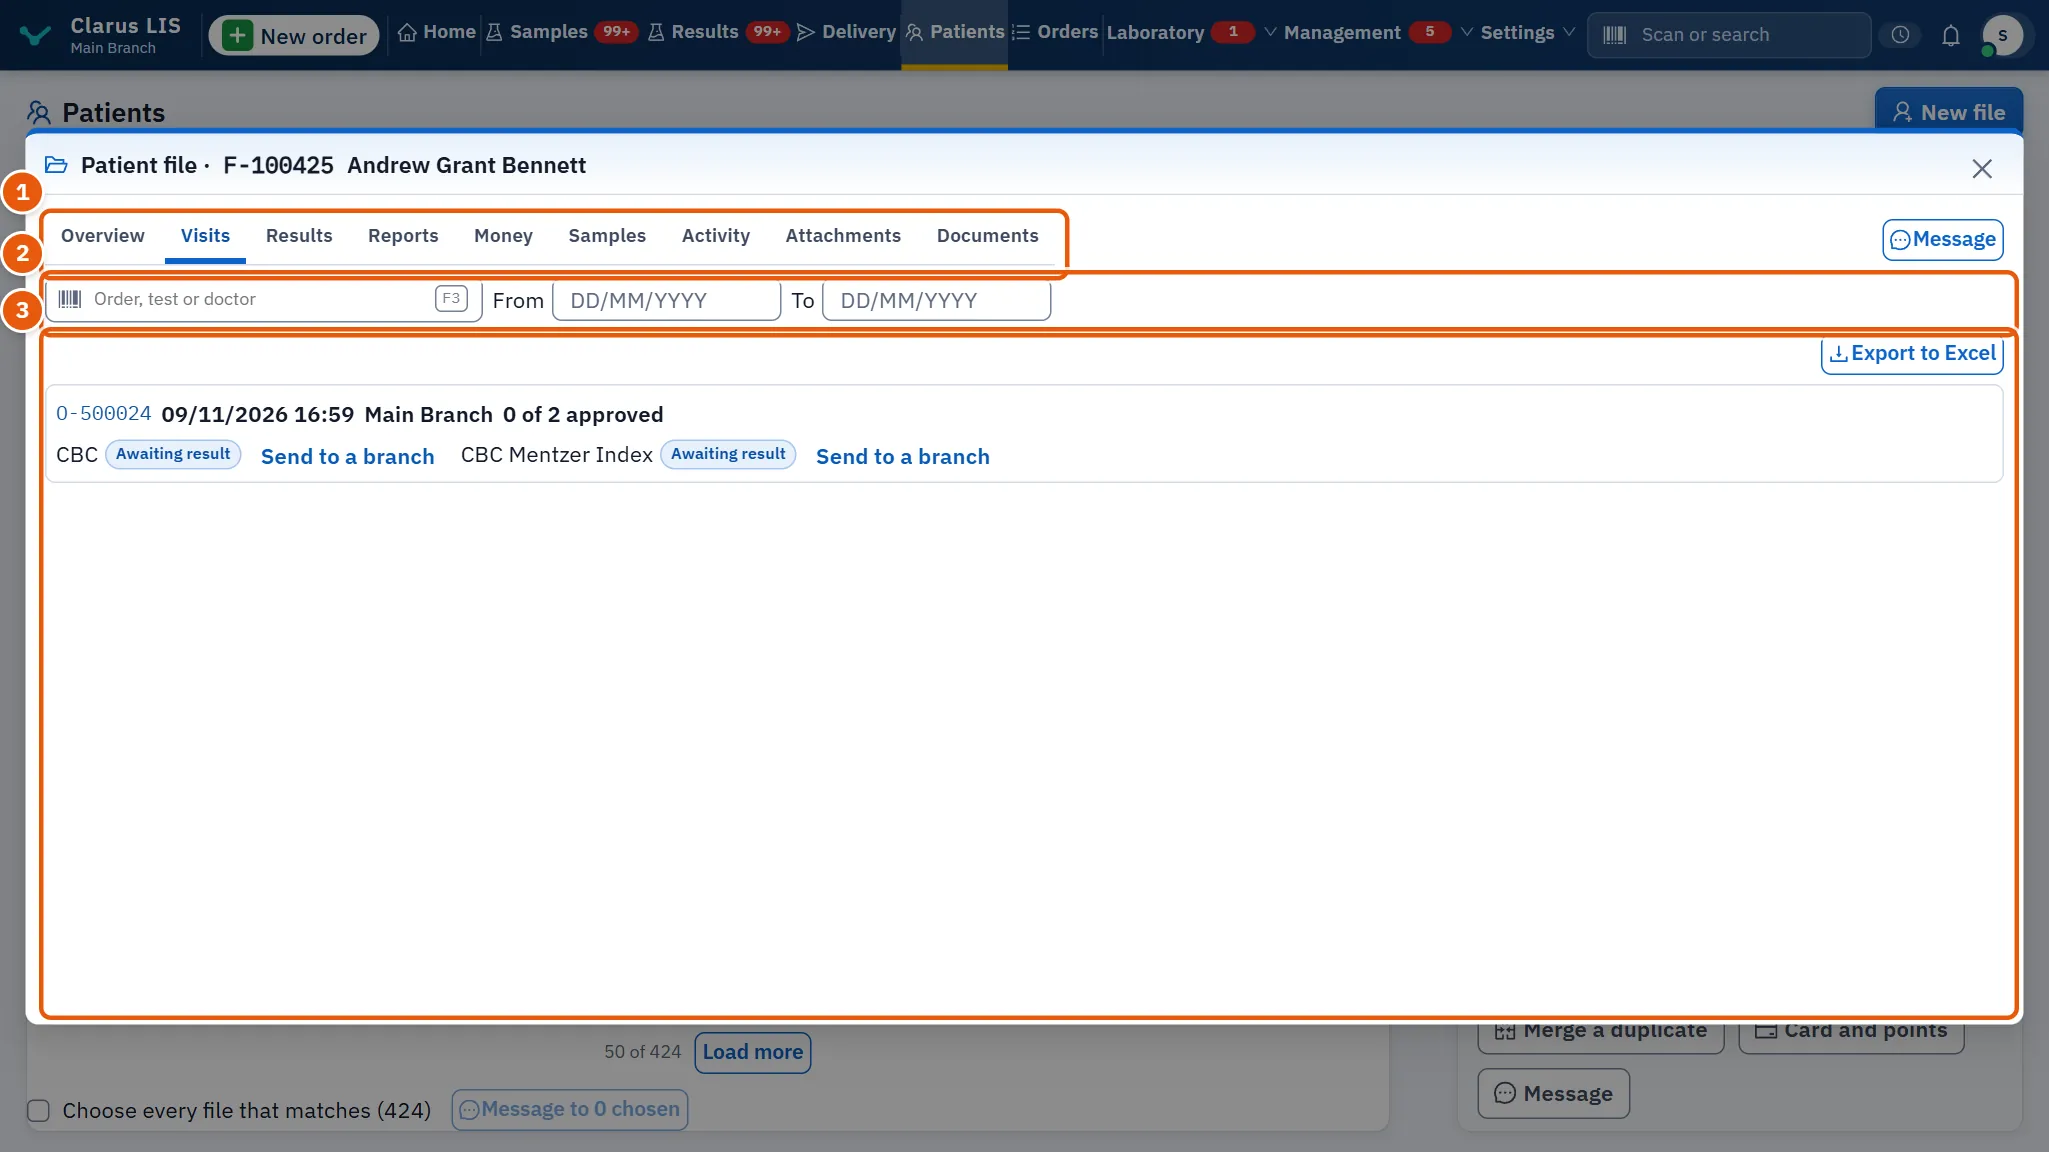
Complete file opens Patient file in a window, with these tabs (The file's sections):
| Tab | What it holds |
|---|---|
| Overview | Identity: File number, Born, Telephone, First visit, Last visit; In the file; the clinical notes; and Discount cards with their state (Active or Stopped). |
| Visits | The orders: Order, Date, Doctor, Branch, State and Tests. A test still awaiting its result offers Send to a branch. Search by order, test or doctor, and limit by From and To. |
| Results | Test, Value, Unit and Flag. Flagged results only keeps only the flagged ones. |
| Reports | Each report version with its Version, state (Draft, Final, Amended and the others), and when it was Made, Signed and Sent. Print opens a preview of that order's report before anything is printed, and Send takes you to Delivery with the order found; Print all the patient's reports prints the patient's reports (up to 50). Handed over at the desk lists what was handed over at the desk. |
| Money | Billed, Paid, Refunded and Payer's share; then Invoices and Payments and refunds. |
| Samples | Each sample with its specimen type, state and collection time, a rejection reason if any, and Sent to other laboratories. |
| Activity | The log of who did what to the file: Action, On, Details. |
| Attachments | The files attached to the patient's orders, each with its Caption. |
| Documents | The patient's own documents (see 9.6.9 Task 9 — Documents). |
Long lists show the first 50 rows and Show more (… of …) shows 50 more each time. Every tab except the overview and the documents has date limits, and all except Money and Attachments have a search box. Export to Excel saves the rows now shown as a CSV file that a spreadsheet program opens. In Visits an order number opens the order in Orders for a role that may read orders. The window also has Message if your role allows it.
9.6 Tasks, step by step
9.6.1 Task 1 — Find a patient
- Type in Name, file, phone or ID number. Part of a name, a file number, a phone number or an ID number is enough.
- If nothing appears, the screen says No file matches «…».. Check the spelling, or choose All in Files' state, since archived files are not in Active.
- Narrow a long list with More filters.
- Click the line. The file opens in the file pane.
9.6.2 Task 2 — Create a new file
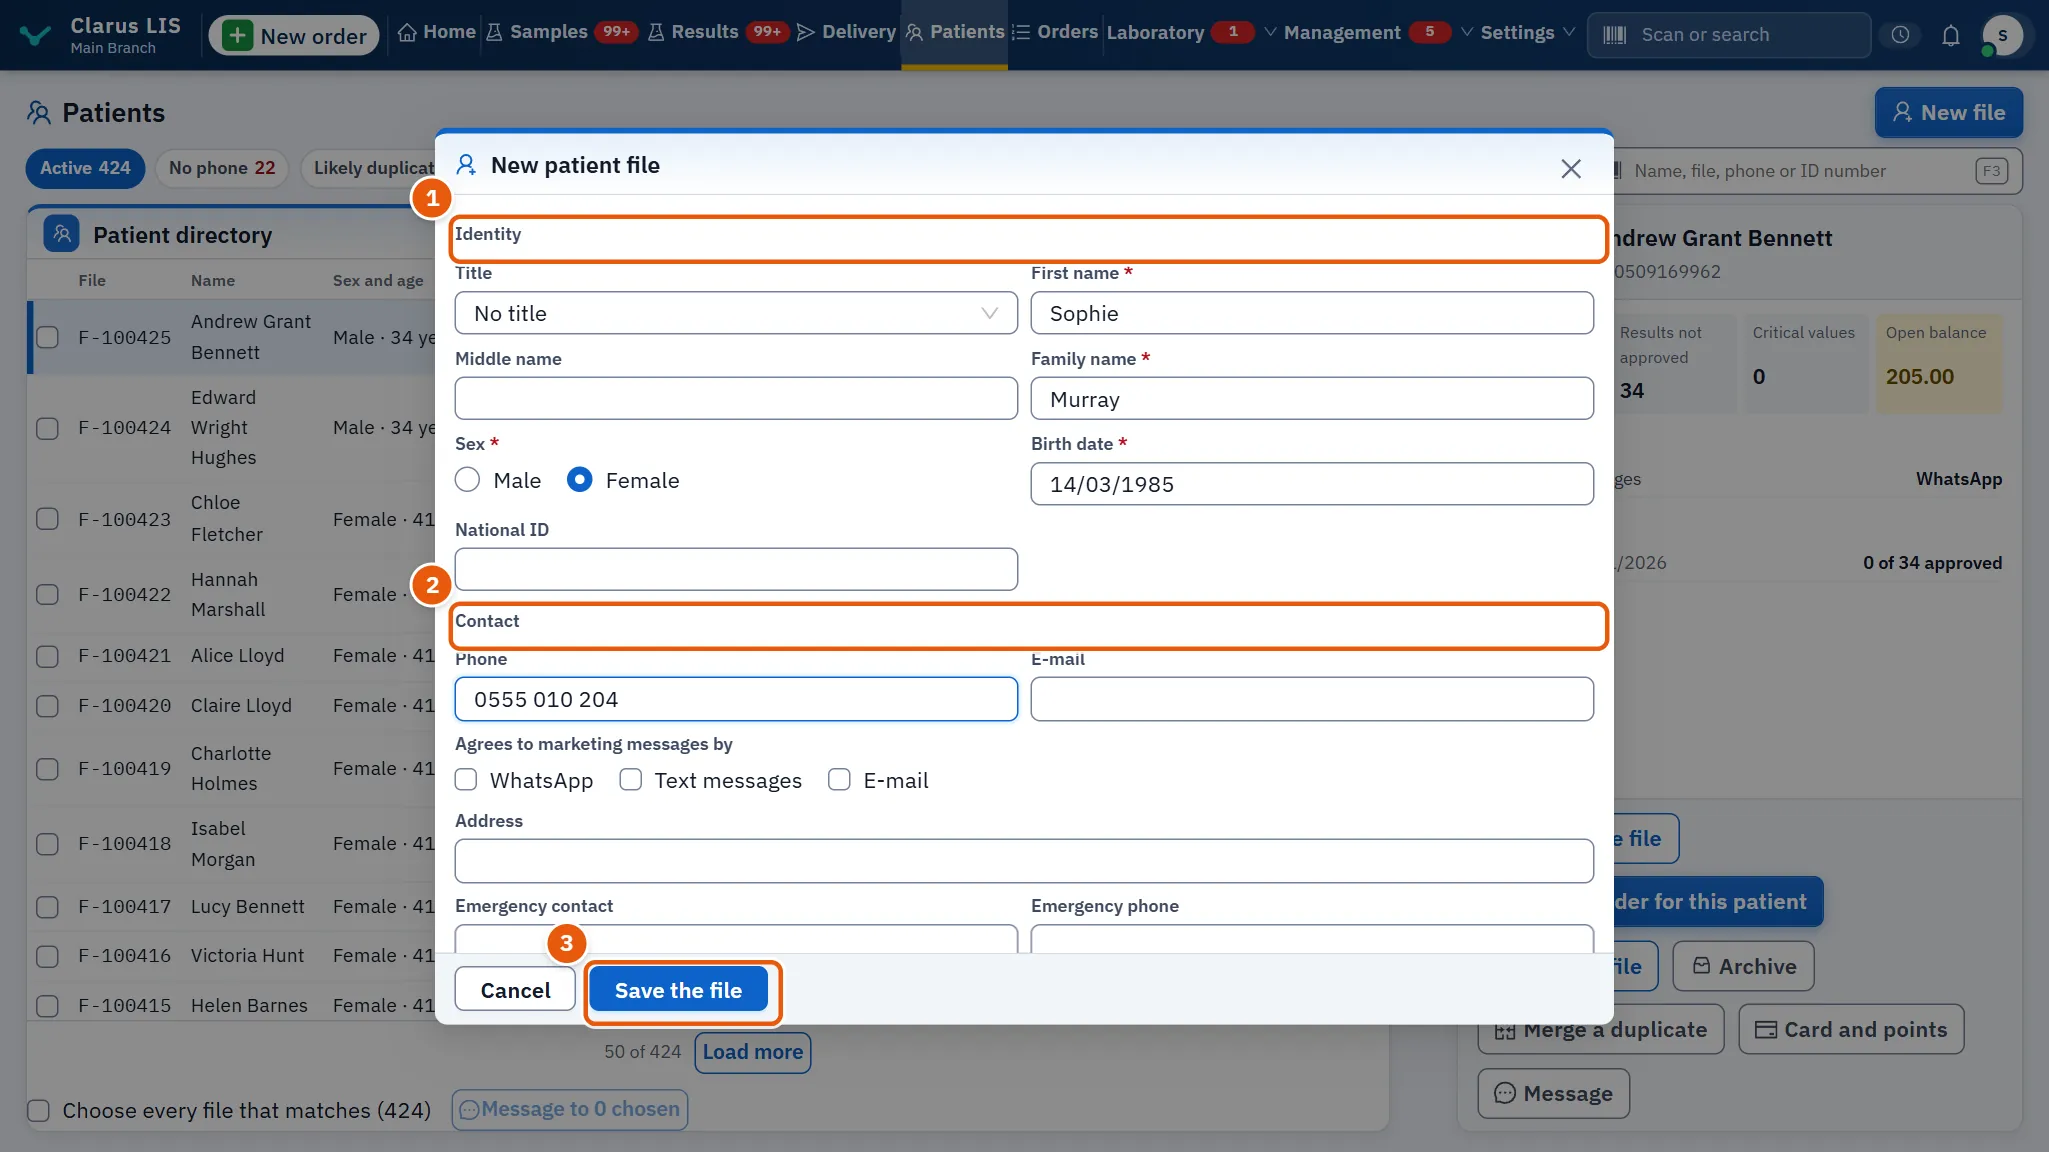
- Press New file. The window New patient file opens.
- Fill Identity: First name, Family name, Sex, Birth date (written day, month, year) and the other fields; and Contact: Phone and the rest. The first name, last name, sex and birth date are required. For a new file a phone number is also required if the laboratory's desk settings say so; otherwise it is optional. When the phone box is empty the box Why there is no phone appears, and a reason is required only when the phone is required.
- Under Medical, add Allergies, Chronic conditions and Current medications if known.
- Record, in Agrees to marketing messages by, the channels the patient agrees to. This field is shown only to a role that may create orders. The same role sees the website upload box when the laboratory's website is published.
- Press Save the file. The screen says that the new file is saved and gives its number.
If the program thinks the patient is already registered it says This patient may be registered already. Open their file if it is them, or save a new file anyway.. Press Open their file if it is the same person; otherwise press Save a new file anyway.
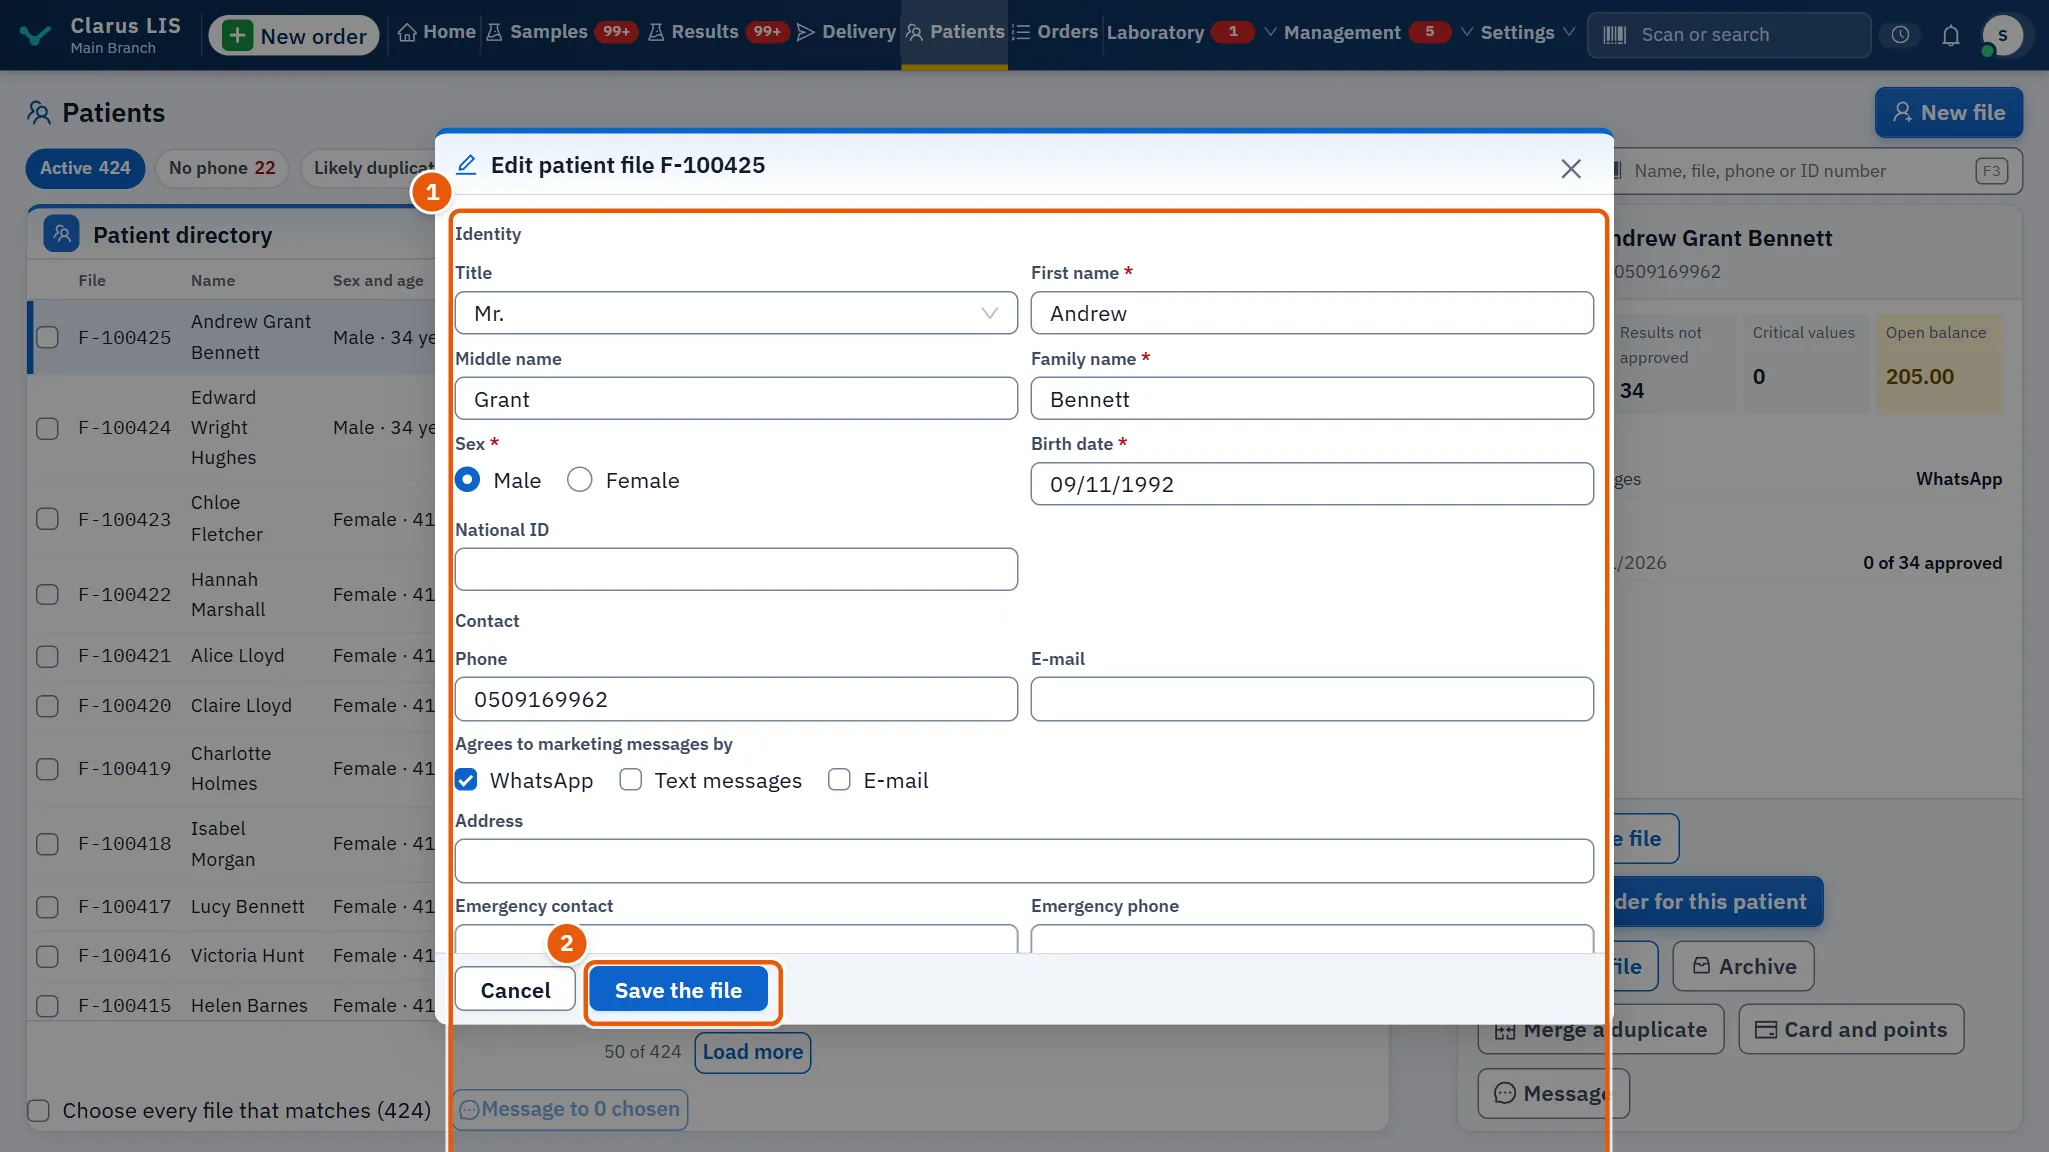
9.6.3 Task 3 — Edit a file
- Choose the file and press Edit the file (or press Edit on its line).
- Change what is needed. A field the program requires says This field is required.; a birth date that is not complete says Write the whole birth date correctly..
- Press Save the file. The screen says The file is saved..
The box Sensitive file: it opens only once its opener says why is shown only to the administrator role.
9.6.4 Task 4 — Open a new order for the patient
- Choose the file, then press A new order for this patient (or New order on the line).
- The program opens the order screen (New order) with this patient already entered. The button is not shown for an archived or merged file.
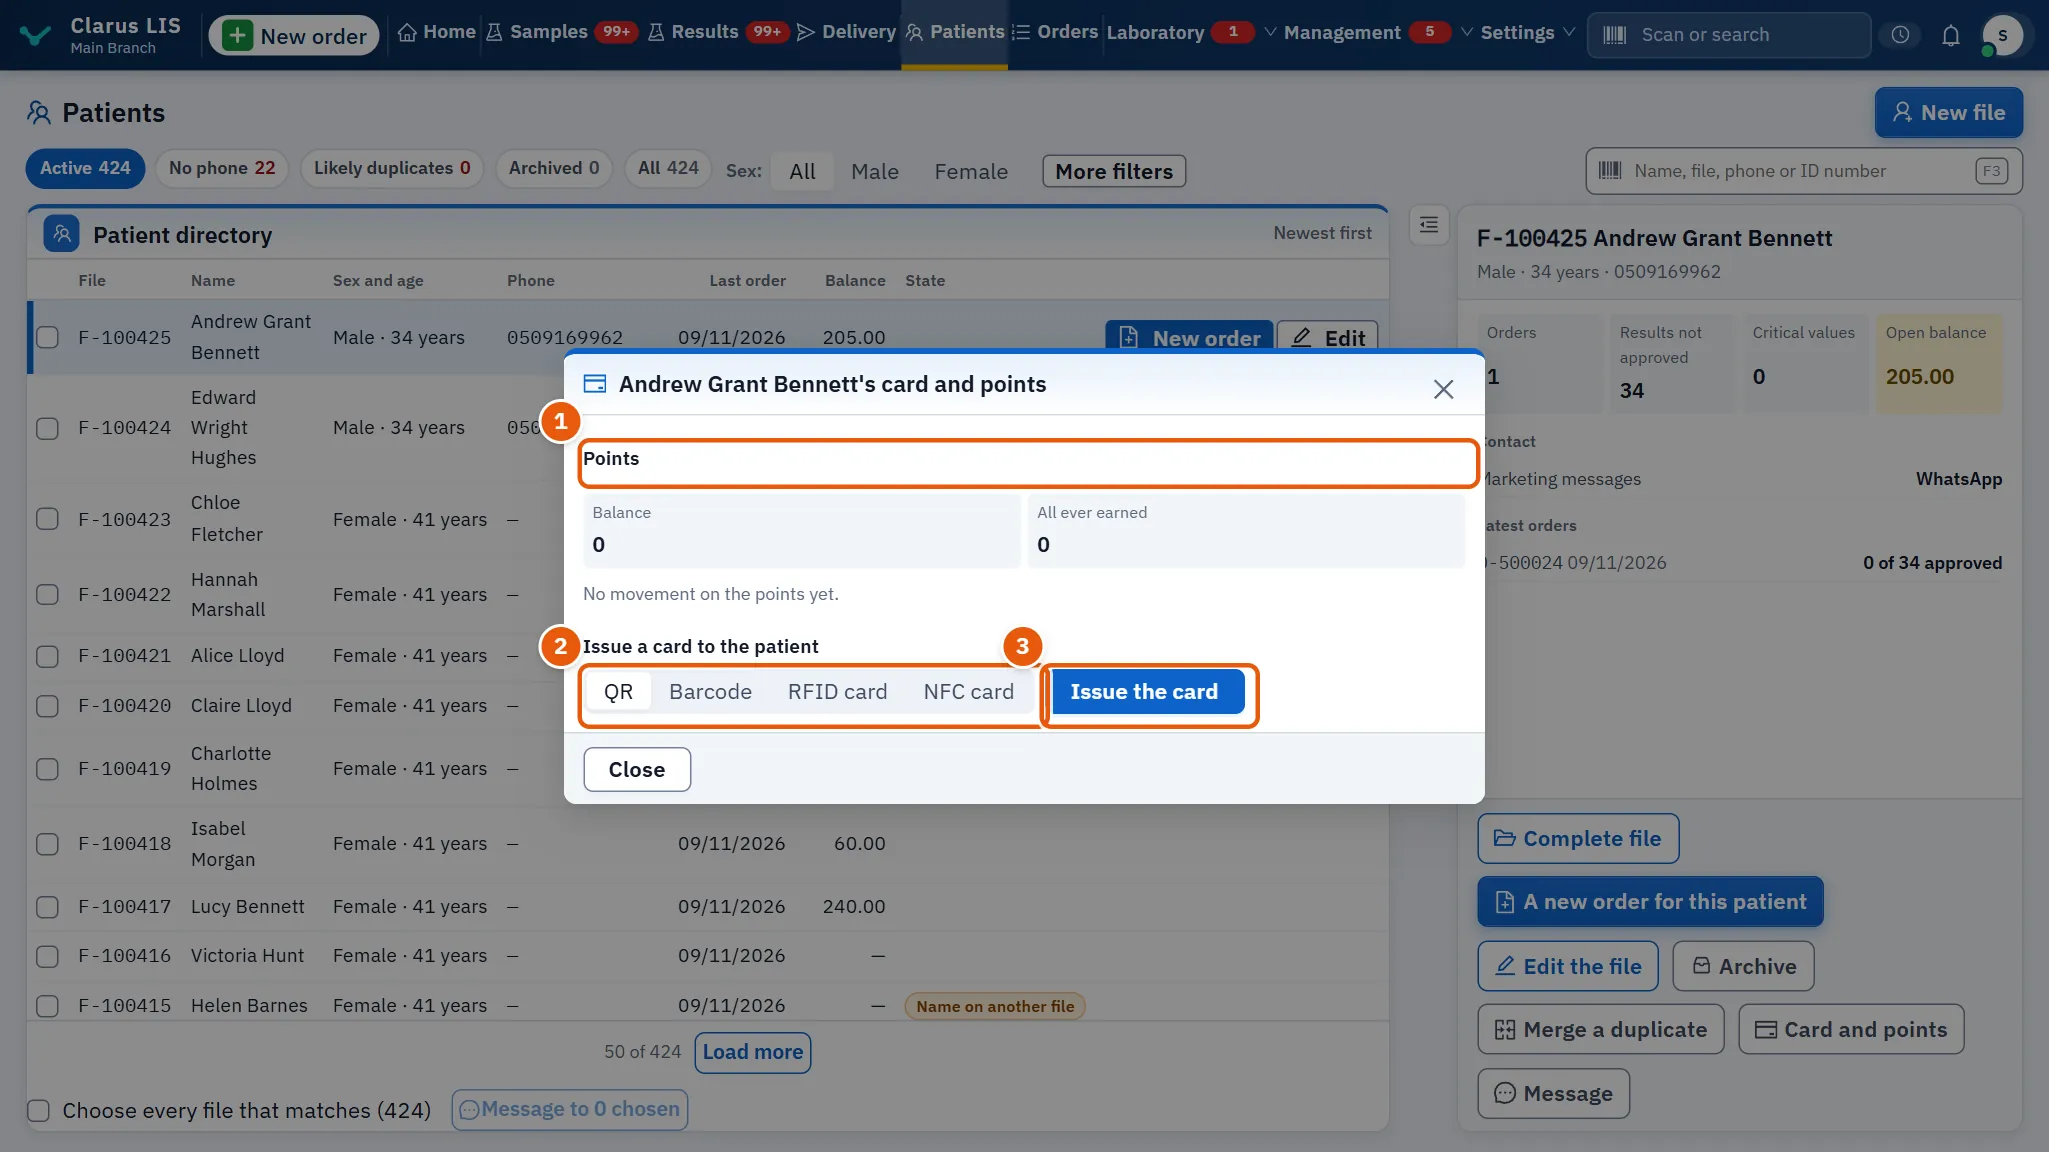
9.6.5 Task 5 — Issue a card and read the points
- Choose the file and press Card and points. The window …'s card and points shows the Points: Balance, All ever earned and The last movements (each movement is Earned, Redeemed, Expired, Adjusted or Reversed); the history lists the latest 12 movements.
- Under Issue a card to the patient (shown only to a role that writes patient files, and never for a merged file), choose the Card type: Barcode, NFC card, QR or RFID card. The window starts on QR.
- Press Issue the card. The card's number appears; press Copy to copy it. It is the number printed or written on the card, and scanned at reception.
- Press Close.
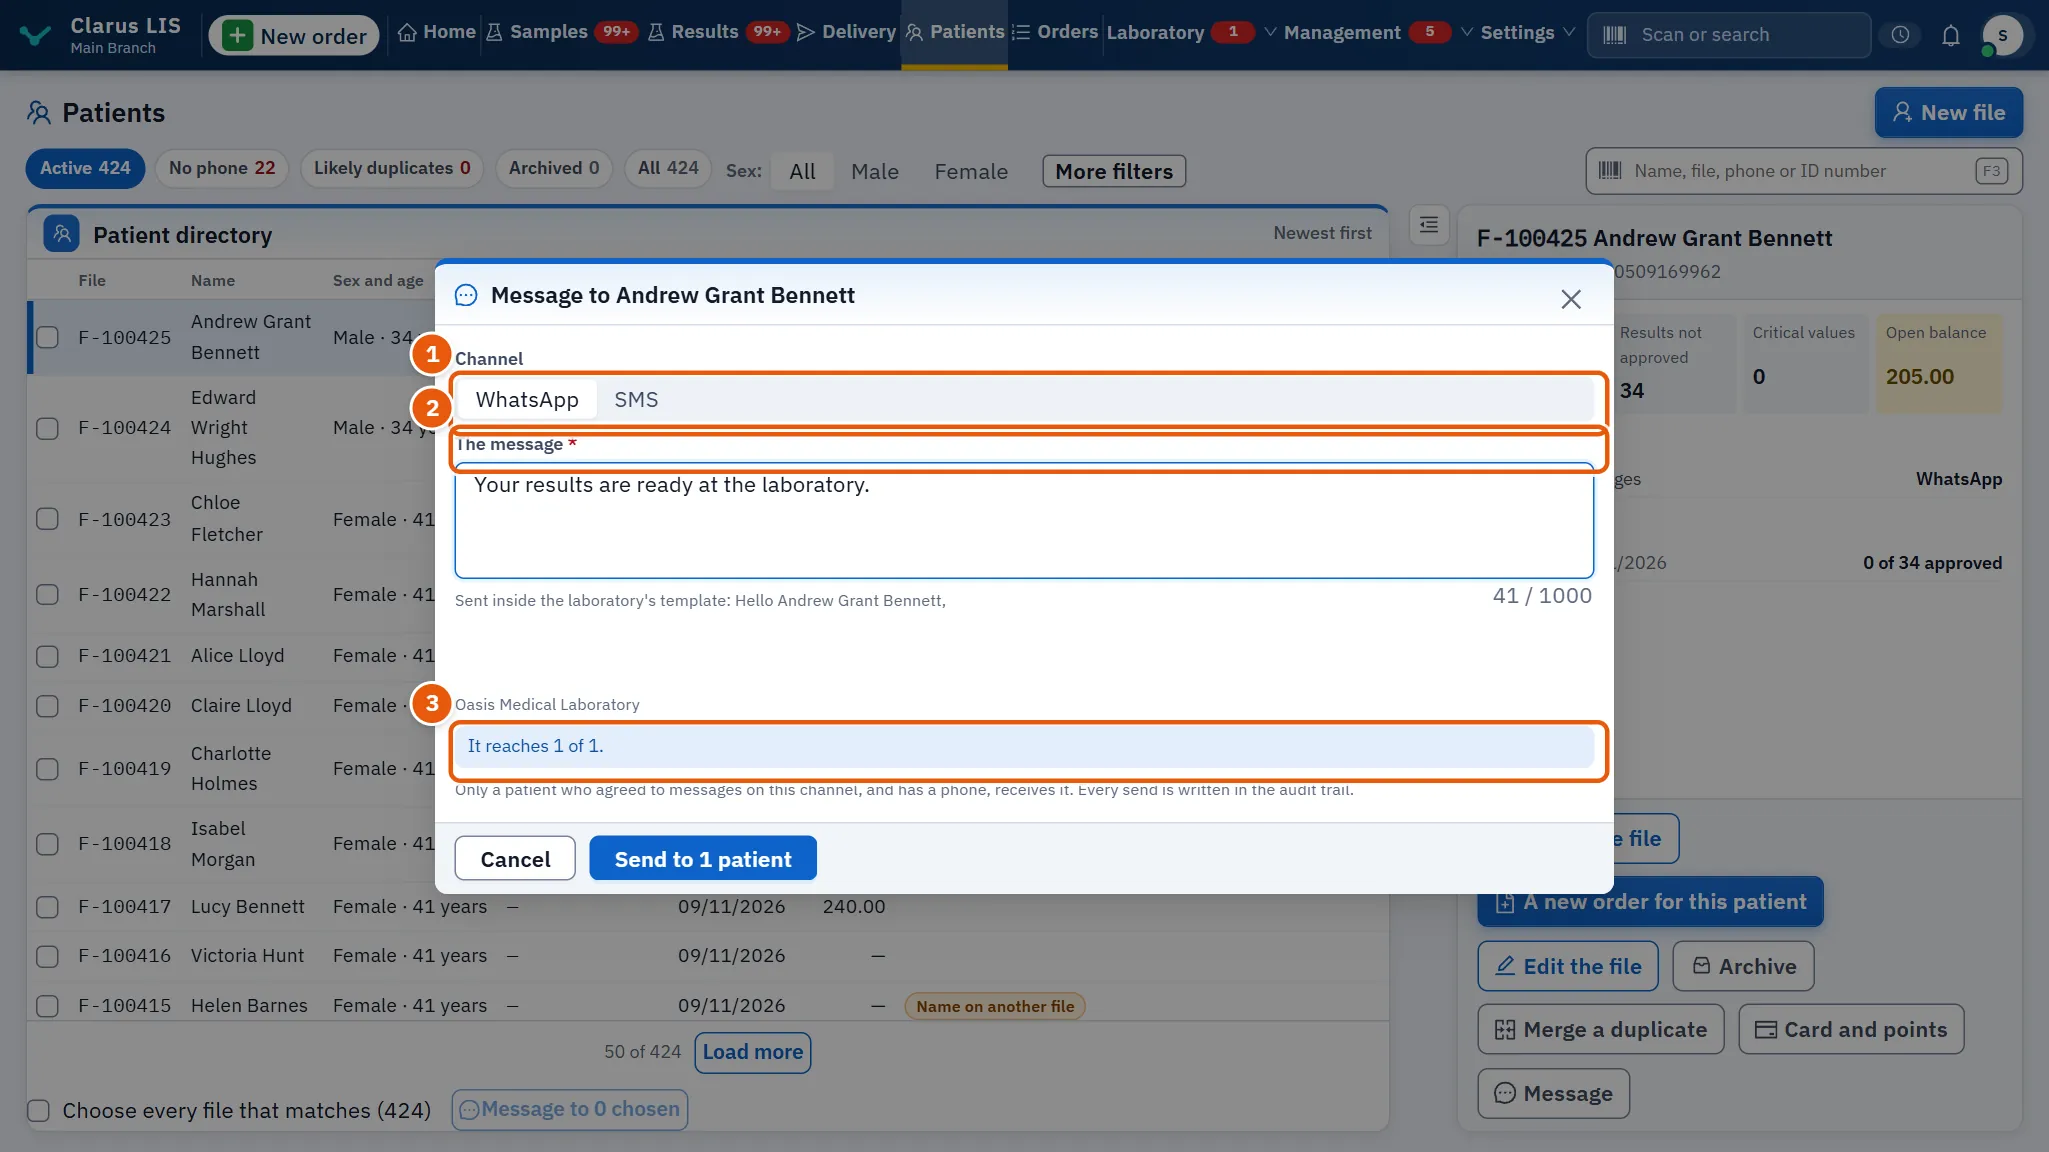
9.6.6 Task 6 — Send a message
- Choose one file and press Message, or tick several files and press Message to … chosen.
- In the window Message to …, choose the Channel: SMS or WhatsApp (the window starts on WhatsApp).
- Either choose a Ready message (offered when the laboratory has some) to fill the text, or write The message, up to 1000 characters. The text is required.
- The window counts who the message reaches and who is left out: patients with no phone, and patients who did not agree to messages on this channel. Only a patient who agreed and has a phone receives it. The send button stays dimmed while the text is empty or nobody is reached. If more are reached than the laboratory's per-minute pace, the window says the sending is spread out.
- Press Send to … patients and confirm. The screen says the message is on its way.
If messages to patients are switched off in the laboratory, the window says so: the message waits in the queue until they are switched on in Messages. Every send is written in the audit trail.
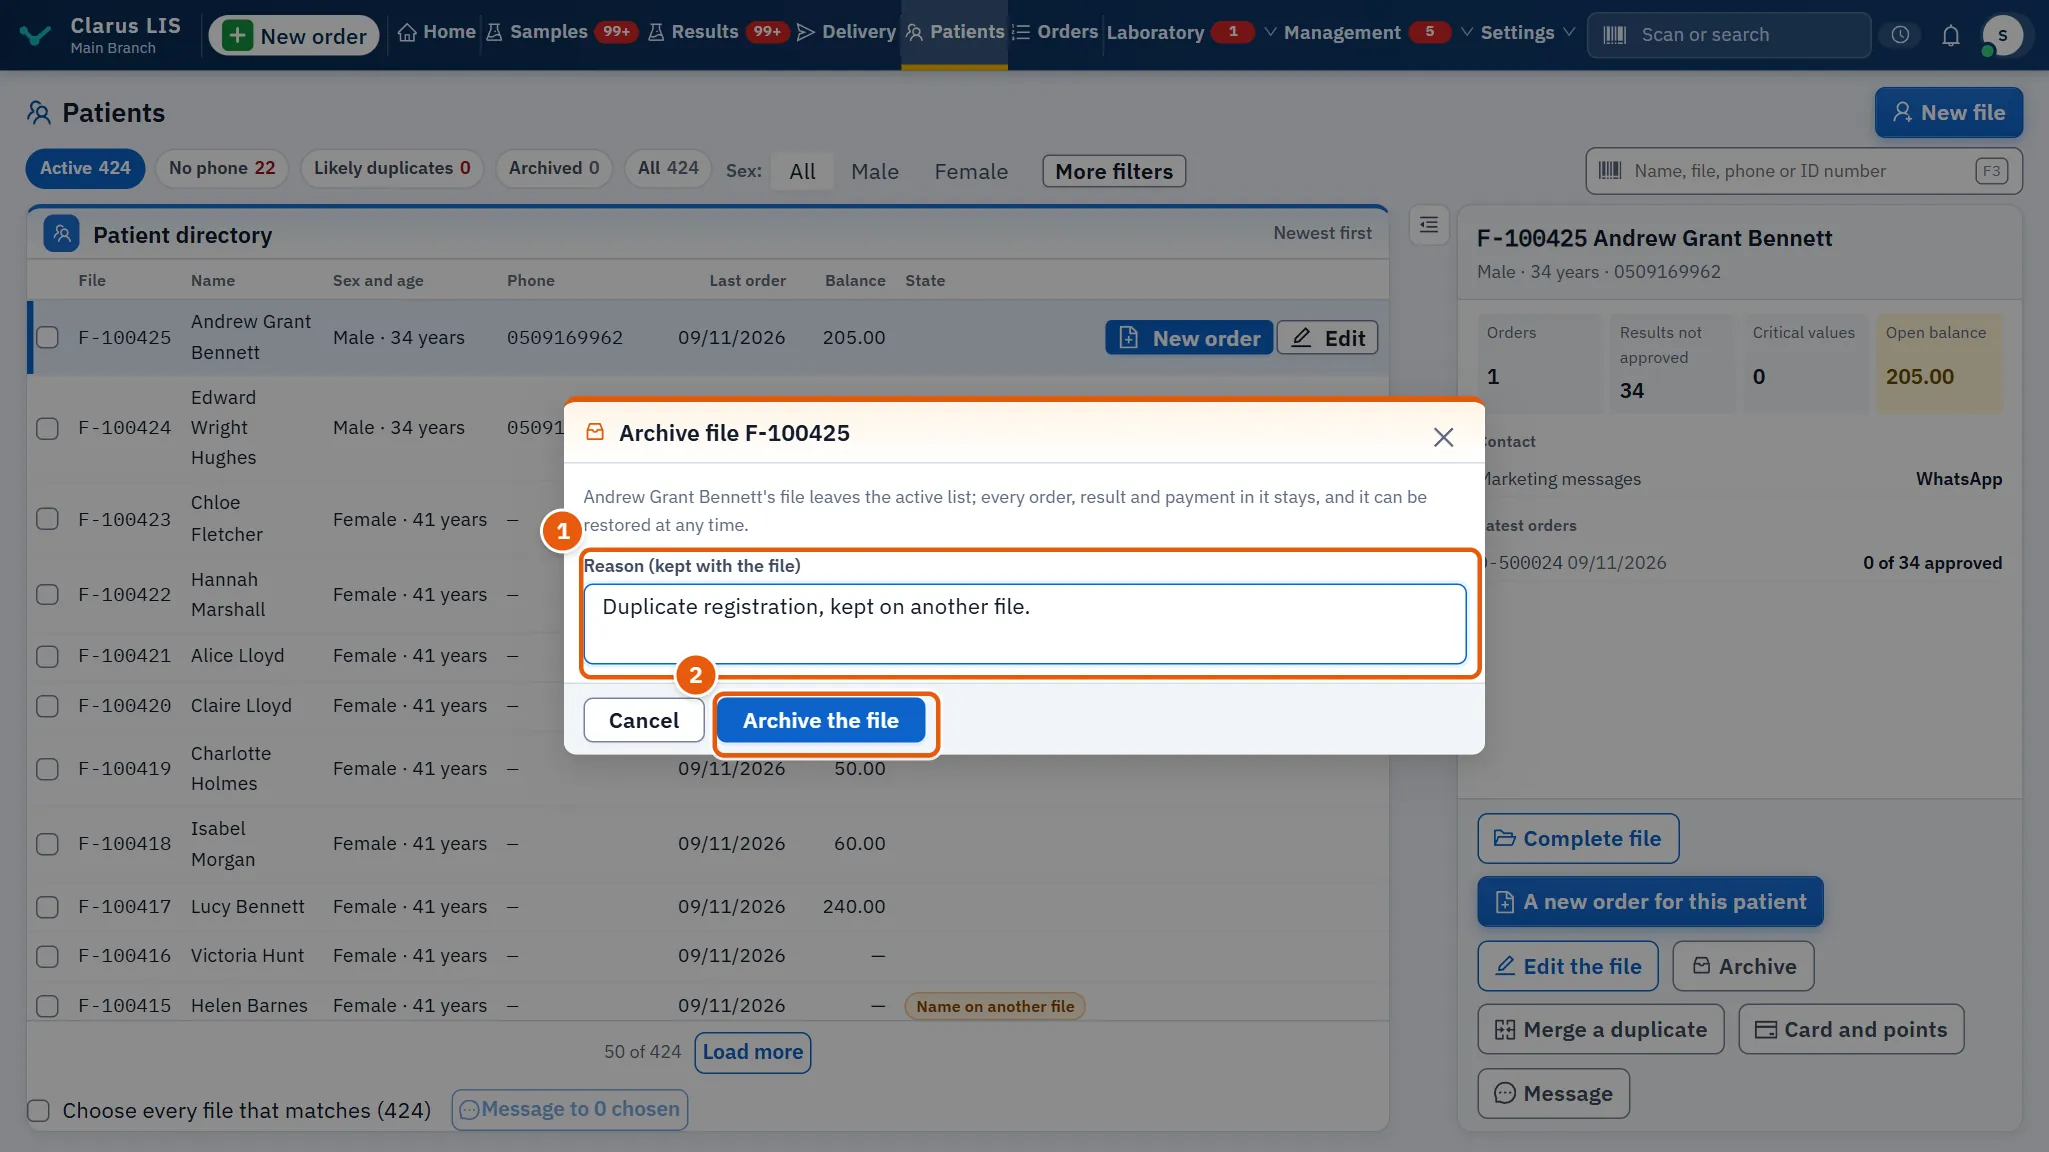
9.6.7 Task 7 — Archive and restore a file
- Choose the file and press Archive.
- Write the Reason (kept with the file) (the window does not insist on one), then press Archive the file. The file leaves the active list; its orders, results and payments stay.
- To bring it back, choose Archived, choose the file and press Restore to active, then confirm.
9.6.8 Task 8 — Stop or resume uploading a patient's results to the website
- Choose the file. The row The laboratory's website, which exists only when the laboratory's website is published, shows whether Uploading results is on, since when and by whom.
- To stop, press Stop uploading and confirm: what was uploaded is withdrawn and nothing more is uploaded.
- To start again, press Resume uploading.
Only a role that may create orders sees these buttons. The same choice is a box in the new-file and edit windows, saved with the file.
9.6.9 Task 9 — Documents
- In the complete file, open Documents.
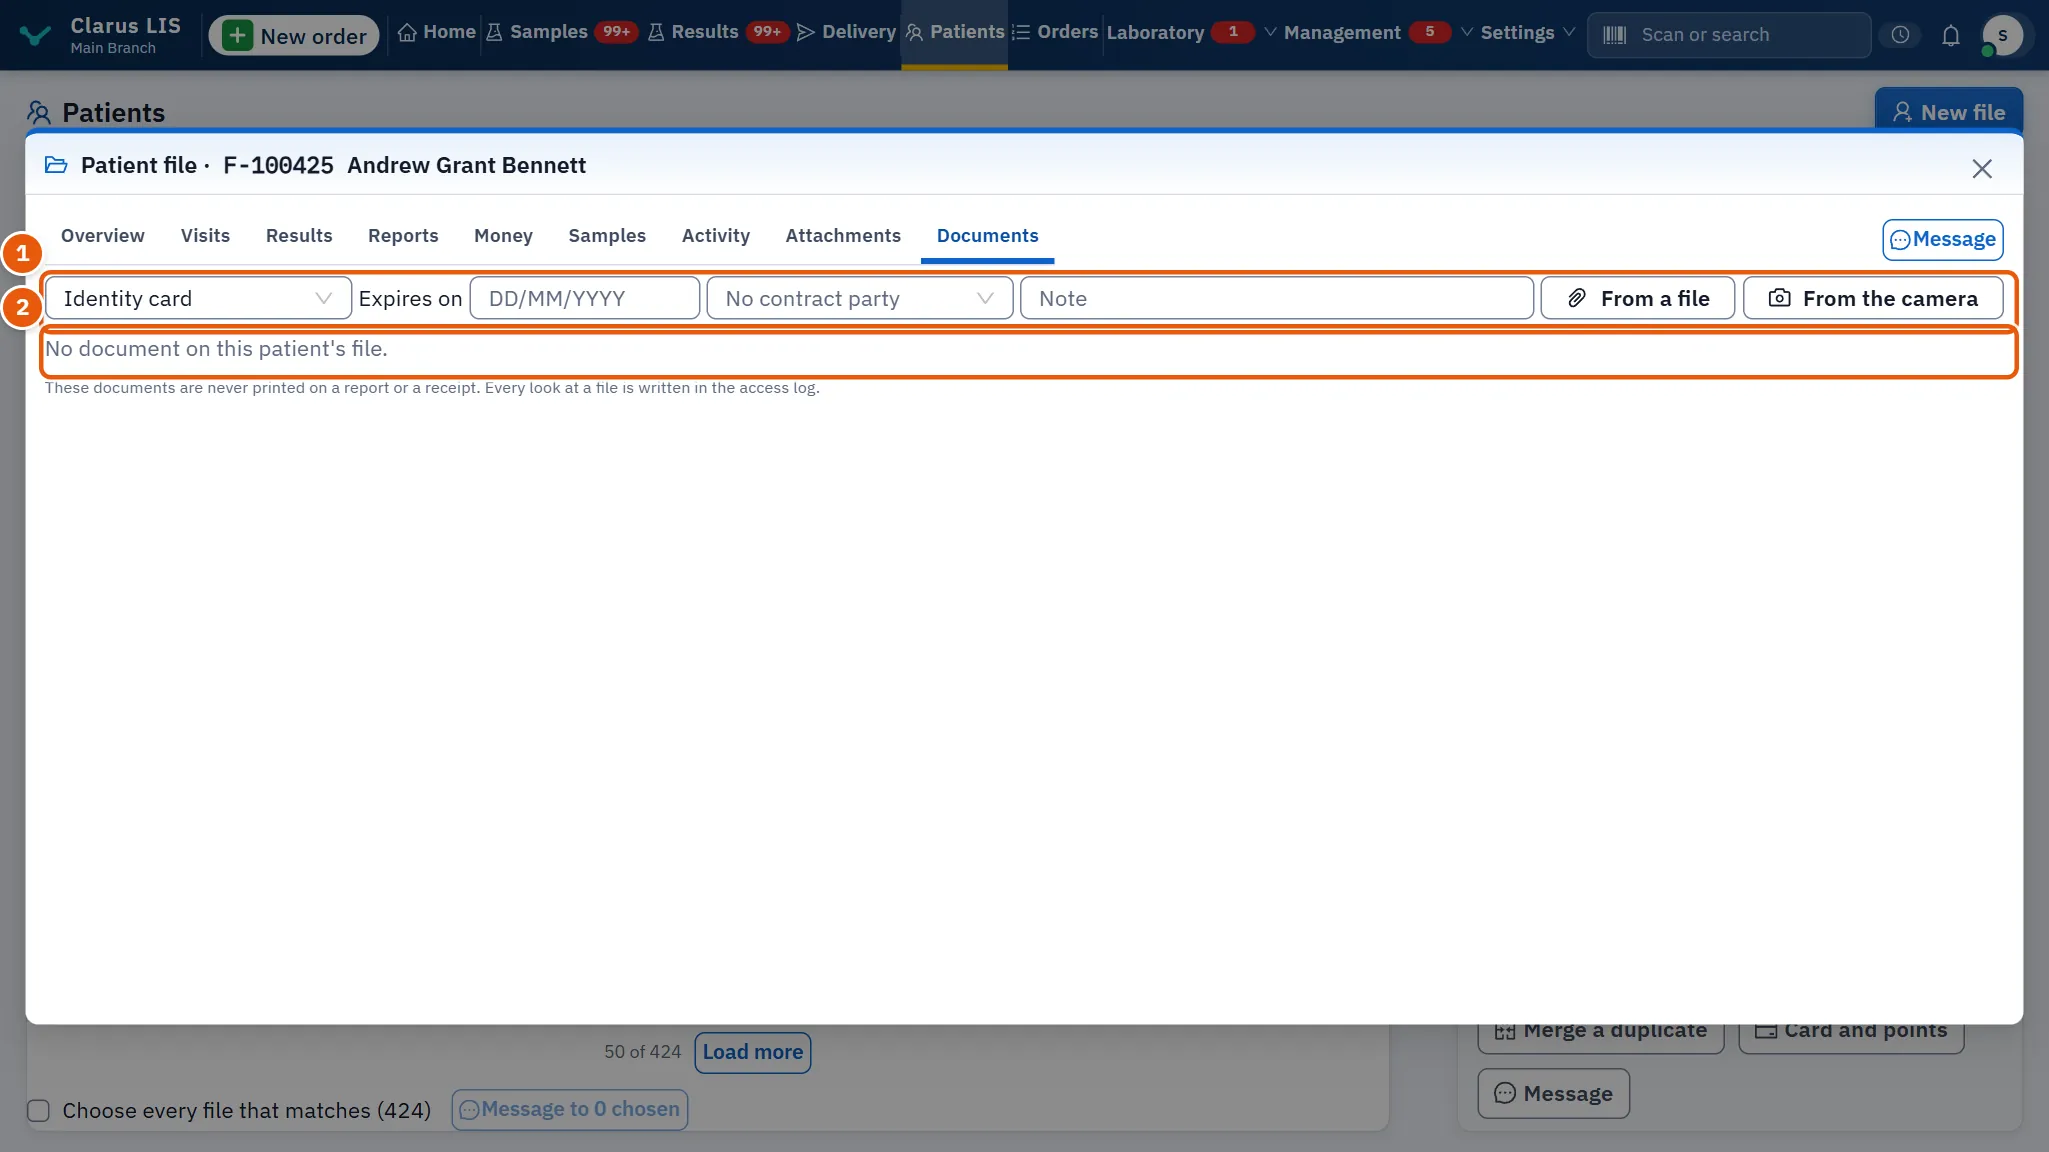
- To add one, under Add a document choose the Type, the Expires on date if it has one, the Contract party (offered only when the laboratory has contract parties; or No contract party) and a Note; then choose From a file (one or several files) or From the camera (one photo). The upload starts as soon as the file is chosen, so fill the other fields first. A PNG, JPEG, WebP or GIF image or a PDF, up to 10 MB, is accepted; the camera takes PNG, JPEG or WebP.
- In the list, Show opens a document, Save on this computer saves it, and Withdraw takes it out of the file after confirmation; its file is kept. An expired document is marked Expired.
These documents are never printed on a report or a receipt, and every look at a file is written in the access log.
9.6.10 Task 10 — Send a test to another branch
- In the complete file, open Visits.
- On a test still Awaiting result, press Send to a branch.
- Choose the branch and press Send. The screen says the test was sent to that branch.
Only branches other than the one you work in are offered. The test then shows as Sent to branch ….
9.6.11 Task 11 — Merge two files of one person
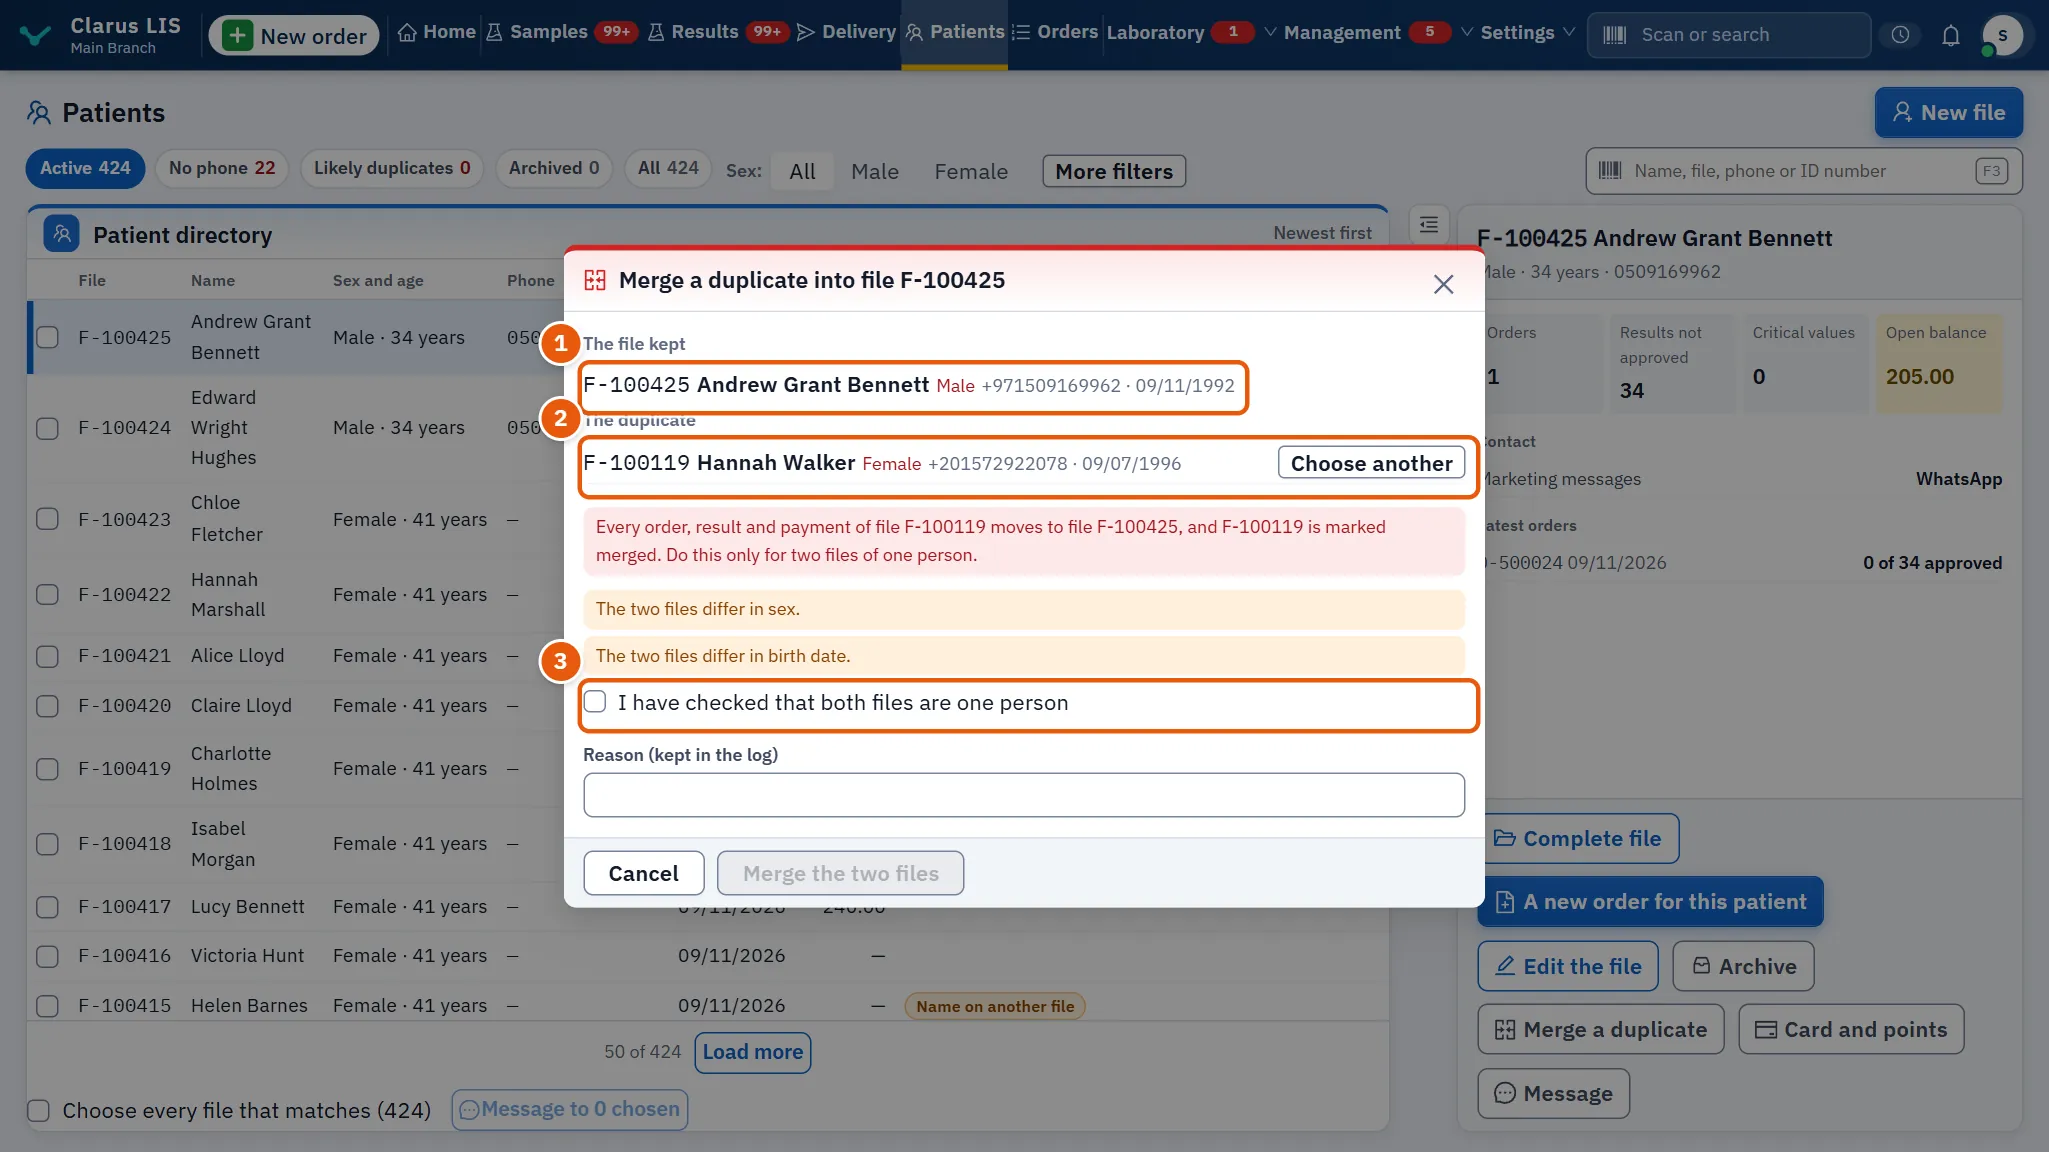
- Open the file that should stay and press Merge a duplicate.
- The window lists Files that may be this same person: with the reason for each (such as Name and birth date or Same national ID); a file that matches by phone alone is not offered here, since a family shares a phone. Press This one on the right one, or find it in Find the duplicate by file number, name or phone (two characters at least).
- Check the two files, shown as The file kept and The duplicate. If they differ in birth date or sex the window says so, and you must tick I have checked that both files are one person.
- Write the Reason (kept in the log) (the window does not insist on one) and press Merge the two files.
9.7 Messages and what to do
| The screen says | Meaning | What to do |
|---|---|---|
| The patient directory could not be loaded. | A connection or server fault | Reload; check the connection |
| No file matches «…». | Nothing has this text | Check spelling; choose All in the files' state |
| This patient may be registered already. | A file with the same details exists | Open that file, or save anyway if it is another person |
| The file could not be saved. | The server refused the save | Read the field notes and correct |
| The file is saved; the consent to marketing messages could not be. | The file saved but the consent did not | Open the file again and record the consent |
| The merge failed. Nothing was changed. | The server refused the merge | Check the two files and try again |
| The message could not be sent. | A fault in sending | Try again |
| The documents could not be read. | A connection fault | Reopen the tab |
| The file is larger than 10 MB. | The document is too large | Attach a smaller copy |
9.8 See also
New order (what the file opens), Results (the results shown here), Delivery (sending reports), Messages (switching patient messages on), Users and permissions (the permissions above).