Chapter 37Data and continuity
Menu: Data and continuity. Address: /setup/data.
37.1 What this screen is for
This screen keeps the laboratory's work safe and lets it start from, or carry on after, something else. It holds five pages as tabs: the backups, the migration from RealLab, the migration from Lab2000, the migration from any other system, and the downtime record.
It is the laboratory's own view. The technician's procedures (installing, moving the program to another computer, repairing a database) are in the service manual; here is only what the screen itself offers. The page opens on Backups. Opened from the first setup, it opens on Migration from RealLab; a page can also be asked for by name in the address (?page=lab2000).
37.2 Who sees it
Whoever holds Import data from a previous system or Manage settings. The menu hides the screen from everyone else.
| You can… | …if your role holds |
|---|---|
| See all five pages and use them | Import data from a previous system, or Manage settings |
Inside the screen no button is tied to a separate permission: whoever may open it may press everything on it, including the restore and delete buttons.
37.3 The screen at a glance
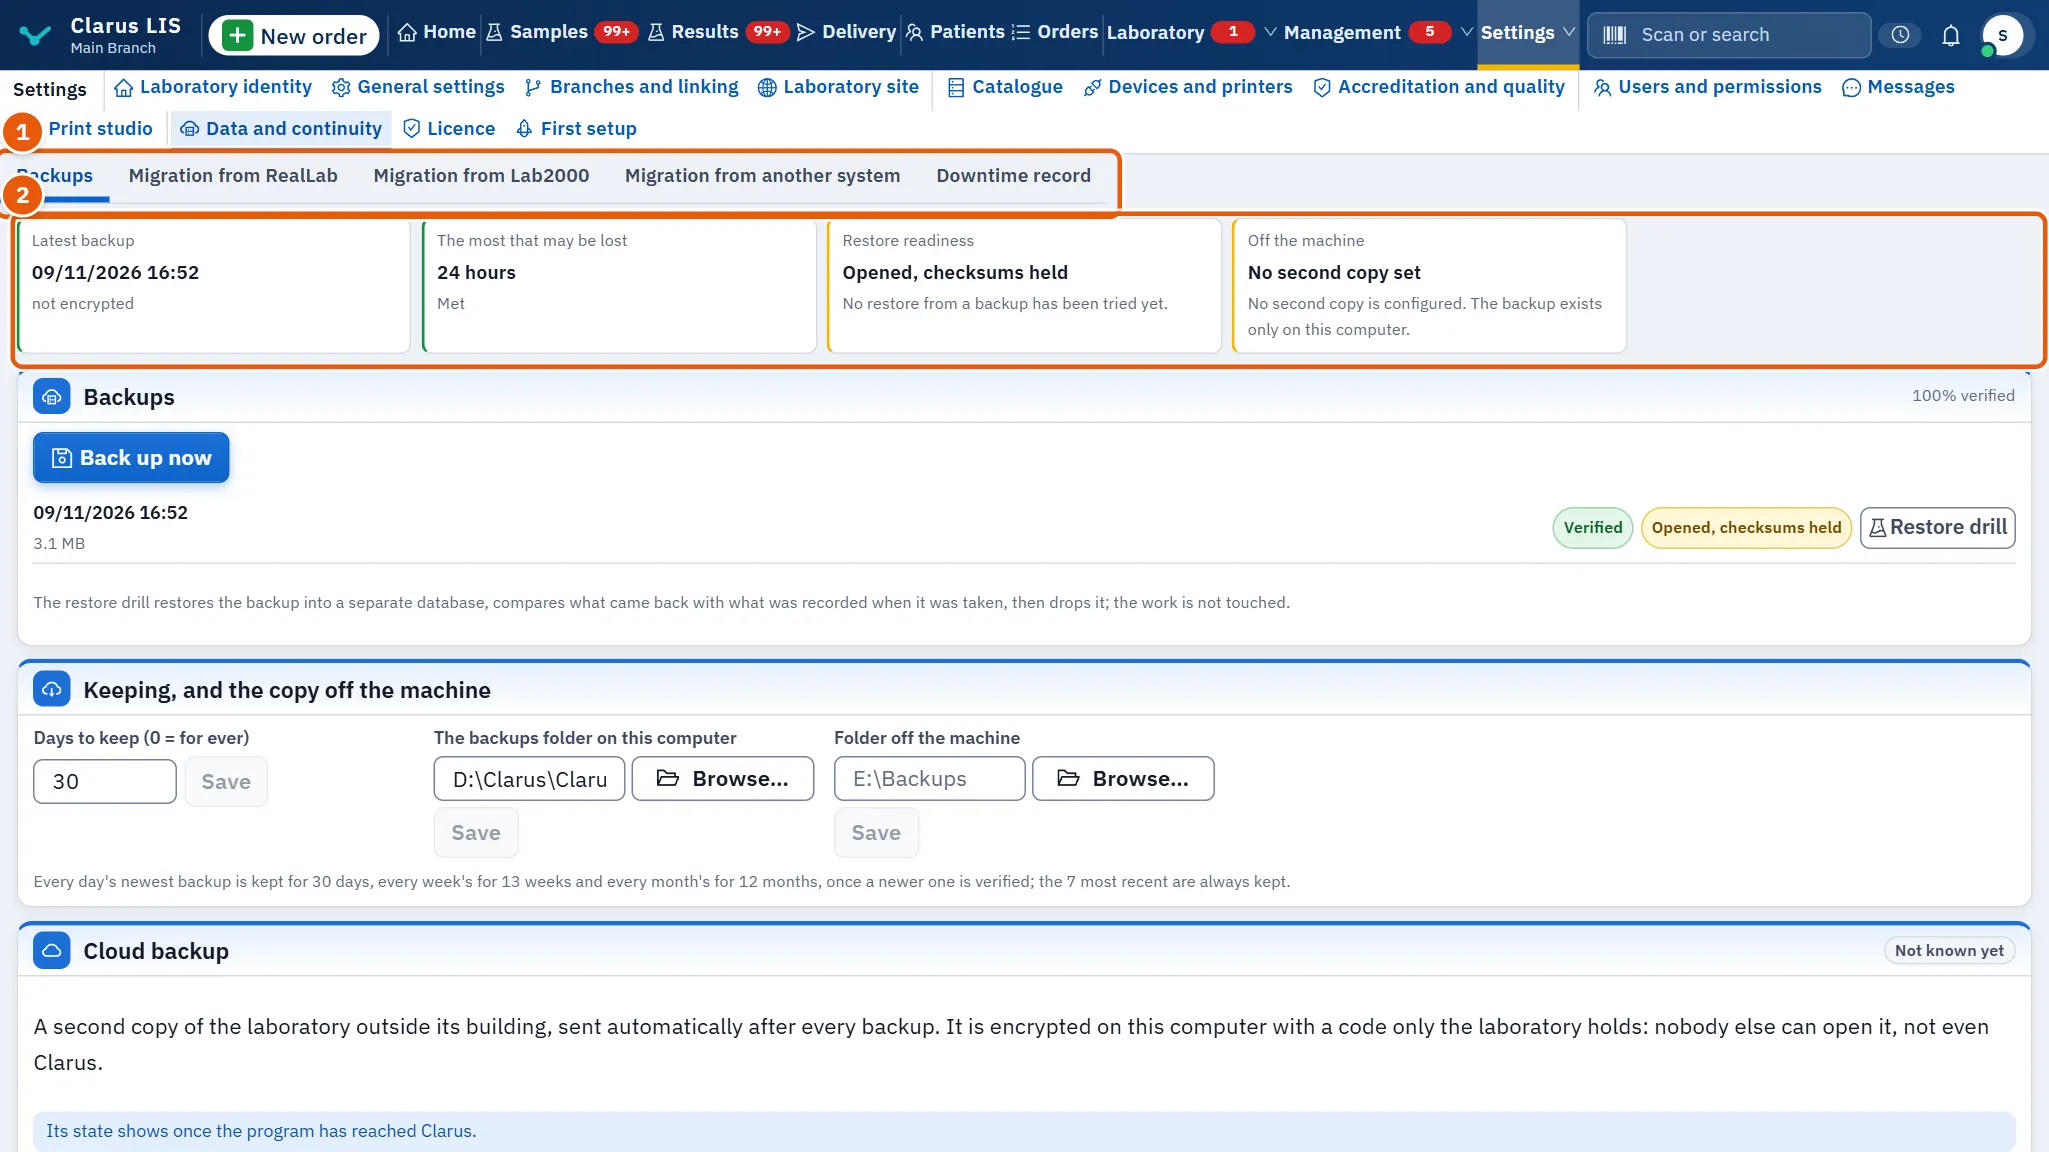
- The tabs (Data and continuity pages): Backups, Migration from RealLab, Migration from Lab2000, Migration from another system, Downtime record.
- The open page.
37.4 Page 1 — Backups
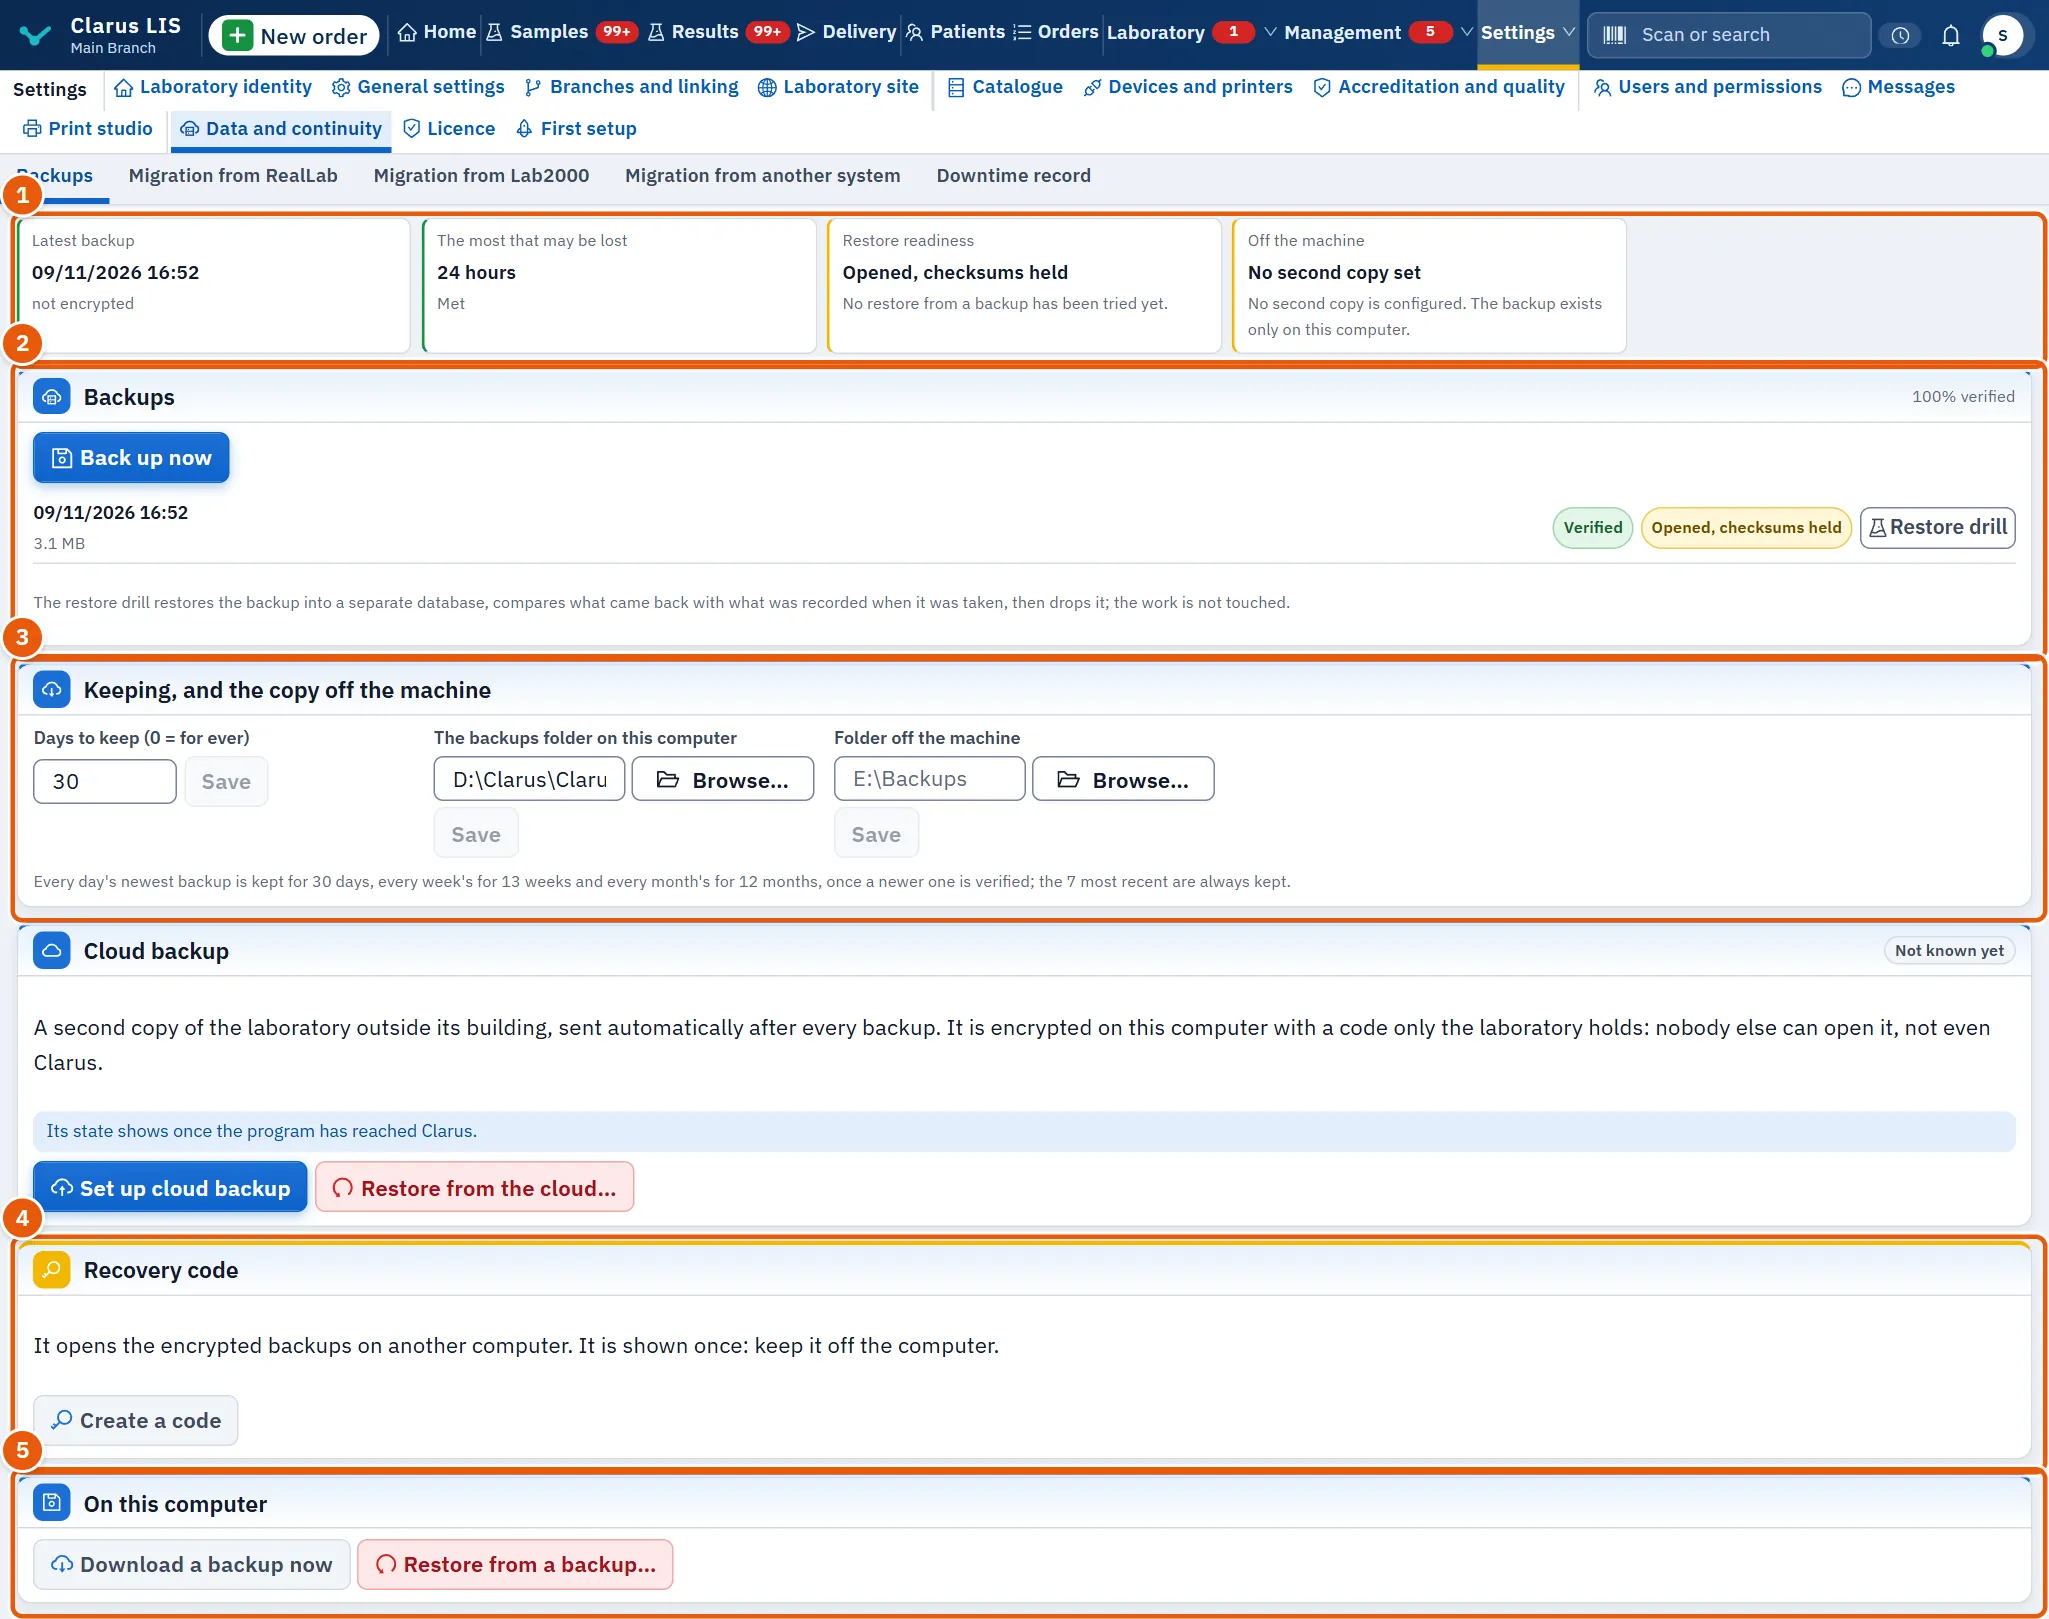
At the top, the page states the facts: Latest backup (or No backup yet), The most that may be lost in hours, with its state (Met, Needs attention, Not met: no recent backup or Unknown), Restore readiness and Off the machine (or No second copy set).
37.4.1 The backups
| Element | What it does |
|---|---|
| Backups | The list of the latest twelve backups. Each shows whether it is encrypted and whether it is Verified, Not verified or Verification failed; a run that failed is marked as failed and has no buttons. The heading also shows the share verified. |
| Back up now | Takes a backup at once. Shown only when the laboratory has a backup job. |
| Verify it | Checks that a backup is whole. Shown on a successful backup that is not yet verified. |
| Restore drill | On every successful backup. Restores the backup into a separate database, compares what came back with what was recorded when it was taken, then drops it. The work is not touched. The result is Restore drill passed or Restore drill failed. |
37.4.2 Keeping, and the copy off the machine
| Element | What it does |
|---|---|
| Days to keep (0 = for ever) | How long to keep backups, from 0 to 3650 days; 0 keeps them for ever. Press Save (it stays dim until you change the number). |
| The backups folder on this computer | Where backups are written on this computer; you can change it and save. Shown only when a backup job exists. |
| Folder off the machine | A second place, such as an external drive or a network folder; save it to set it. Copy the latest backup there now sends the latest backup there and appears only once a second place is set. |
37.4.3 Recovery code
Recovery code opens the encrypted backups on another computer. It is shown once and the program does not keep it: write it down and keep it off the computer, then press I have kept it. The card has a button that makes the code (Create a code); a laboratory that already has one sees A code exists and the button becomes Create a new code.
37.4.4 On this computer
Download a backup now makes a backup and downloads it as a file you can keep or carry. Restore from a backup opens the restore window (37.9.1 Task 5 — Restore from a backup).
37.4.5 Cloud backup

Cloud backup is a second copy outside the building, sent after every backup. It is encrypted on this computer with a code only the laboratory holds, so nobody else can open it, not even Clarus. The card shows the service's state (Its state shows once the program has reached Clarus. until the program has reached Clarus, then when it ends, with Buy the service), the copies kept by day, week and month, Last cloud copy, Copies in the cloud, the space used, and Restore drill from the cloud. The last three facts appear only once the cloud copy is on. Which buttons show depends on the state: before it is on, the set-up button (it reads Finish setting up if set-up was left half done) and the restore button; once on, send, check, refresh, show code and stop; the delete button appears once the copy has been set up, whether on or off.
| Element | What it does |
|---|---|
| Set up cloud backup | Opens Set up cloud backup: you read what leaves this computer, the legal note about health data, and the warning that the code is the only key; tick I have read this and I agree (the button stays dim until you do); the program shows the cloud code, which you keep (or Save the code as a file) and confirm by typing its last group; Switch cloud backup on stays dim until something is typed. |
| Send now | Sends the newest backup now. If the last attempt failed the card says why and when the program tries again. |
| Restore drill from the cloud | Brings a copy back and checks it. |
| Refresh the list | Reads the list of cloud copies again. |
| Show the code | Shows the code again, in The laboratory's cloud code. |
| Stop sending | Stops sending. Copies already in the cloud stay until their time ends. |
| Restore from the cloud | Opens the cloud restore window (37.9.2 Task 6 — Restore from the cloud). |
| Delete all cloud copies | Opens the window that deletes every cloud copy for good (the backups on this computer are not touched). Press Delete for good. |
37.5 Page 2 — Migration from RealLab
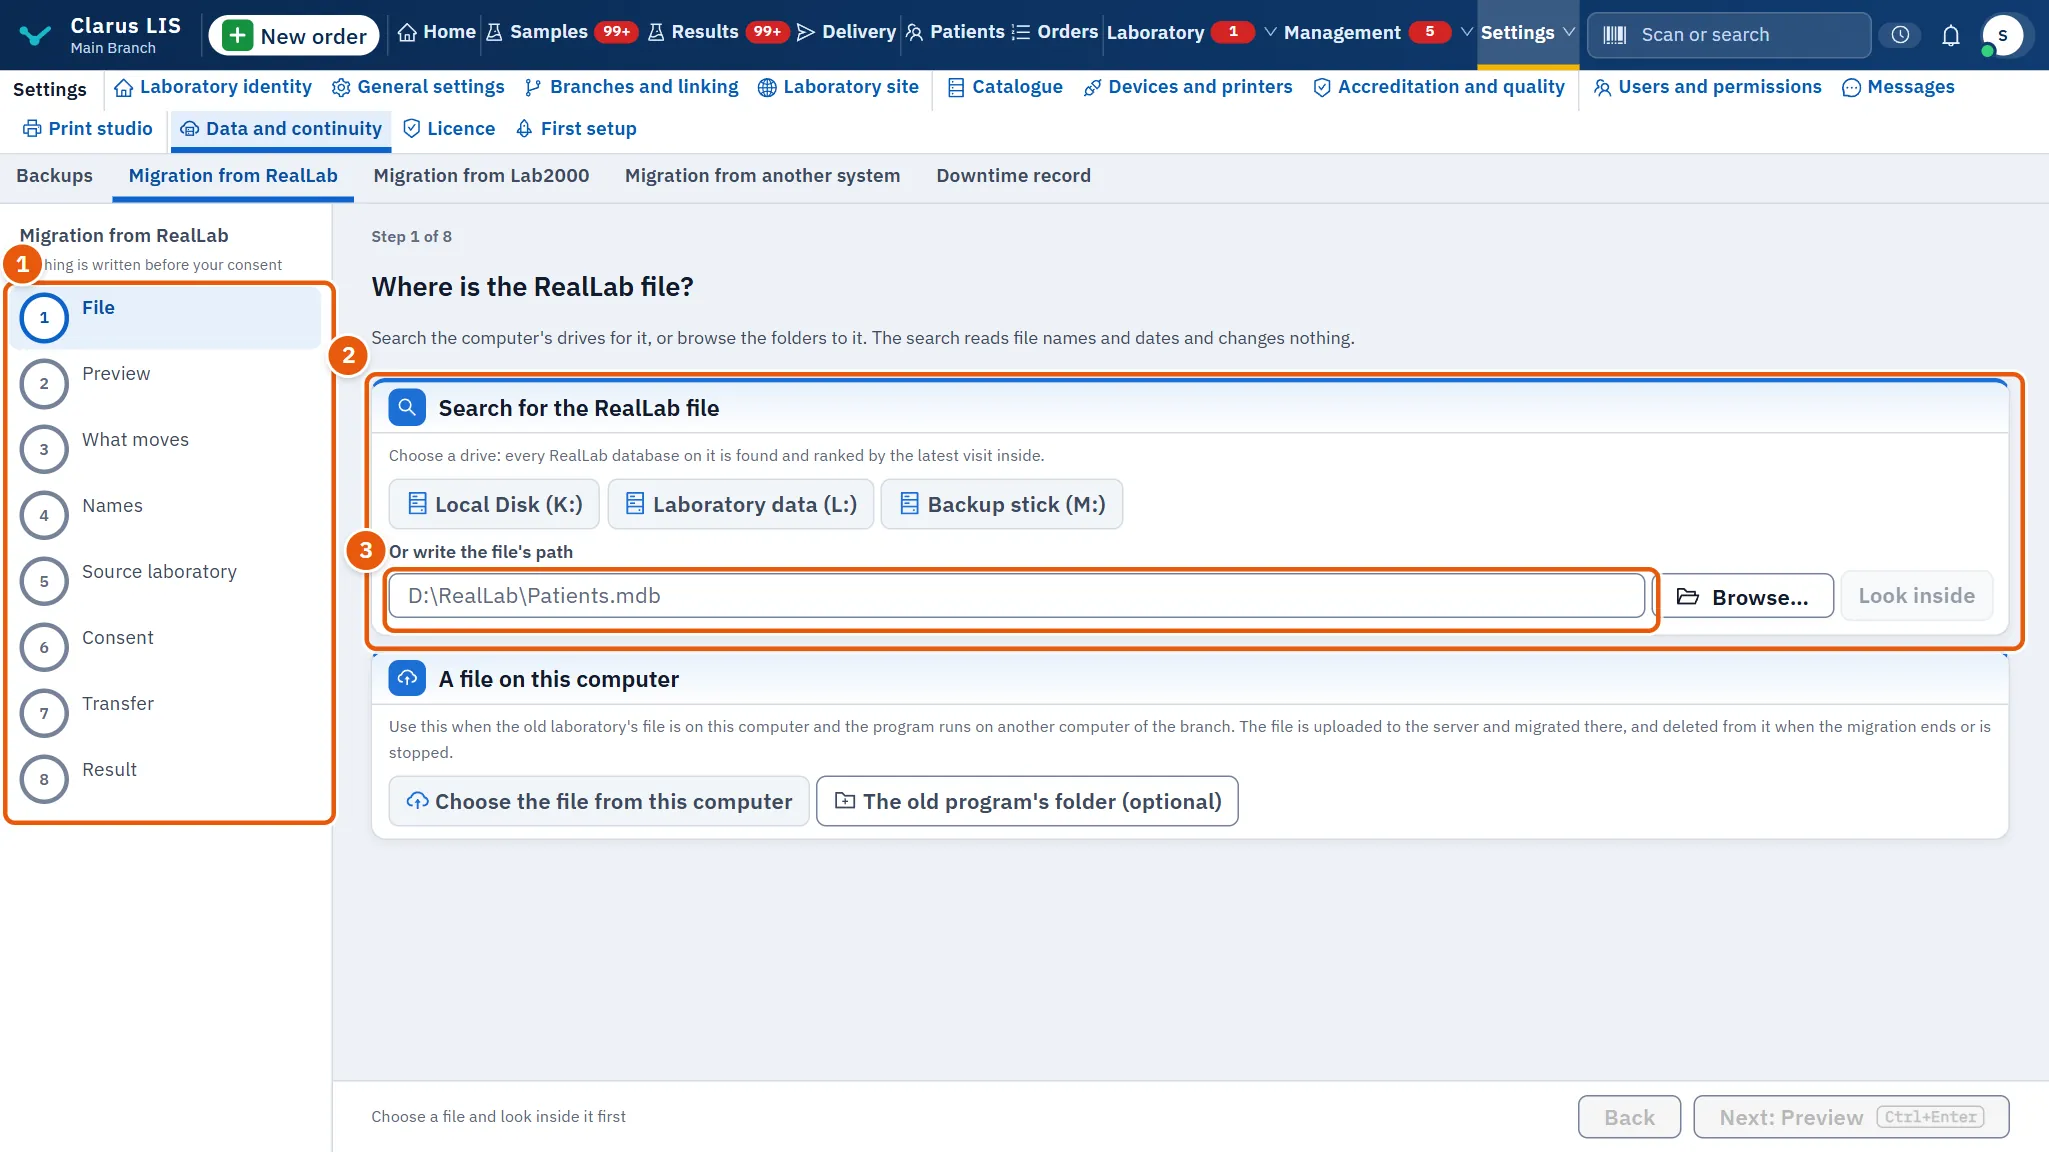
Nothing is written before your consent, and the transfer is all or nothing: if it stops for any reason, a fault or your own stop, nothing of it is kept and the laboratory is as it was. The page walks through eight steps.
| Step | What happens |
|---|---|
| File | Find the RealLab file: Search for the … file by choosing a drive (it stops by itself after about two minutes, or when you stop it), or Write the file's path. Then Look inside. The search reads names and dates and changes nothing. If the file is on this computer but the program runs on another, use A file on this computer, which takes a .mdb, .accdb or .bak file and, if you wish, the old program's folder; the copy sent is deleted when the migration ends or is stopped. |
| Preview | The numbers in your file: patients, visits, requested tests, tests, reference ranges, packages and price lists. Compare them with what you know. Notices may appear: the old program's folder, pictures, one file per person, "See Report" lines, tests your laboratory changed, tables not read, and the date order. |
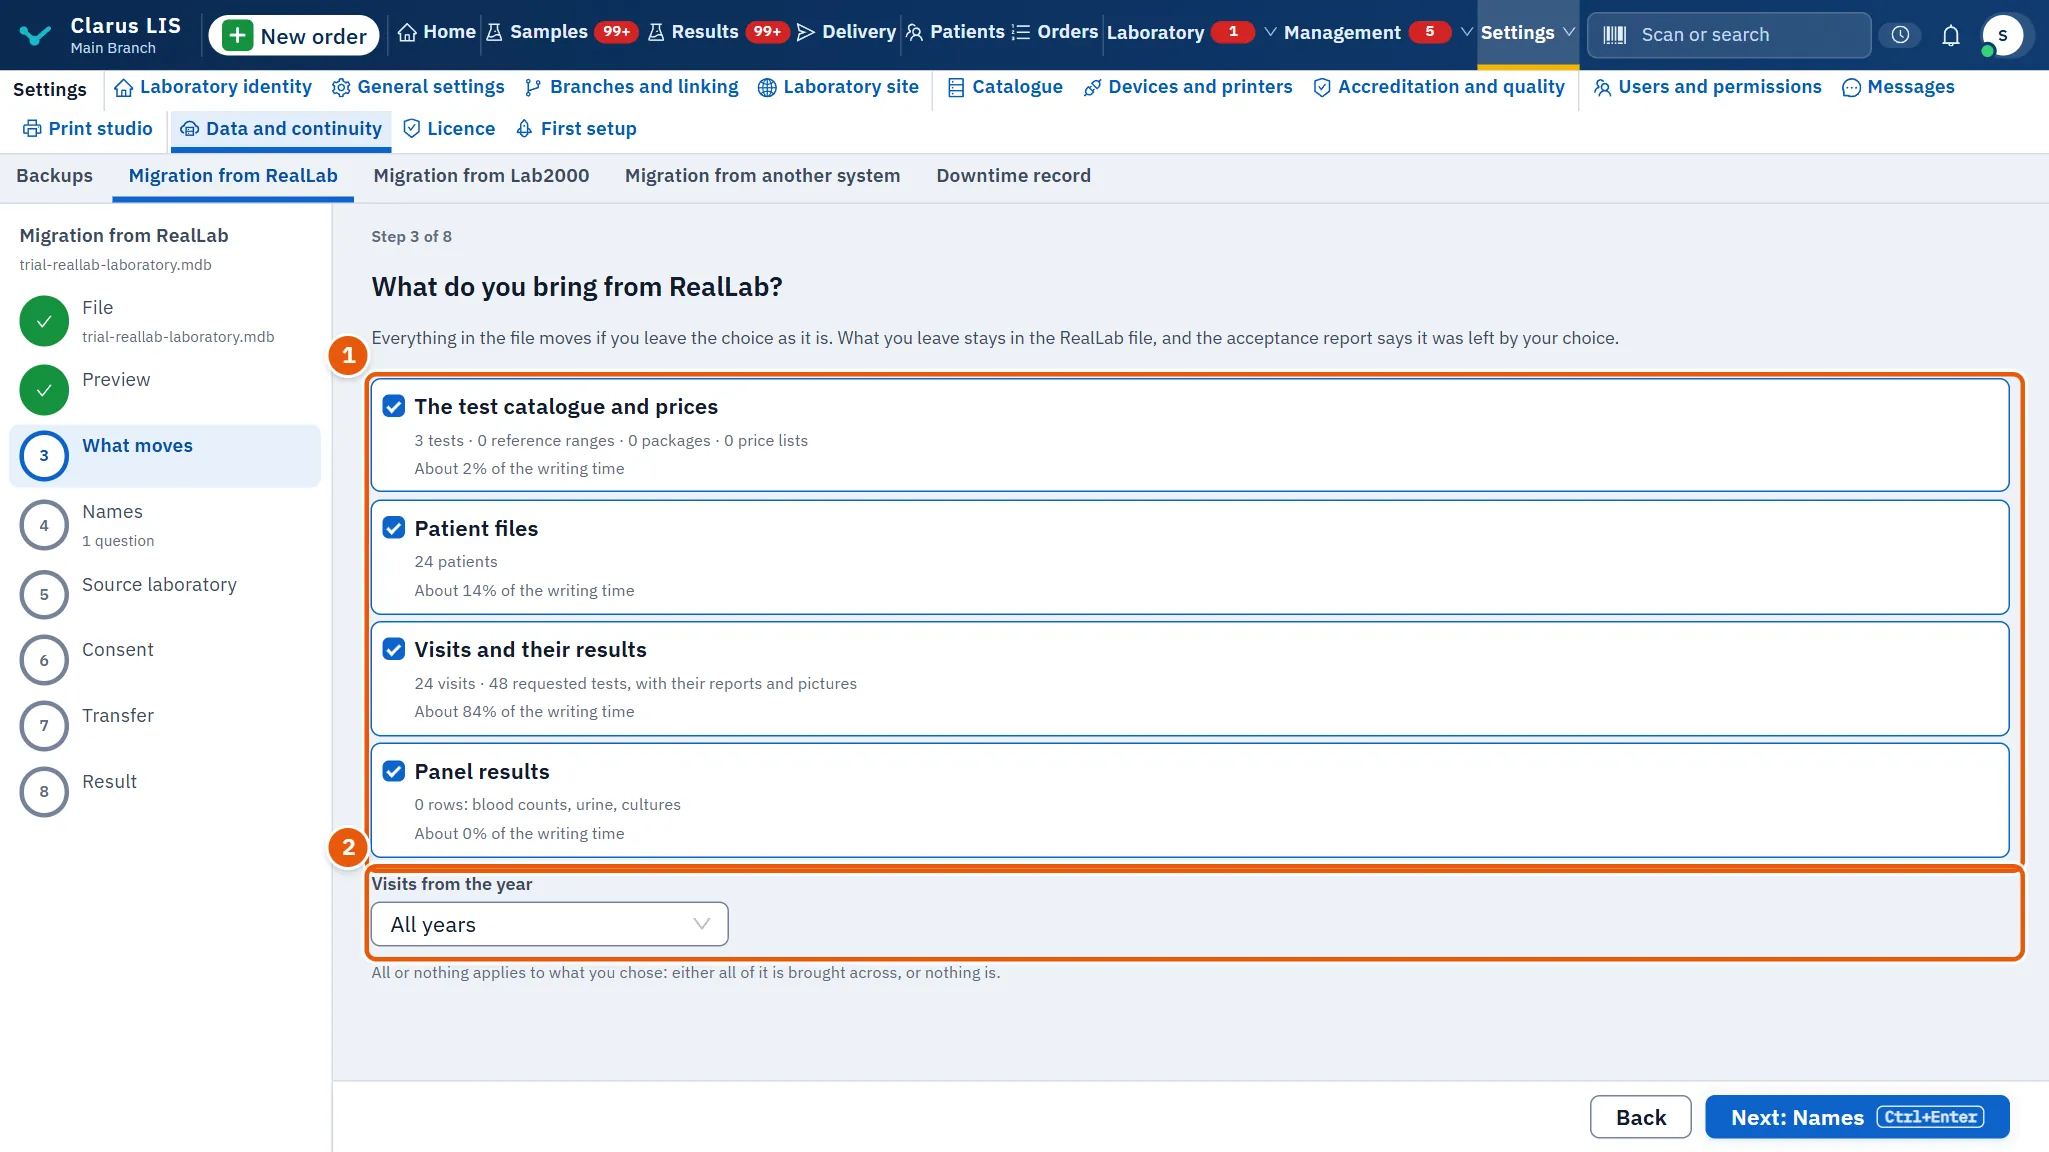
| What moves | Choose what moves: Patient files, The test catalogue and prices, Visits and their results, Panel results, and Visits from the year. Everything moves if you leave it. The visits cannot move without the patient files and the catalogue, and the panel results cannot move without the visits: unticking a part unticks those that depend on it. The year choice appears only when the visits are ticked and the file spans more than one year; every patient file still moves, and visits whose date cannot be read are kept. You cannot go on with nothing ticked. |
| Names | For each test the catalogue does not know, say The same as ours or Another test. If there is no such test the step is skipped. |
| Source laboratory | Whose file this is: A continuation of this laboratory, Another laboratory or a branch or A new laboratory. For another laboratory you choose one the program already knows or write a new name; you cannot go on with neither. |
| Consent | A last check; nothing is written until you press the button. The button stays dim until you tick the confirmation; if CLARUS already holds this laboratory's own patients or visits, a second box (importing beside that work) must be ticked too. |
| Transfer | The transfer. You may leave the screen, but do not switch the computer off. Stop the migration stops it, and nothing is kept. |
| Result | What was brought across, left by your choice, and not brought, and why. |
37.5.1 Task 1 — Bring a RealLab laboratory across
- Open Migration from RealLab.
- In File, search the drive or write the path, then press Look inside.
- Check the numbers in Preview. A file nothing could be read from cannot be brought across.
- In What moves, keep the choice or untick what you leave.
- Answer the questions in Names only for what you are sure of.
- Say whose file it is in Source laboratory.
- In Consent, read the summary and start.
- When it ends, read the result, then Print the acceptance report and Save the diagnostic file if support asks. Open a patient and print an old report: that is the check that matters.
If you return while an import is running, the page opens at the transfer; if it has ended, at the result. A migration that was cut is undone whole; opened from the first setup, the last button returns you to the setup instead of offering another file.
37.5.2 Imports already brought in
Imports already brought in appears on the file step, only when there are earlier imports, and lists them; the undo button is on completed imports. An import can be undone while nothing has been done on CLARUS with what it brought; there is no time limit, only that condition. Undo this import counts what it brought, asks you to tick that these rows will be deleted and cannot be brought back (the delete button stays dim until you do), and deletes them; what it added to the catalogue stays. If work was done since, the screen lists the reasons and the import cannot be undone.
37.6 Page 3 — Migration from Lab2000
The same kind of wizard, for a Lab2000 database file (AnaLab.mdb or a backup of it). The file step searches a drive for the Lab2000 file or takes a written path; it has no upload from another computer and no choice of parts or year. It has seven steps: The file, What is in it, The names, The laboratory, The consent, The transfer, The result. The file is read on this computer and nothing is sent to the vendor. The result counts every kind in the file, as read, and in Clarus, and says where the numbers differ. A migrator built from only one laboratory's file is marked experimental: check the result's numbers before you work on the migrated records.
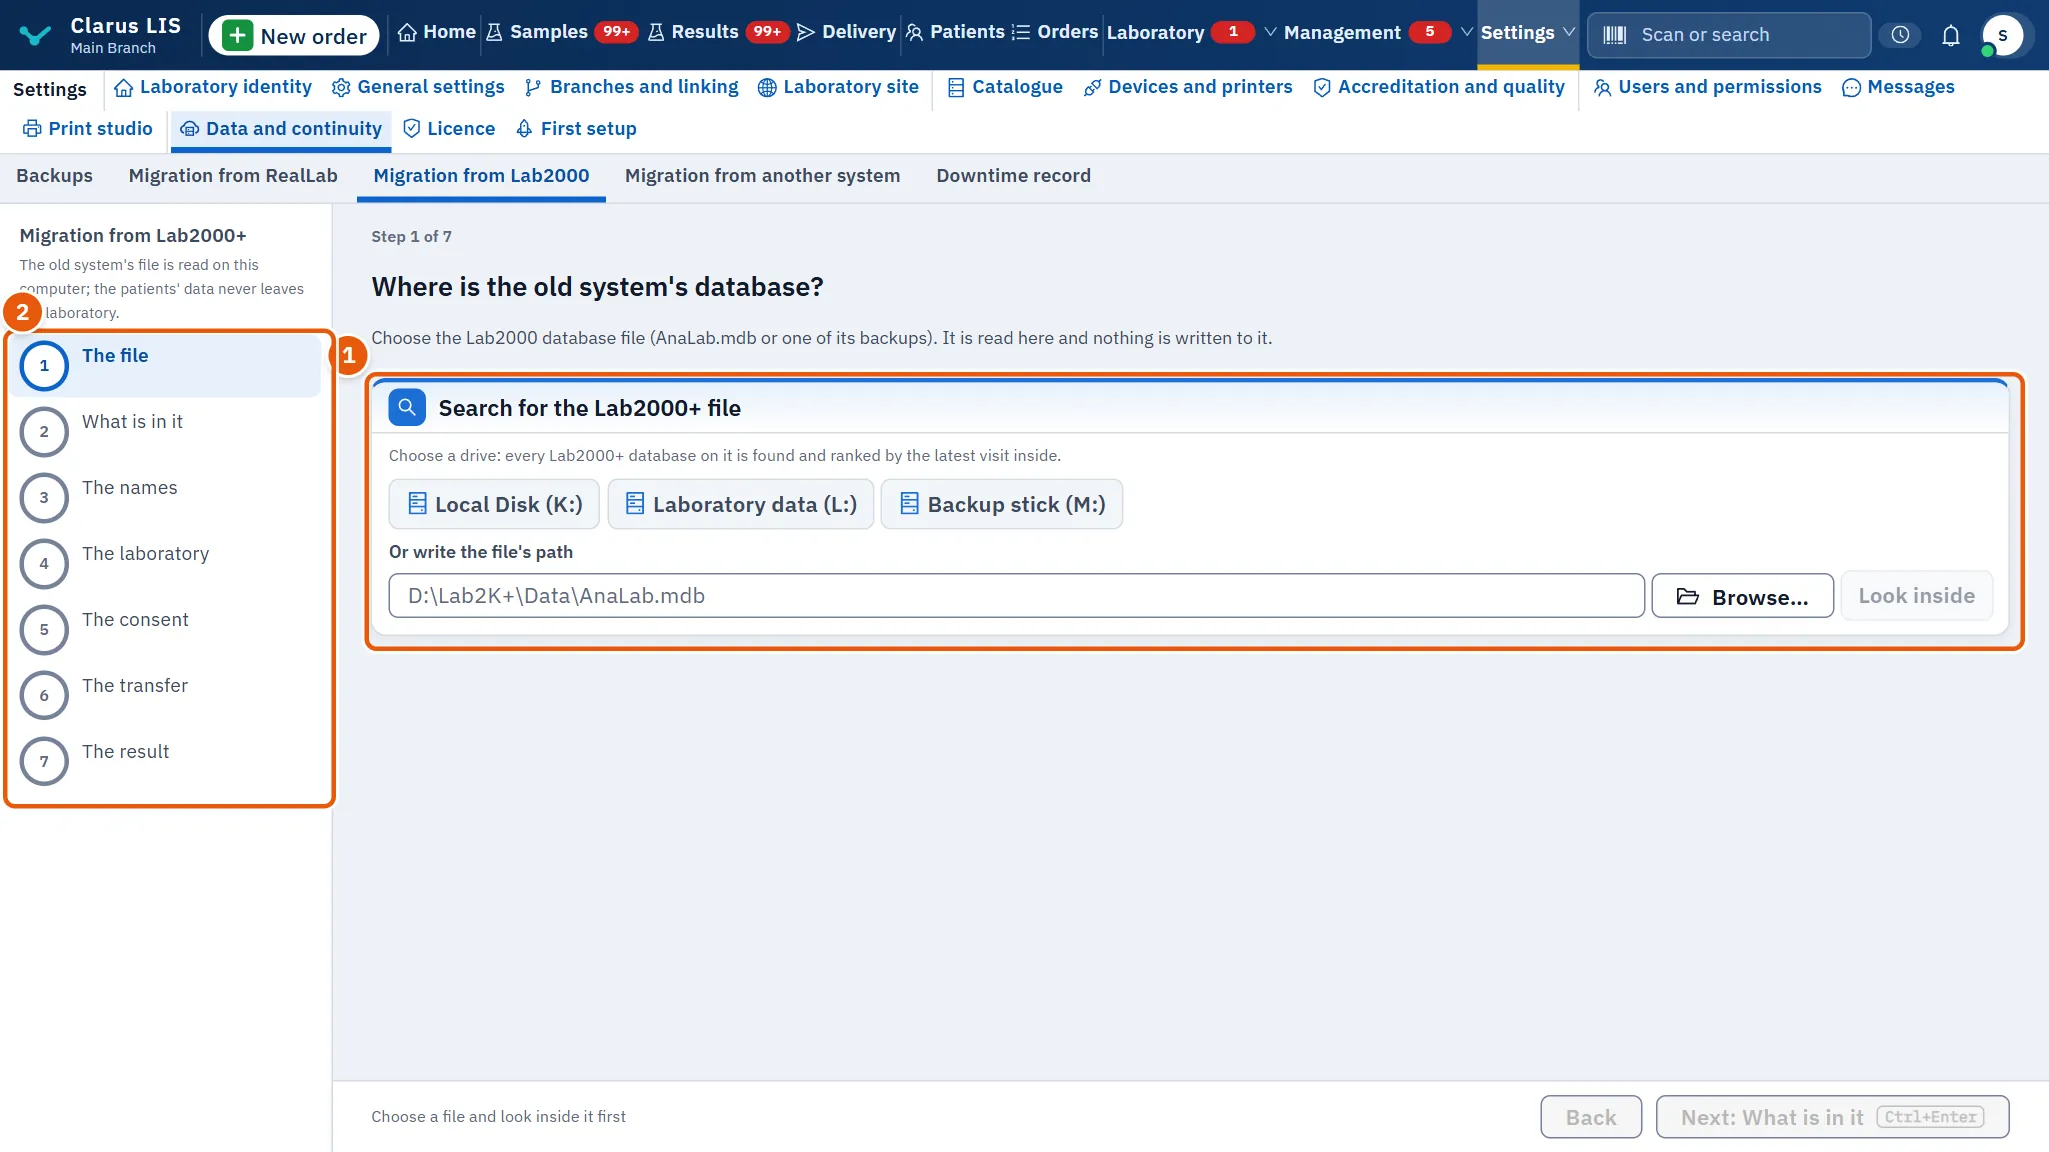
37.6.1 Task 2 — Migrate from Lab2000
- Open Migration from Lab2000 and choose the database file.
- Read what the migrator found.
- Answer the names, say whose file it is, tick the confirmation and press Bring my data across.
- Read the result. Bring in another file brings in a further file; Open patients opens the patients.
37.7 Page 4 — Migration from another system
For a system that has no migrator yet. The screen describes the old database's structure, never its data, and the laboratory sends the file itself.
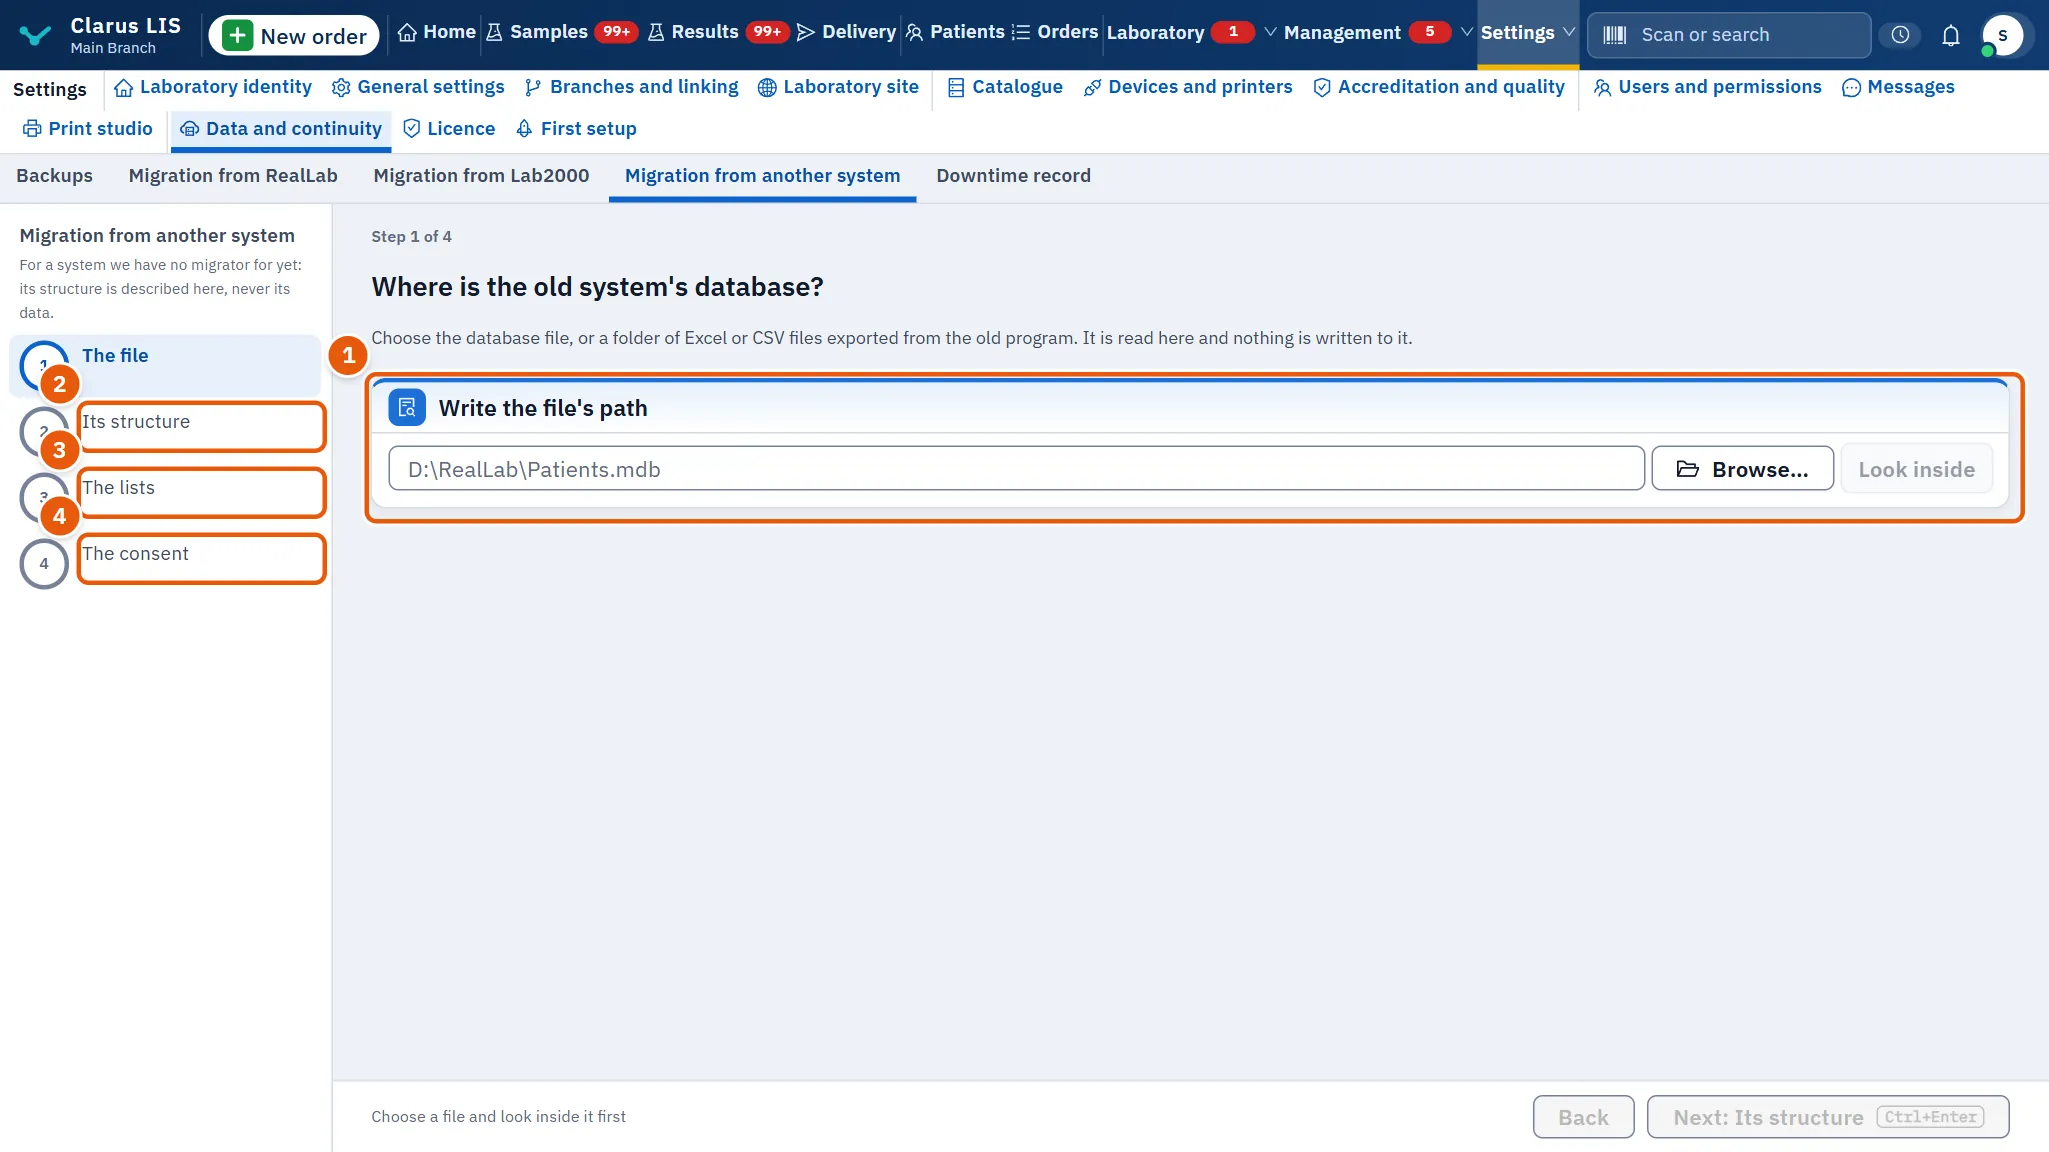
| Step | What happens |
|---|---|
| The file | Write the path of the database file, or of a folder of Excel or CSV files exported from the old program (there is no search here). It is read here and nothing is written to it. If the system already has its own migrator, the screen says so and Open its migration, and the next step stays dim until you do. |
| Its structure | Tables, columns and row counts, and the shape of the values; each value is replaced by its shape. |
| The lists | Only lists that hold no person (test names, units, sample types). Tick the ones you agree to send; only the first twelve values of each list are shown. |
| The consent | You may fill in The old system's name (as you know it) and Its version, if you know it (neither is required by the screen); tick that you reviewed the file, which Save the file and Send it to the vendor now both need. Send it to the vendor now sends exactly that file, once; if the computer is offline, save it and send it yourself by e-mail or WhatsApp. |
37.7.1 Task 3 — Send a fingerprint
- Open Migration from another system, choose the file.
- Review the structure and tick the lists you agree to.
- Write the system's name, tick the agreement and press Save the file.
- Send it. The saved fingerprint is shown.
37.7.2 The anonymised copy
If the structure is not enough (values hidden inside fields, a closed format), An anonymised copy instead opens An anonymised copy, for a closed system.
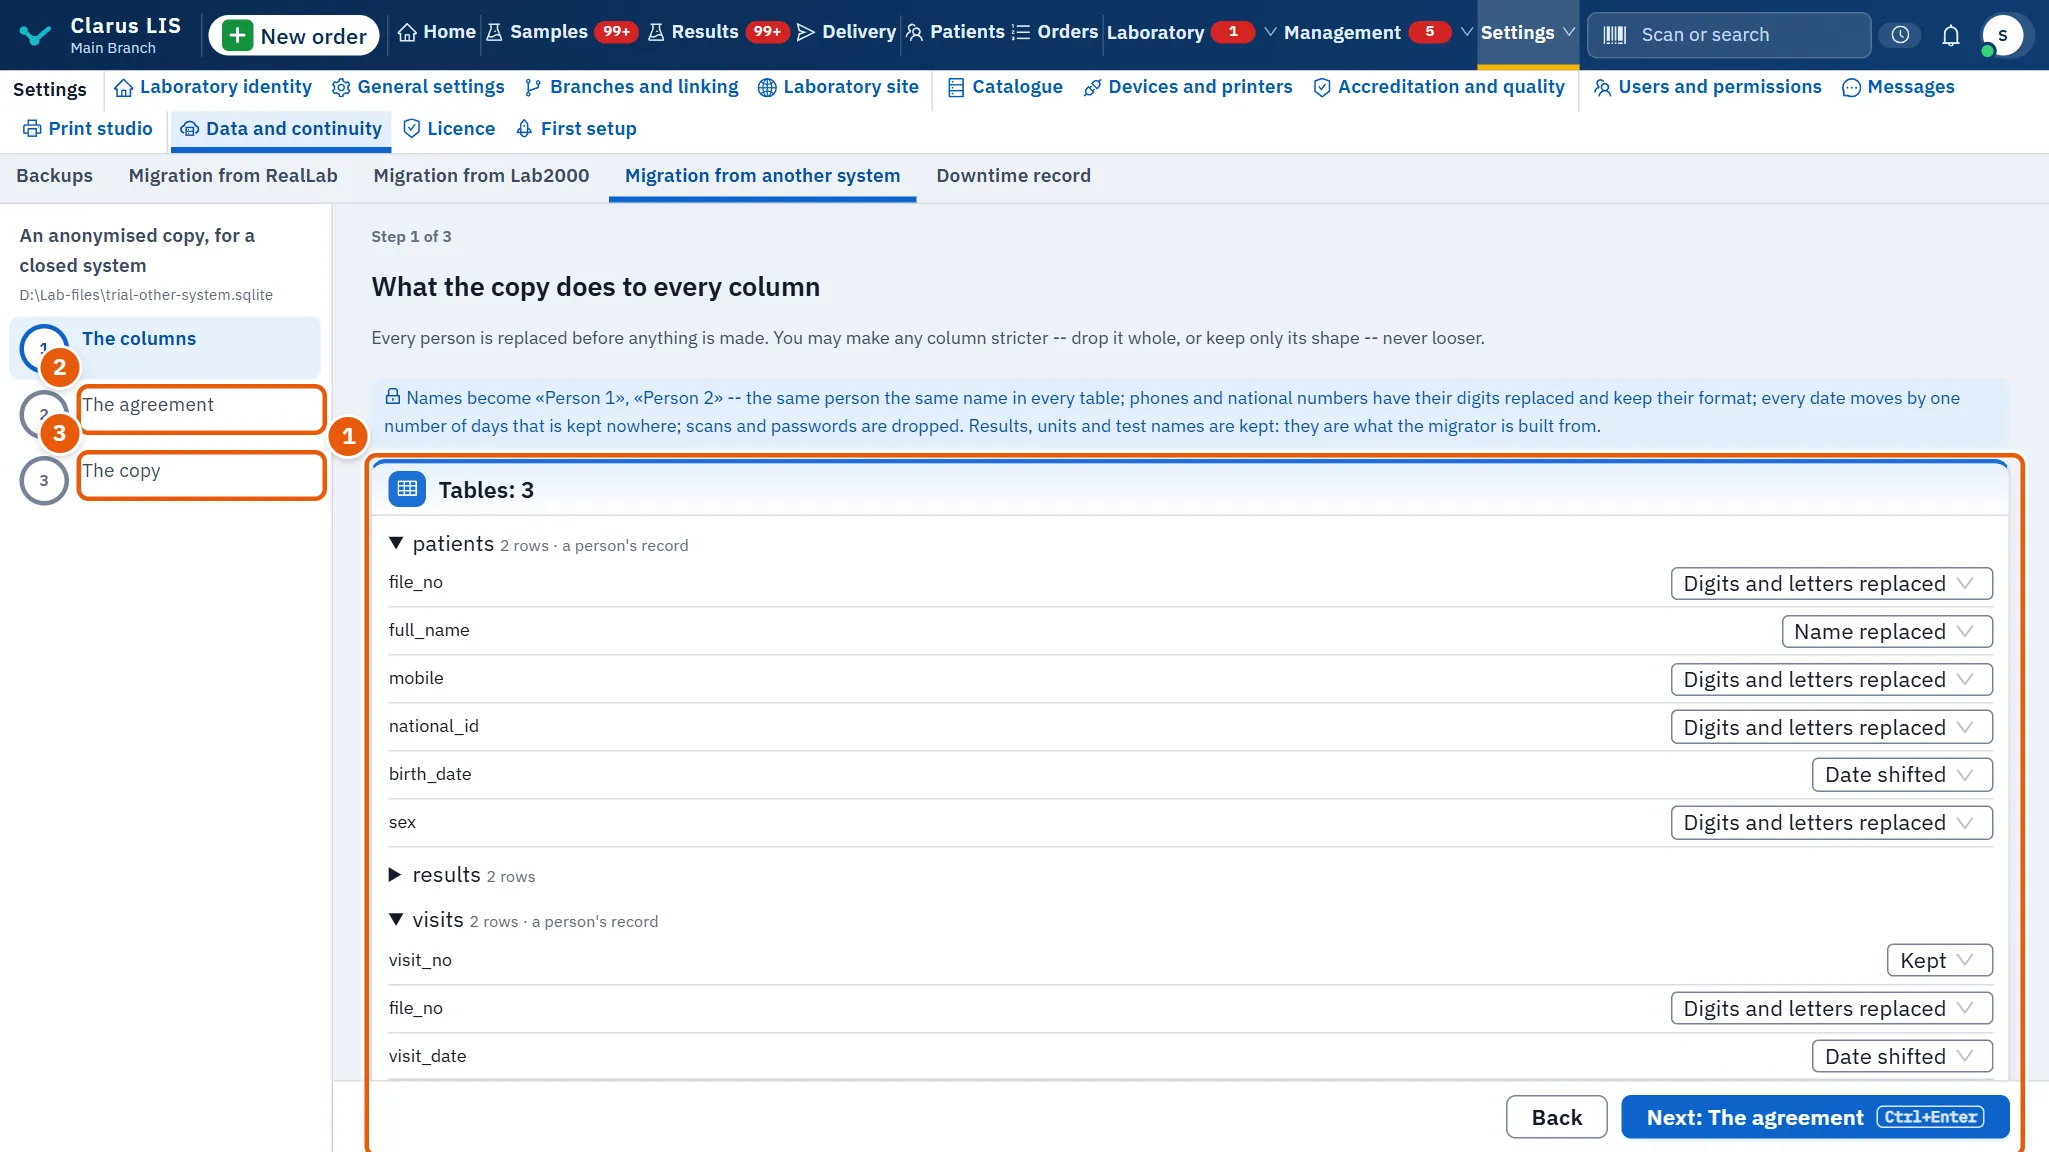
- The columns: names become «Person 1», «Person 2» and so on; phones and national numbers keep their shape; dates move by one number of days that is kept nowhere; scans and passwords are dropped. Each column shows what the copy does. You may make a column stricter (Dropped whole or Only its shape), never looser.
- The agreement: the copy is made only after you give The signed agreement's reference (its number or date), tick This laboratory has signed this data-processing agreement with the vendor. and tick your consent. Both are recorded with who confirmed them and when.
- The copy: Make the copy and save it. The copy is sealed for the vendor alone and not even this computer can open it again. Send the saved file to the vendor yourself.
If the program carries no intake key, or no agreement exists for the laboratory's country, the copy cannot be offered and the screen tells you to send the fingerprint instead.
37.8 Page 5 — Downtime record
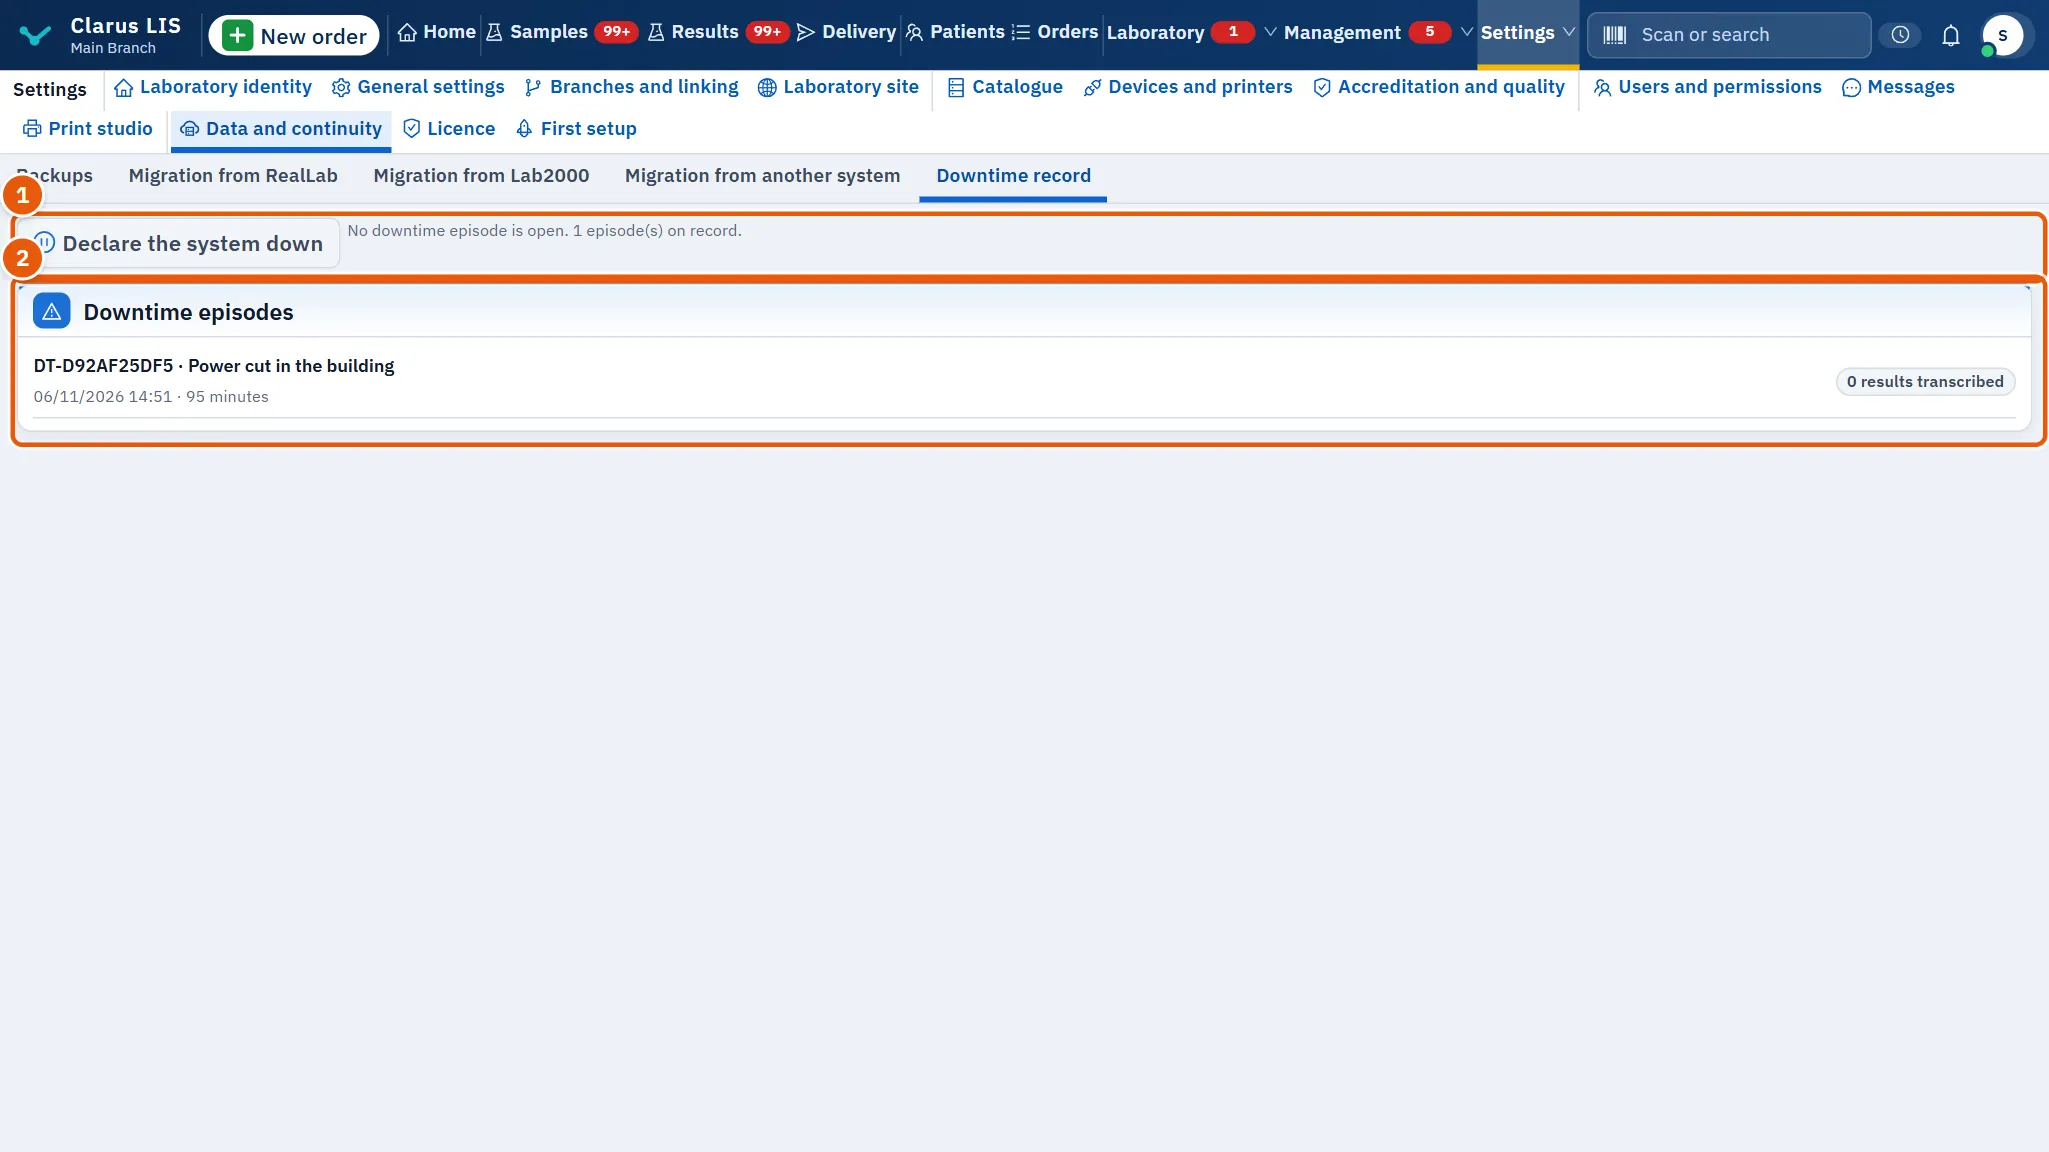
The laboratory works on paper until the system is back. Afterwards the paper results are transcribed and each episode keeps how many.
| Element | What it does |
|---|---|
| Declare the system down | Shown only when no episode is open. Opens a window: Reason (required: the button stays dim while it is empty), Started at and Notes. |
| The system is back | Shown while an episode is open, in place of the declare button, so only one episode can be open at a time. Closing it records Back at, then reminds you to transcribe the paper results. |
| Downtime episodes | The episodes, each with its length, whether it is still open, and the number of results transcribed. |
37.8.1 Task 4 — Declare and close a downtime
- Press Declare the system down, write the Reason, adjust Started at if needed and save.
- Work on paper.
- When the system is back, press The system is back, check Back at and save.
- Transcribe the paper results, each with the time it was really produced.
37.9 Restore windows
37.9.1 Task 5 — Restore from a backup
- On Backups, press Restore from a backup.
- Choose the backup file. Choose the file ending in .clarus-backup.zip to restore attachments too.
- Type the laboratory's name as shown. If it has none, write it first in the laboratory identity.
- Restore stays dim until a file is chosen and the name matches. Press it and do not close the program.
- Read the result. An old backup may be read by salvage: the screen lists what did not come back. The pairing of analysers and branch devices, and the licence activation, do not travel to another computer and are done again.
37.9.2 Task 6 — Restore from the cloud
- Press Restore from the cloud.
- Type the cloud code, or Use this computer's code, and press Show the copies.
- Choose the copy to restore.
- Type the laboratory's name as in 37.9.1 Task 5 — Restore from a backup; Restore stays dim until a copy is chosen and the name matches. Press it.
37.10 Messages and what to do
| The screen says | Meaning | What to do |
|---|---|---|
| No backup has been taken yet. Take one now. | No backup yet | Press Back up now |
| Not met: no recent backup | No recent backup | Take one now |
| The database is back, but the file you chose carries no attachments (pictures and documents). To restore them, choose the backup file whose name ends in .clarus-backup.zip. | The file chosen has no attachments | Choose the .clarus-backup.zip file |
| We could not read this file. | The file is damaged or half copied | Try another copy |
| The migration was cut and nothing of it was written. | The program closed during the transfer | Start again |
| Tick the consent first. | The consent is not ticked | Tick it |
37.11 See also
Laboratory identity (used to confirm a restore), Patients (to check migrated patients).